Website
1. Add domain to WebEngage Dashboard
Click to enlarge
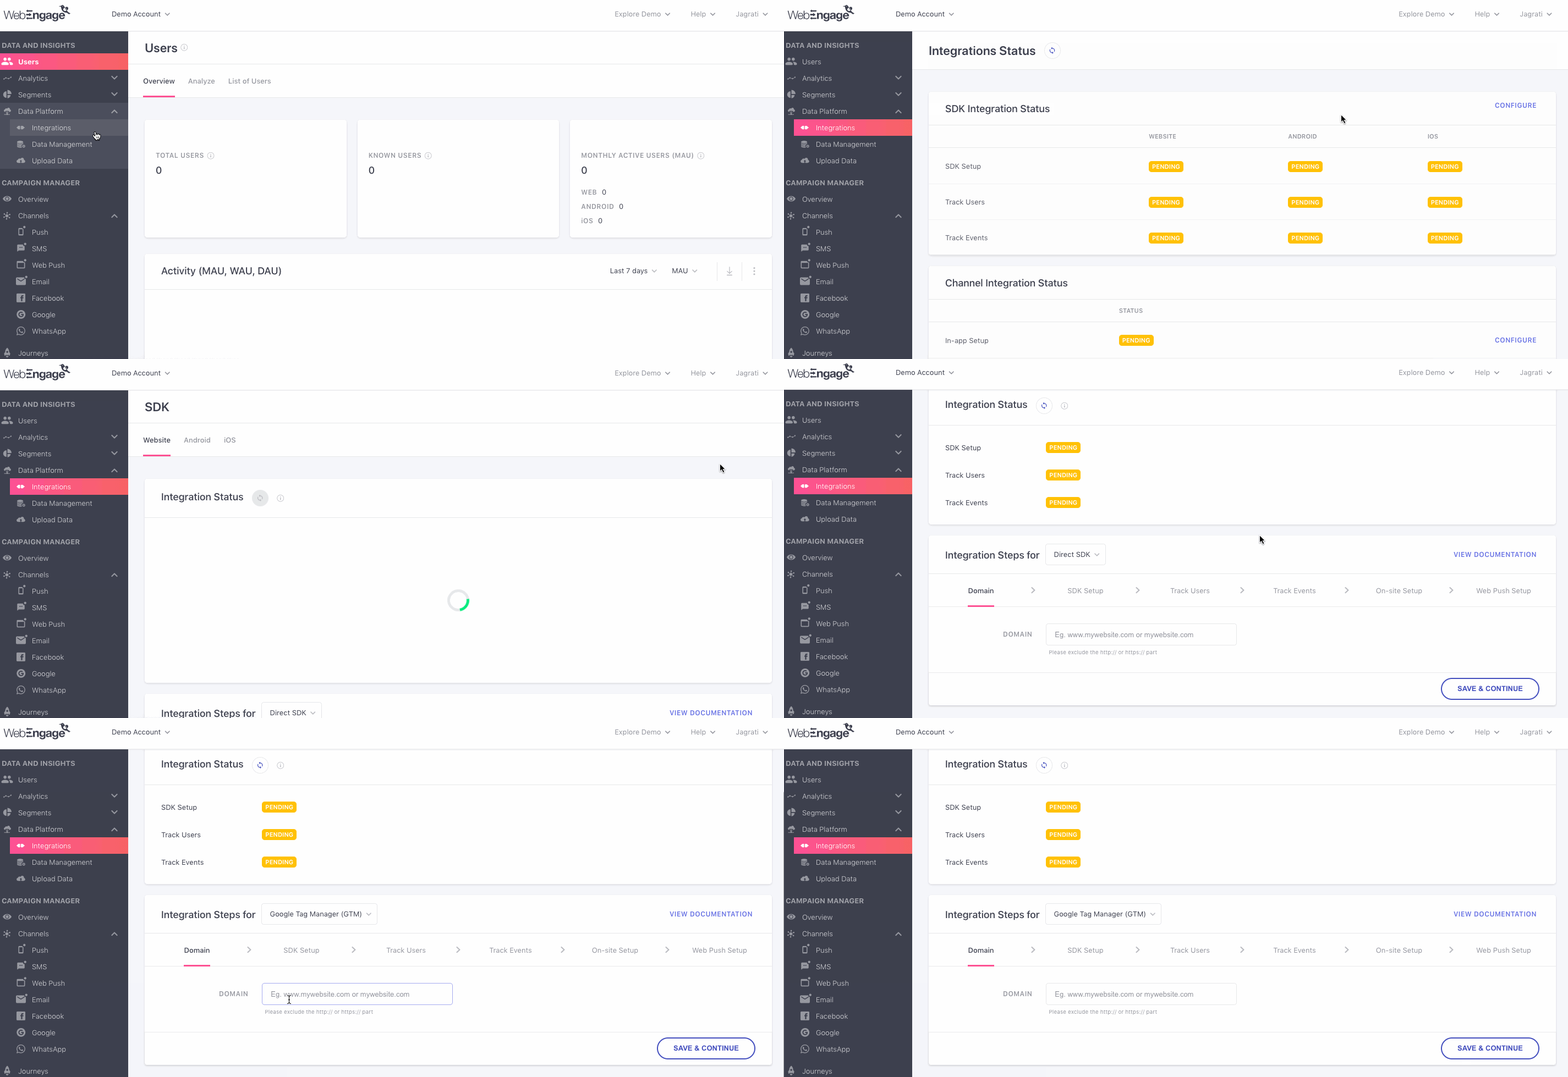
As shown above:
-
Log in to your WebEngage dashboard and navigate to Data Platform> Integrations > SDK (Configure) > Website.
-
Add your website's domain name against the field Domain under Integration Steps.
2. Configure your Google Tag Manager
Step 1: Create a new tag under the Tags section and provide a name.
Step 2: Click on Tag Configuration and under Choose Tag Type select Custom HTML.
Step 3: Enter the code snippet mentioned below.
<div id="_webengage_script_tag"></div>
<script type="text/javascript">
  var webengage;
  ! function(w, e, b, n, g) {
    function o(e, t) {
      e[t[t.length - 1]] = function() {
        r.__queue.push([t.join("."), arguments])
      }
    }
    var i, s, r = w[b],
      z = " ",
      l = "init options track screen onReady".split(z),
      a = "feedback survey notification".split(z),
      c = "options render clear abort".split(z),
      p = "Open Close Submit Complete View Click".split(z),
      u = "identify login logout setAttribute".split(z);
    if (!r || !r.__v) {
      for (w[b] = r = {
          __queue: [],
          __v: "6.0",
          user: {}
        }, i = 0; i < l.length; i++) o(r, [l[i]]);
      for (i = 0; i < a.length; i++) {
        for (r[a[i]] = {}, s = 0; s < c.length; s++) o(r[a[i]], [a[i], c[s]]);
        for (s = 0; s < p.length; s++) o(r[a[i]], [a[i], "on" + p[s]])
      }
      for (i = 0; i < u.length; i++) o(r.user, ["user", u[i]]);
      setTimeout(function() {
        var f = e.createElement("script"),
          d = e.getElementById("_webengage_script_tag");
        f.type = "text/javascript",
          f.async = !0,
          f.src = ("https:" == e.location.protocol ? "https://ssl.widgets.webengage.com" : "http://cdn.widgets.webengage.com") + "/js/webengage-min-v-6.0.js",
          d.parentNode.insertBefore(f, d)
      })
    }
  }(window, document, "webengage");

  webengage.init("_YOUR_LICENSE_CODE_");
</script>
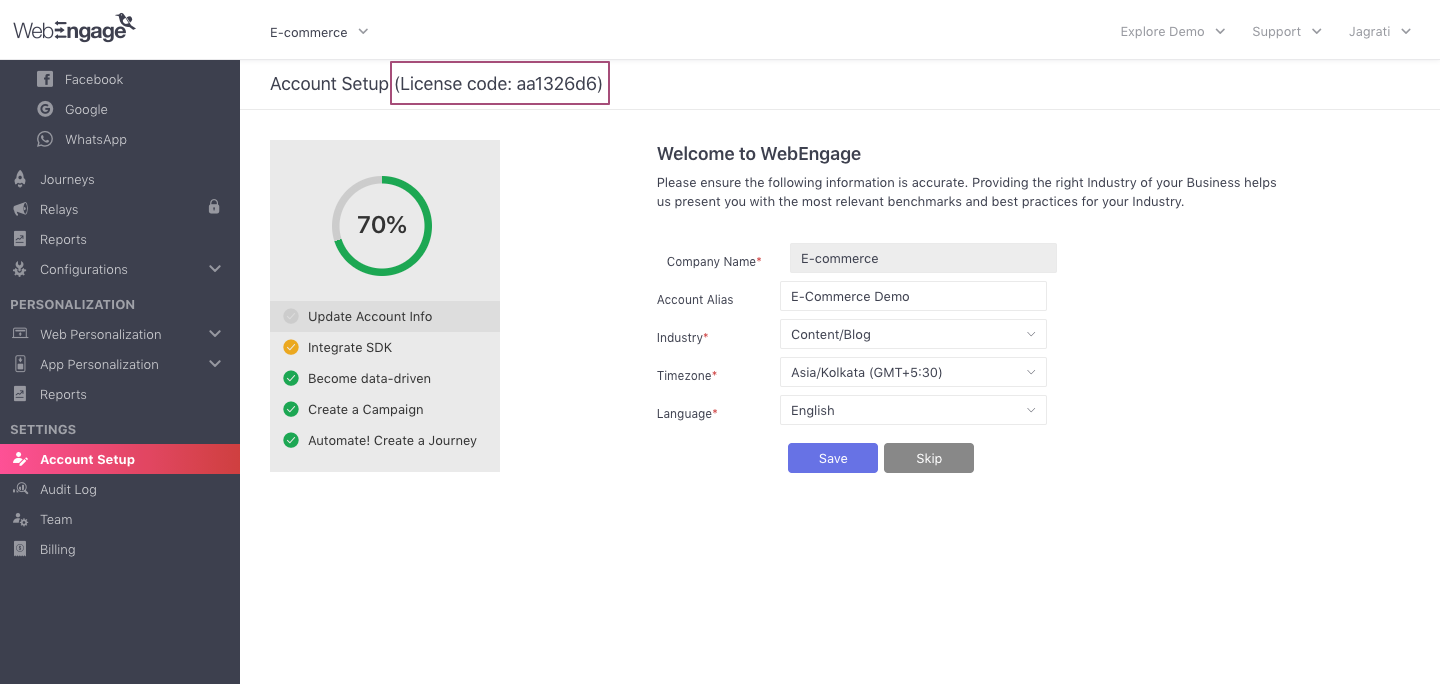
When you paste, replace _YOUR_LICENSE_CODE_ with your account's license code. You can find your license code in the Account Setup section of your WebEngage dashboard (as highlighted in the image below)
Click to enlarge
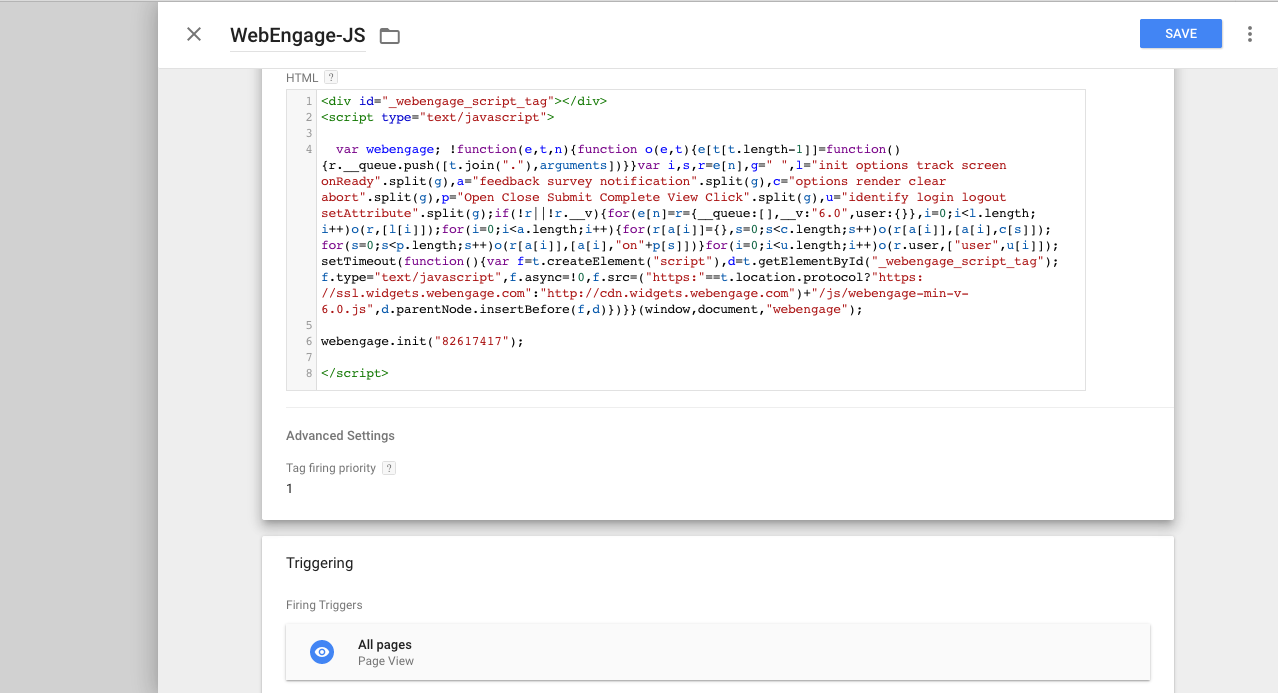
Step 4: Click on Triggering section and choose All Pages
Click to enlarge
3. User Login and Attributes Setup
Must ReadWe recommend that you get yourself acquainted with all the concepts related to Users and User Attributes before proceeding. Doing so will help you understand the workings of this section, better.
Here's how you can go about it:
Step 1: Create a new Tag under the Tags section and provide a name.
Step 2: Click on Tag Configuration and under Choose tag type select Custom HTML.
Step 3: Enter the code for tracking your users. All the variables mentioned in the below example in {{ }} are GTM variables.
<script>
//Login
webengage.user.login({{user_id}})

//Set user attributes
webengage.user.setAttribute({
    'we_first_name' : {{first_name}},
    'we_last_name' : {{last_name}},
    'we_email' : {{email}}
    'title' : {{title}}
})

//Logout
webengage.user.logout()
</script>
List of System User Attributes Defined by WebEngage
Name | Type | Description |
|---|---|---|
we_first_name | String | User's first name |
we_last_name | String | User's last name |
we_email | String | User's email address |
we_birth_date | String | User’s birth date in |
we_phone | String | User’s phone number in E.164 format |
we_gender | String | User’s gender (values can only be |
we_company | String | User’s company |
we_hashed_email | String | Encrypted email address |
we_hashed_phone | String | Encrypted phone number |
we_push_opt_in | Boolean | If set to |
we_sms_opt_in | Boolean | If set to |
we_email_opt_in | Boolean | If set to |
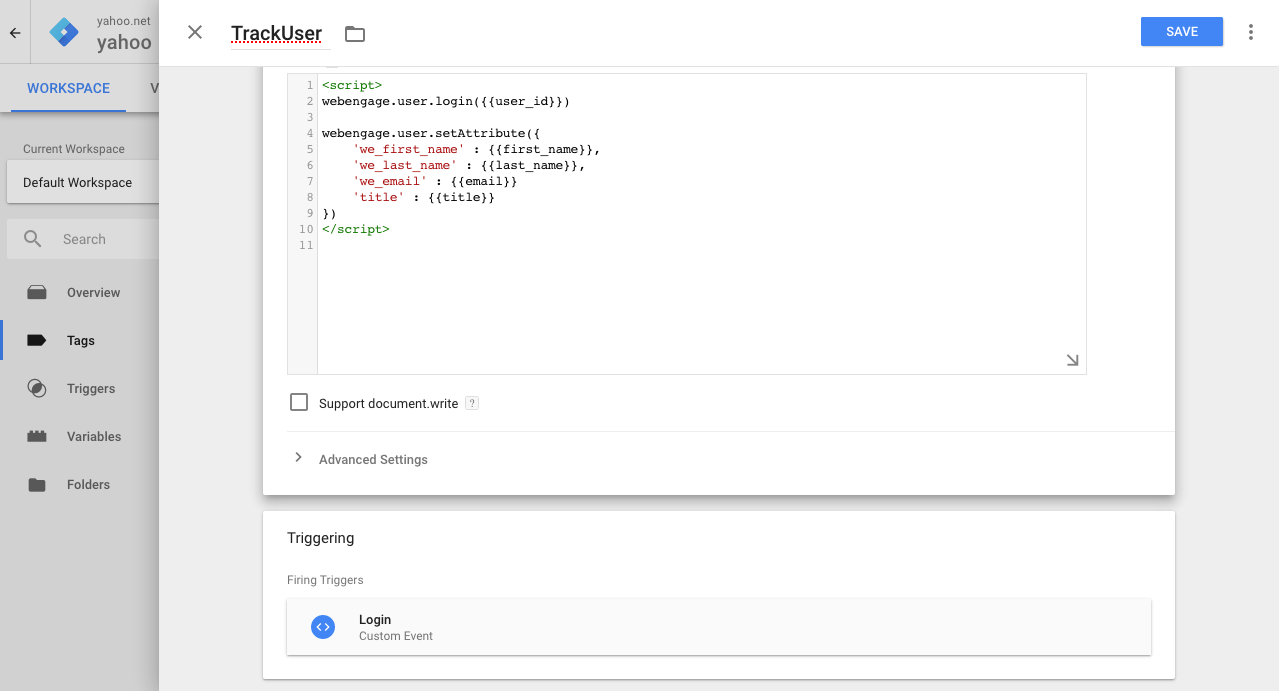
Step 4: Click on Triggering and choose the appropriate trigger on the occurrence of which the specified Tag should be fired.
Click to enlarge
Guidelines for Tracking Custom User Attributes
Here are a few things to keep in mind:
-
User Attribute names are case sensitive and must be less than 50 characters long.
Stringattribute values must be less than 1000 characters long. Additional characters will be truncated. -
You can create a maximum of 25 Custom User Attributes of each data type.
-
userAttributeNamemust not start withwe_. Names starting withwe_are reserved exclusively for internal use at WebEngage. Thus, to avoid data contamination for your account, such data will be ignored if used for your Custom User Attributes. -
The first datapoint synced to WebEngage defines the data type for that user attribute. Thus, data types must be consistent with the value that you want to store against the attribute. If the data type is changed at a later date, then Custom Users Attribute data will stop flowing to your WebEngage dashboard.
4. Event Tracking Setup
Must ReadWe recommend that you get yourself acquainted with the concept of System Events, Custom Events and their attributes before proceeding. Doing so will help you better understand the workings of this section.
Here are a few Custom Event Templates to help you get started.
Here's how you can go about it:
Step 1: Create a new Tag under the Tags section of your GTM account and provide a name.
Step 2: Click on Tag Configuration and under Choose Tag Type select Custom HTML.
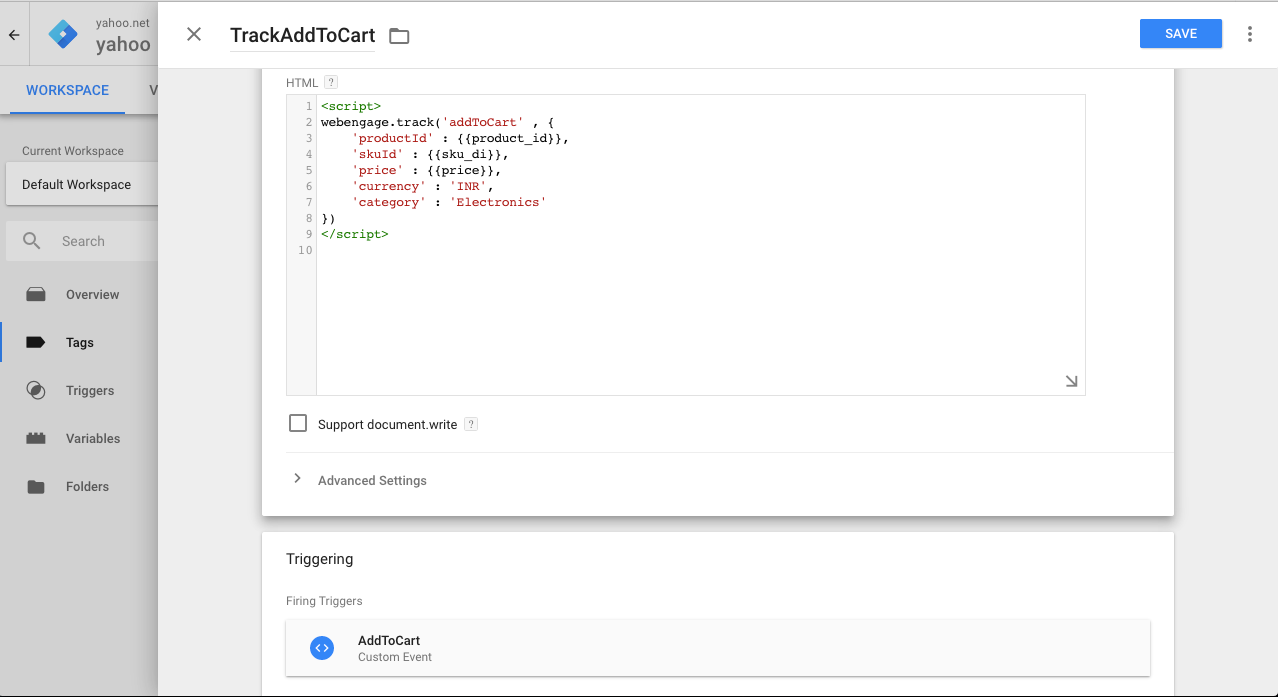
Step 3: Enter the code for tracking your events.
- All the variables mentioned in the below example in
{{ }}are GTM variables.
<script>
//Track addToCart event
webengage.track('addToCart' , {
    'productId' : {{product_id}},
    'skuId' : {{sku_id}},
    'price' : 1200,
    'currency' : 'INR',
    'category' : 'Electronics'
})
</script>
Step 4: Click on Triggering and choose the appropriate trigger on the occurrence of which the specificed Tag should be fired.
Click to enlarge
Guidelines for Tracking Custom Events & Custom Event Attributes
Here are a few things to keep in mind:
-
Custom Event names must be less than 50 characters long.
-
Custom Event Attribute names are case sensitive and must be less than 50 characters long.
Stringattribute values must be less than 1000 characters long. -
eventNameoreventAttributeNamemust not start withwe_. Names starting withwe_are reserved exclusively for internal use at WebEngage. Thus, to avoid data contamination for your account, such data will be ignored if used for your Custom Events. -
You can create a maximum of 25 Event Attributes of each data type for a Custom Event.
-
The first datapoint synced to WebEngage defines the data type for that event attribute. Thus, data types must be consistent with the value that you want to store against the attribute. If the data type is changed at a later date, then Custom Event Attribute data will stop flowing to your WebEngage dashboard.
5. Data Types
-
String,BooleanandNumberattribute values should be passed in the form of JavaScriptString,BooleanandNumberrespectively. Similarly date attribute values must be passed as JavaScriptDateobjects. -
Complex and nested data such as
MapandListcan also be passed as plain JavaScriptObjectsandArrays.
Please feel free to drop in a few lines at [email protected] in case you have any queries or feedback. We're always just an email away!
Updated 3 months ago