Advanced
1. Tracking in iOS WKWebView: JavaScript Bridge
JavaScript bridge is useful if you are using WKWebViews in your iOS app.
WebEngage provides a JavaScript bridge which enables you to handle WebEngage Website SDK calls from your iOS WKWebViews. When you use this bridge, all WebEngage JavaScript API calls (such as track, user.setAttribute, screen) made from web pages inside WKWebViews will be redirected to WebEngage iOS native APIs. This will ensure that tracked data is attributed to the right devices, even if Website SDK APIs are called from within your iOS app WKWebViews.
Follow the steps below to create a bridge between WebEngage Website SDK and iOS SDK. These steps assume that you have already integrated the Website SDK and are using it to track users, events and other information on your website.
Step 1: Replace your existing WebEngage Website SDK integration code with the one below at the end of the <head> section of each page you are tracking.
<script id="_webengage_script_tag" type="text/javascript">
  var webengage;
  ! function(w, e, b, n, g) {
    function o(e, t) {
      e[t[t.length - 1]] = function() {
        r.__queue.push([t.join("."), arguments])
      }
    }
    var i, s, r = w[b],
      z = " ",
      l = "init options track screen onReady".split(z),
      a = "feedback survey notification".split(z),
      c = "options render clear abort".split(z),
      p = "Open Close Submit Complete View Click".split(z),
      u = "identify login logout setAttribute".split(z);
    if (!r || !r.__v) {
      for (w[b] = r = {
          __queue: [],
          __v: "6.0",
          user: {}
        }, i = 0; i < l.length; i++) o(r, [l[i]]);
      for (i = 0; i < a.length; i++) {
        for (r[a[i]] = {}, s = 0; s < c.length; s++) o(r[a[i]], [a[i], c[s]]);
        for (s = 0; s < p.length; s++) o(r[a[i]], [a[i], "on" + p[s]])
      }
      for (i = 0; i < u.length; i++) o(r.user, ["user", u[i]])
    }
  }(window, document, "webengage");


  if (window.__WEBENGAGE_MOBILE_BRIDGE__) {

    (function(bridge) {

      var type = Object.prototype.toString;

      webengage.user.login = webengage.user.identify = function(id) {
        bridge.login(id)
      };
      webengage.user.logout = function() {
        bridge.logout()
      };

      webengage.user.setAttribute = function(name, value) {
        var attr = null;

        if (type.call(name) === '[object Object]') {
          attr = name;
        } else {
          attr = {};
          attr[name] = value;
        }

        if (type.call(attr) === '[object Object]') {
          bridge.setAttribute(JSON.stringify(attr));
        }
      };

      webengage.screen = function(name, data) {
        if (arguments.length === 1 && type.call(name) === '[object Object]') {
          data = name;
          name = null;
        }

        bridge.screen(name || null, type.call(data) === '[object Object]' ? JSON.stringify(data) : null);
      };

      webengage.track = function(name, data) {
        bridge.track(name, type.call(data) === '[object Object]' ? JSON.stringify(data) : null);
      };

    })(window.__WEBENGAGE_MOBILE_BRIDGE__);

  } else {

    setTimeout(function() {
      var f = document.createElement("script"),
        d = document.getElementById("_webengage_script_tag");
      f.type = "text/javascript",
      f.async = !0,
      f.src = ("https:" == window.location.protocol ? "https://ssl.widgets.webengage.com" : "http://cdn.widgets.webengage.com") + "/js/webengage-min-v-6.0.js",
      d.parentNode.insertBefore(f, d)
    });

  }

  webengage.init("__LICENSE_CODE__");
</script>Make sure you replace YOUR_WEBENGAGE_LICENSE_CODE with your WebEngage license code.
Step 2: Import WEGMobileBridge class
import WebEngage.WEGMobileBridge#import <WebEngage/WEGMobileBridge.h>Step 3: Create an object of WEGMobileBridge
let weObject = WEGMobileBridge()WEGMobileBridge *weObject=[[WEGMobileBridge alloc] init];Step 4: Configure your WKWebViewConfiguration object completely and initialize your WKWebView by passing your config object to WEGMobileBridge.
self.webView = WKWebView(frame: self.view.frame, configuration: weObject.enhanceWebConfig(forMobileWebBridge: defaultConfig))

self.view.addSubview(self.webView)

self.webView?.load(URLRequest(url: URL(string: "your_url")))
self.webView = [[WKWebView alloc] initWithFrame:self.view.frame configuration:[weObject enhanceWebConfigForMobileWebBridge:your_config_object]];
[self.view addSubview:self.webView];
[self.webView loadRequest:[NSURLRequest requestWithURL:[NSURL URLWithString:@“your_url”]]];2. Location Tracking
WebEngage iOS SDK allows you to define location tracking accuracy, or to disable location tracking, which enables you to optimize for resources - device battery and data usage. Use autoTrackUserLocationWithAccuracy to define location tracking accuracy as shown below. Note that this method is to be called after WebEngage SDK initialization.
-
If
autoTrackUserLocationWithAccuracyis not called, then the SDK will track user location only if your app has permission to read the device location, with default accuracyWEGLocationAccuracyForCity. -
Calling this method after initializing the SDK will force every launch of your app to track location with the given accuracy.
-
If your app does not have the permission to read device location, WebEngage SDK will not track any location irrespective of the configuration.
WebEngage.sharedInstance()?.autoTrackUserLocation(with: .forCity)[[WebEngage sharedInstance] autoTrackUserLocationWithAccuracy:WEGLocationAccuracyForCity];Following are the options that you can use to define location tracking accuracy.
| Uses the highest level of accuracy. Recommended for real-time location tracking, as it requires more time to determine location and consumes more device power. |
| Recommended for city-level location tracking; consumes less device power. |
| Recommended for country-level location tracking; consumes less power. |
| Disables location tracking by WebEngage SDK. With this value, WebEngage will neither track any user location nor update it on your WebEngage dashboard. If you are using this configuration, you can manage location updates by using |
3. Alternative Initialization
In order to initialize the SDK your app needs to call one of the below mentioned APIs, whichever is appropriate for the use case from your application's AppDelegate.
open func application(_ application: UIApplication!, didFinishLaunchingWithOptions launchOptions: [AnyHashable : Any]! = [:]) -> Bool

open func application(_ application: UIApplication!, didFinishLaunchingWithOptions launchOptions: [AnyHashable : Any]! = [:], autoRegister apnRegister: Bool) -> Bool

open func application(_ application: UIApplication!, didFinishLaunchingWithOptions launchOptions: [AnyHashable : Any]! = [:], notificationDelegate: WEGInAppNotificationProtocol!) -> Bool

open func application(_ application: UIApplication!, didFinishLaunchingWithOptions launchOptions: [AnyHashable : Any]! = [:], notificationDelegate: WEGInAppNotificationProtocol!, autoRegister apnRegister: Bool) -> Bool
- (BOOL)application:(UIApplication *)application
didFinishLaunchingWithOptions:(NSDictionary *)launchOptions;
- (BOOL)application:(UIApplication *)application
didFinishLaunchingWithOptions:(NSDictionary *)launchOptions
autoRegister:(BOOL)autoRegister;
- (BOOL)application:(UIApplication *)application
didFinishLaunchingWithOptions:(NSDictionary *)launchOptions
notificationDelegate:(id<WEGInAppNotificationProtocol>)notificationDelegate;
- (BOOL)application:(UIApplication *)application
didFinishLaunchingWithOptions:(NSDictionary *)launchOptions
notificationDelegate:(id<WEGInAppNotificationProtocol>)notificationDelegate
autoRegister:(BOOL)autoRegister;Parameters
-
launchOptions-NSDictionarypassed intoapplication:didFinishLaunching:WithOptionsof yourAppDelegate. You must pass the same dictionary in the above method calls. -
autoRegister- If your application handles the APNs registration for remote notifications manually (or using some other SDK), setautoRegistertoNO. Default value for this isYES, in which case WebEngage SDK will attempt to make the registration.
In case you are manually handling the APNs registration (passingautoRegisterasNO):
For SDK version 2.1.9 and above, your app will need to make both APNs related calls:
a.
registerUserNotificationSettings:which will spawn the permission dialog.b.
registerForRemoteNotifications:which will start the APNs registration to generate a device token.For SDK versions below 2.1.9, the SDK will spawn the permission dialog and your app only needs to make the
registerForRemoteNotificationscall.
notificationDelegate- Must be an instance of a class which implements theWEGInAppNotificationProtocolfor In-App notification lifecycle callbacks.
You are now ready to continue with the setup process here.
4. Multiple App Support
WebEngage supports running multiple apps within the same License Code.
Please ensure that you are using Auth Keys instead of APNS Certificates for Push Notifications.
To enable Multi App Support, in app's Info.plist file, enter WEGAlternateAppSupport key as Boolean type & set it to YES.
<key>WEGAlternateAppSupport</key>
<true/>
Click to enlarge
5. Using APNs Push Certificate
Create APNs Push Certificate
Here's how you can go about it:
To create an APNs Certificate, follow the steps below:
Step 1: Log in to the Apple Developer Console and go to Certificates, Identifiers & Profiles.
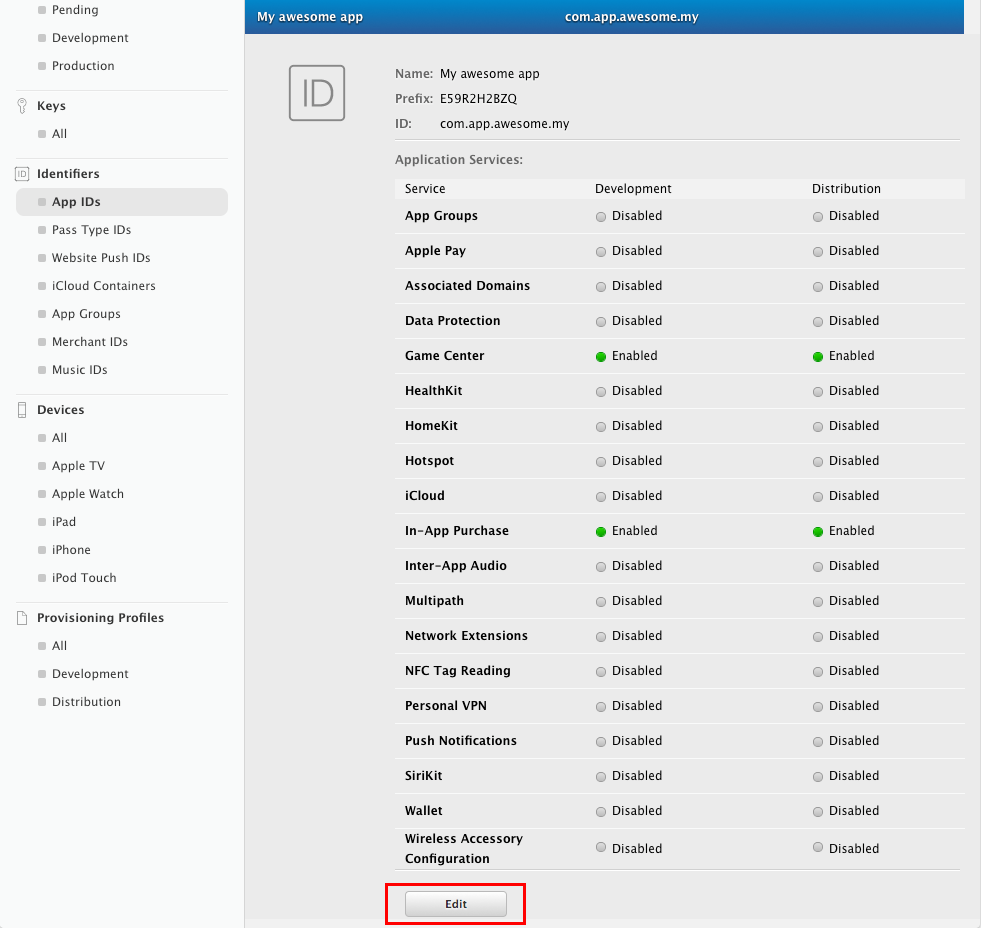
Step 2: Select Identifiers > App IDs and then select your app.
Click to enlarge
Step 3: Click Edit to update the app settings.
Step 4: If not already enabled, tick the Push Notifications service checkbox to enable it.
Step 5: If you already have a certificate created which you can use, download it and proceed to the next step. If not, click Create Certificate….
Step 6: Follow the instructions on the next webpage to create a certificate request on your Mac, and click Continue.
Step 7: On the Generate your certificate page, click Choose File and choose the certificate request file you just created (with a .certSigningRequest extension) and then click Continue.
Step 8: Download the generated certificate to your Mac and then open the .cer file to install it in Keychain Access.
Since Apple treats Development & Production as separate instances, we strongly suggest making 2 applications in the WebEngage dashboard. This will allow you to test your application even after releasing it without interrupting your users.
Upload APNs Push Certificate
Here's how you can go about it:
Step 1: Launch Keychain Access on your Mac.
Step 2: In the Category section, select My Certificates.
Make sure you select My Certificates on the lower left-hand side. If My Certificates is not highlighted, you will not be able to export the certificate as a
.p12file.
Step 3: Find the certificate you generated and expand it to disclose its contents. You’ll see both a certificate and a private key.
Step 4: Select both the certificate and the key, and select File > Export Items... from the menu.
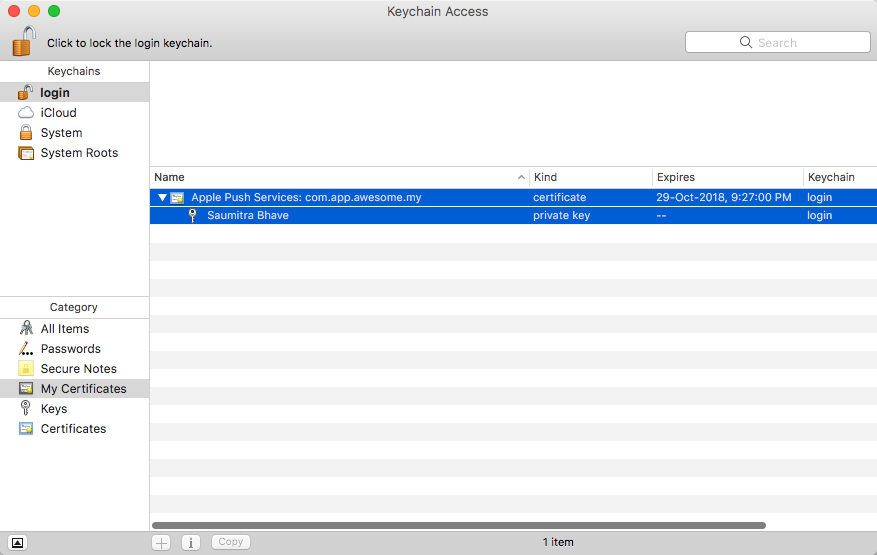
Step 5: Save the certificate in the Personal Information Exchange (.p12) format. You must enter a password to protect it.
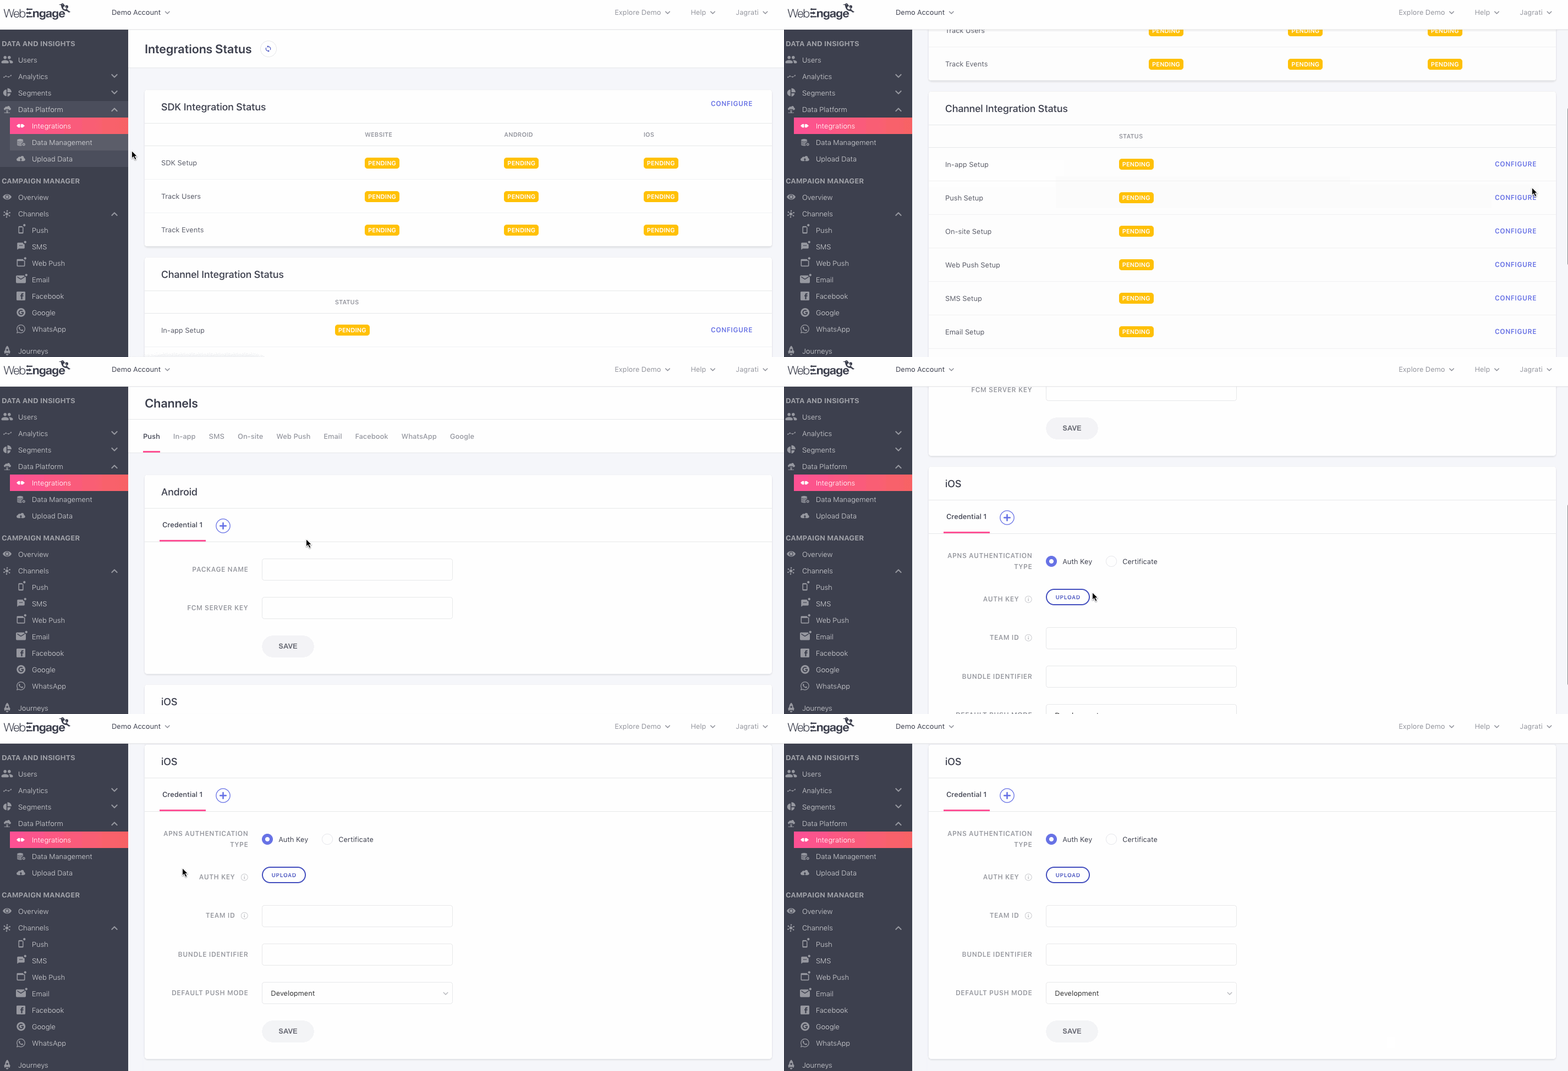
Step 6: Log in to your WebEngage dashboard and navigate to Data Platform > Integrations>> Push Steup (Configure).
Step 7: In Push tab, under the iOS section, select "Certificate" as APNs Authentication Type. Click Upload button against Push Certificate and upload the certificate.
Step 8: Enter the push certificate password under Push Password and select the default push mode for sending push notifications i.e. Production or Development. Click Save.
Click to enlarge
6. WebEngage Rich Push Notification SDK - Manual Integration (without CocoaPods)
Please follow the steps below to integrate WebEngage AppEx SDK manually (without CocoaPods):
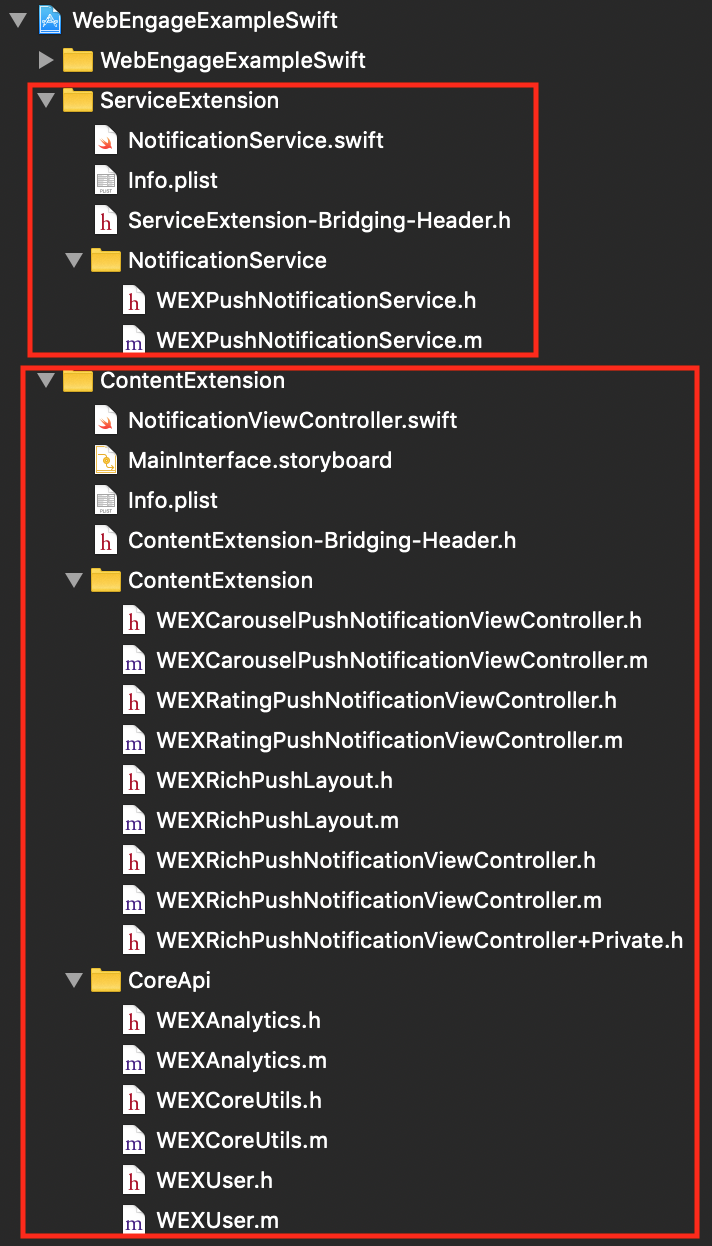
Step 1: Download the folders containing Obj-C .h/.m files of NotificationService, CoreApi & ContentExtension from this link.
Click to enlarge
Step 2: Add the WEXPushNotificationService.h/.m to your ServiceExtension Target only.
Step 3: In ServiceExtension-Bridging-Header.h:
#import "WEXPushNotificationService.h"

Click to enlarge
Step 4: In NotificationService.swift file:
class NotificationService: WEXPushNotificationService { }

Click to enlarge
Step 5: Now in only your ContentExtension Target, add the contents of CoreApi & ContentExtension folders downloaded in Step 1.
Step 6: In your ContentExtension-Bridging-Header.h:
#import "WEXRichPushNotificationViewController.h"
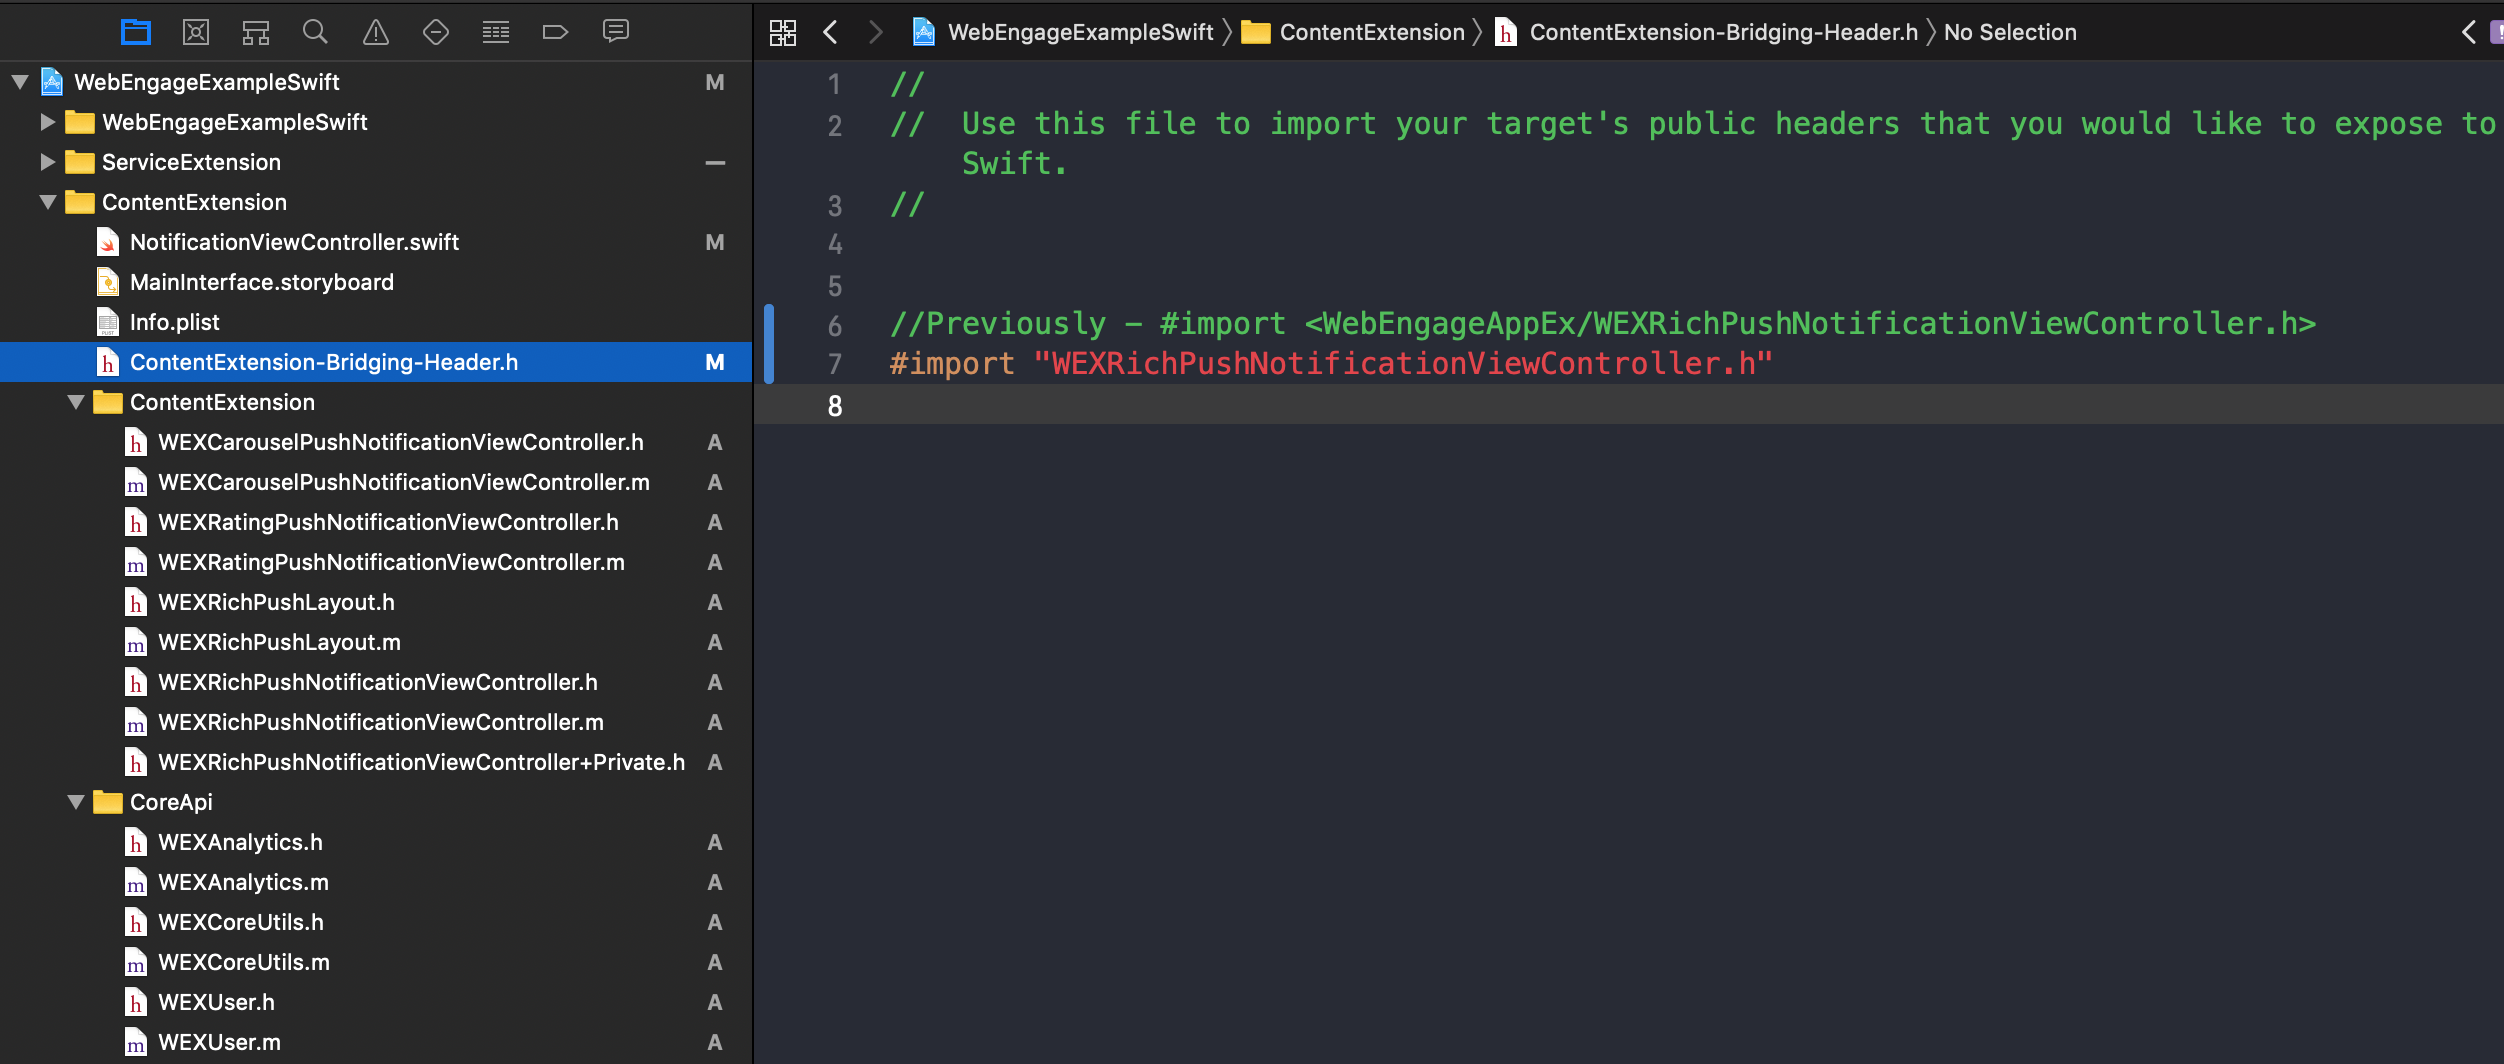
Click to enlarge
Step 7: In NotificationViewController.swift file:
class NotificationViewController: WEXRichPushNotificationViewController { }
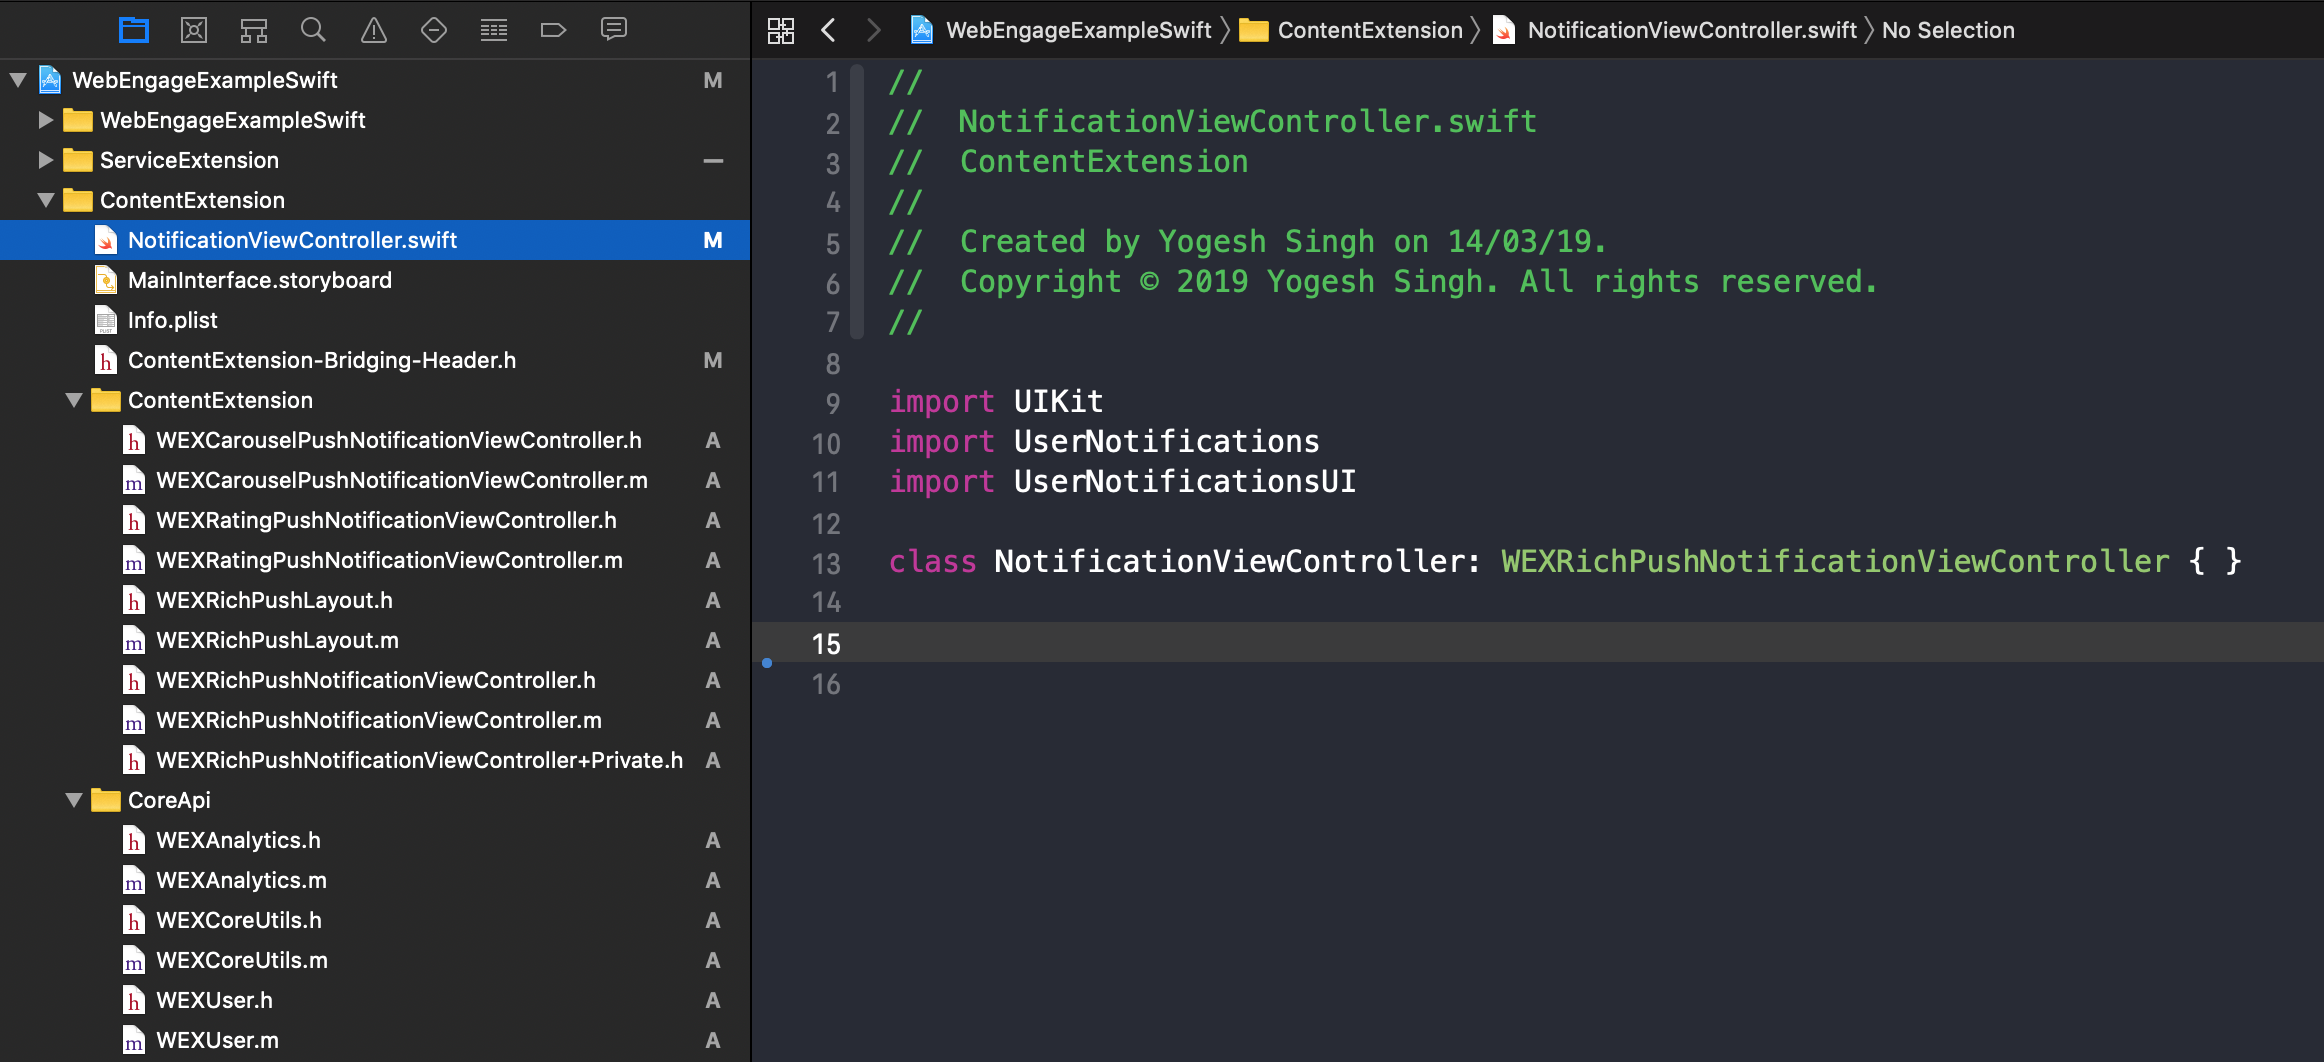
Click to enlarge
Step 8: In WEXRichPushNotificationViewController.m file would give compile error due to the inclusion of < > (angled brackets) in import. Change these to regular " " (quotation marks) imports like this:
#import "WEXAnalytics.h"
#import "WEXRichPushNotificationViewController.h"
Step 9: Ensure that you have already implemented the required changes in Service & Content Extension Info.plist files. Specifically, implement these two steps - 7. Configure ServiceExtension-Info.plist & 8. Configure ContentExtension-Info.plist
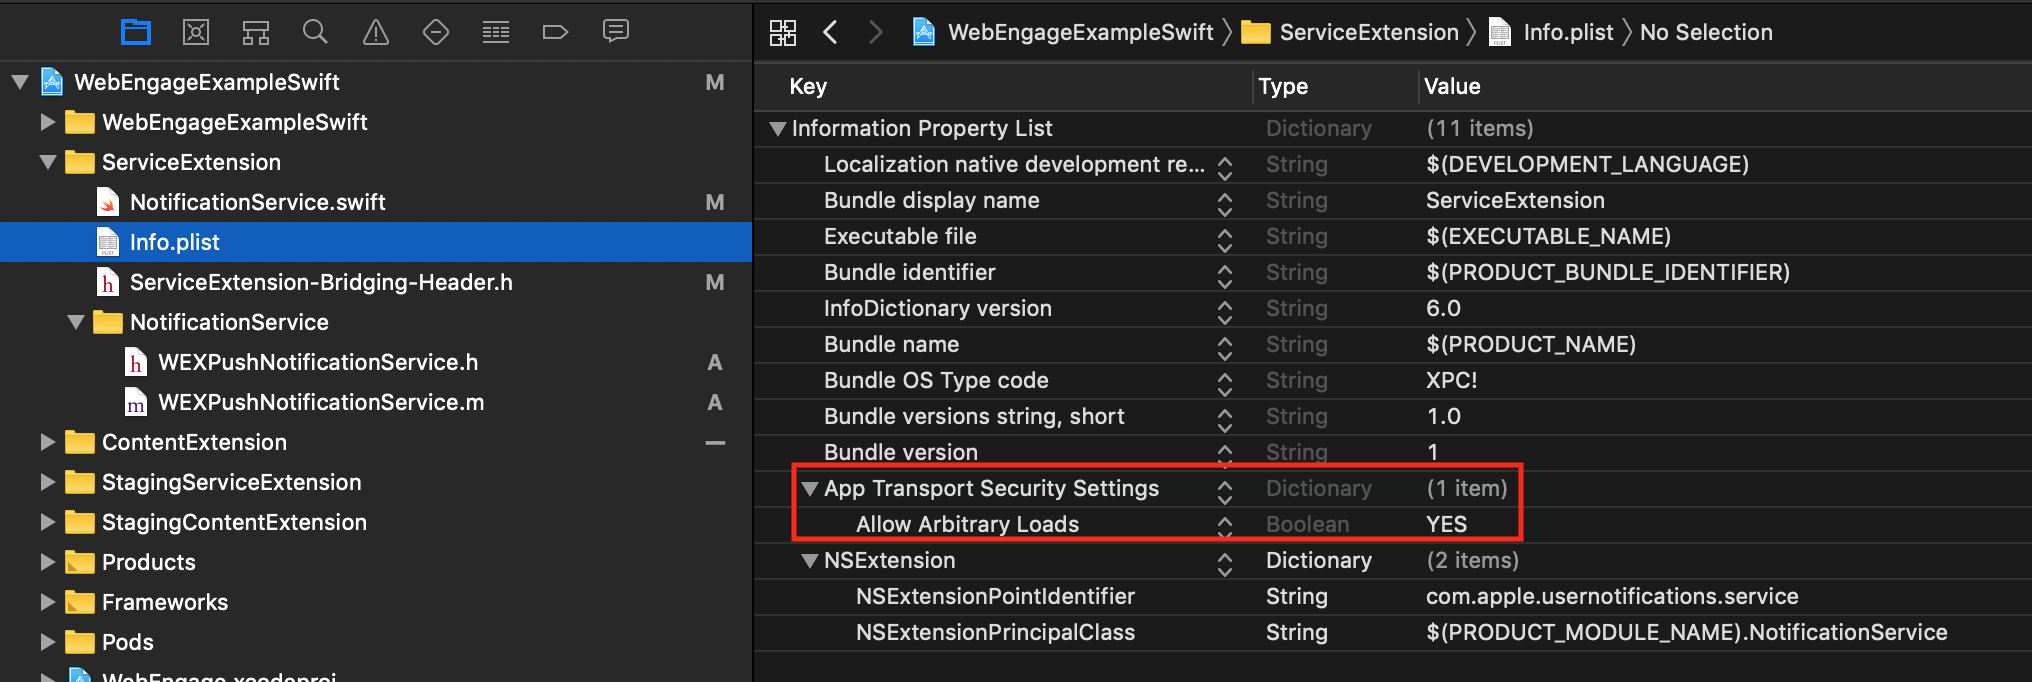
Click to enlarge
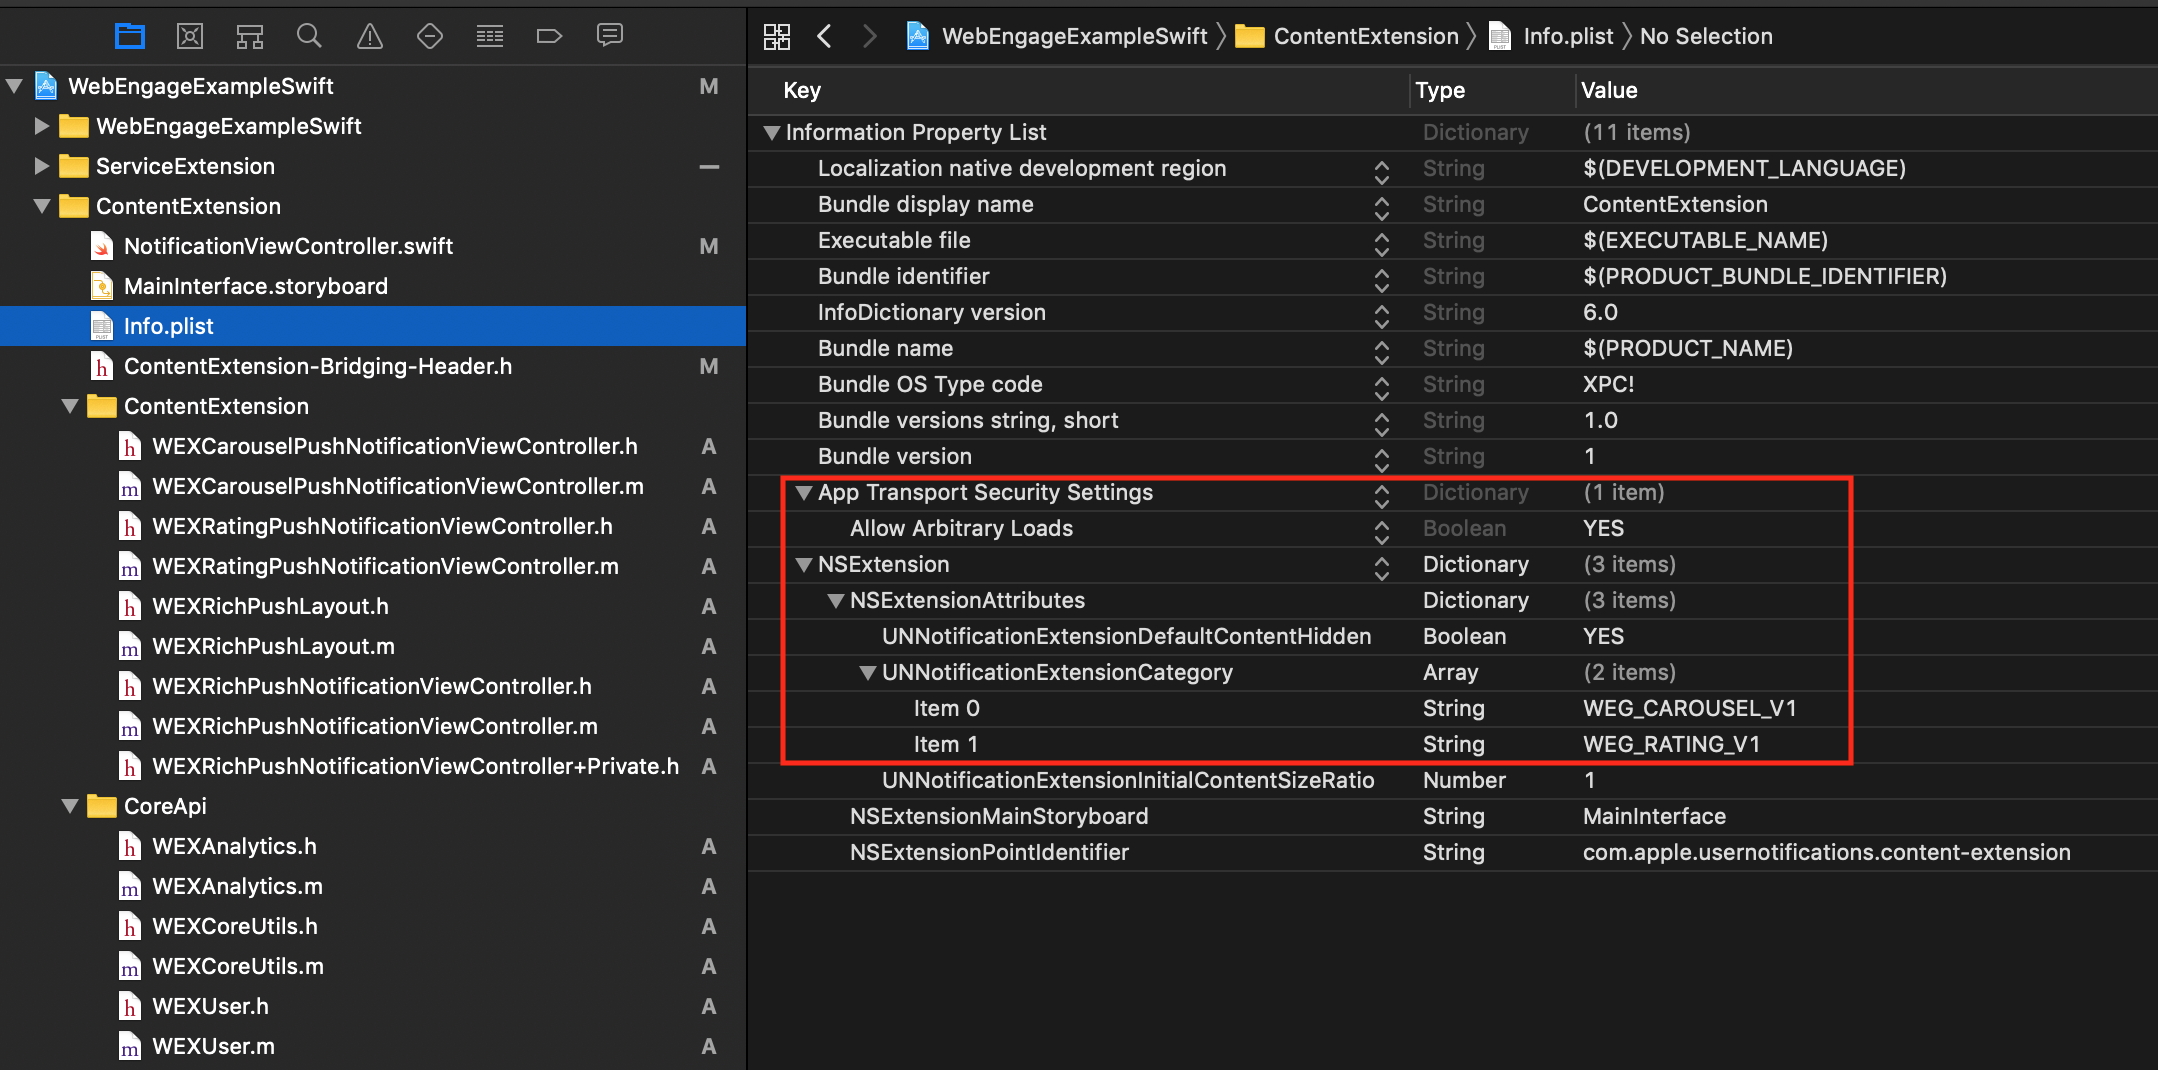
Click to enlarge
Step 10: Test the implementation. Rich push notifications with manual integration (without CocoaPods) should work reliably now.
7. Resolving Push Conflicts with Other SDKs (Disabling Swizzling)
By default, the WebEngage iOS SDK uses method swizzling to intercept UNUserNotificationCenterDelegate callbacks, which simplifies push integration.
However, if you want manual control (for example, if you have multiple push SDKs), you can disable swizzling manually.
Step 1 : Assigning UNUserNotificationCenterDelegate Add the following lines to the didFinishLaunchingWithOptions method in the AppDelegate.m or AppDelegate.swift file of your iOS project before the return statement.
if #available(iOS 10.0, *) {
  UNUserNotificationCenter.current().delegate = self as? UNUserNotificationCenterDelegate
}
if (@available(iOS 10.0, *)) {
  [UNUserNotificationCenter currentNotificationCenter].delegate = (id<UNUserNotificationCenterDelegate>) self;
}
Step 2 : Info.plist Flag Add the WEGManualIntegration Boolean key in app's Info.plist & set it to YES

Click to enlarge
Step 3 : Forwarding Notification Callbacks
You must manually forward the notification payloads to WebEngage in the UNUserNotificationCenterDelegate methods:
extension AppDelegate: UNUserNotificationCenterDelegate {

    @available(iOS 10.0, *)
    func userNotificationCenter(_ center: UNUserNotificationCenter,
                                willPresent notification: UNNotification,
                                withCompletionHandler completionHandler: @escaping (UNNotificationPresentationOptions) -> Void) {

        print("center: ", center, "\nnotification: ", notification)

				// forward notification payload to WebEngage
        WEGManualIntegration.userNotificationCenter(center, willPresent: notification)

        completionHandler([.alert, .badge, .sound])
    }

    @available(iOS 10.0, *)
    func userNotificationCenter(_ center: UNUserNotificationCenter,
                                didReceive response: UNNotificationResponse,
                                withCompletionHandler completionHandler: @escaping () -> Void) {

        print("center: ", center, " response: ", response)

				// forward notification payload to WebEngage
        WEGManualIntegration.userNotificationCenter(center, didReceive: response)

        completionHandler()
    }
}
- (void)userNotificationCenter:(UNUserNotificationCenter *)center
willPresentNotification:(UNNotification *)notification
withCompletionHandler:(void (^)(UNNotificationPresentationOptions))completionHandler{
NSLog(@"center: %@, notification: %@", center, notification);
// forward notification payload to WebEngage
[WEGManualIntegration userNotificationCenter:center willPresentNotification:notification];
completionHandler(UNNotificationPresentationOptionAlert | UNNotificationPresentationOptionSound | UNNotificationPresentationOptionBadge);
}
- (void)userNotificationCenter:(UNUserNotificationCenter *)center
didReceiveNotificationResponse:(UNNotificationResponse *)response
withCompletionHandler:(void (^)(void))completionHandler {
NSLog(@"center: %@, response: %@", center, response);
// forward notification payload to WebEngage
[WEGManualIntegration userNotificationCenter:center didReceiveNotificationResponse:response];
completionHandler();
}Reference Screenshots :
Objective-C Sample Screenshot of WEGManualIntegration implementation in AppDelegate.m file:
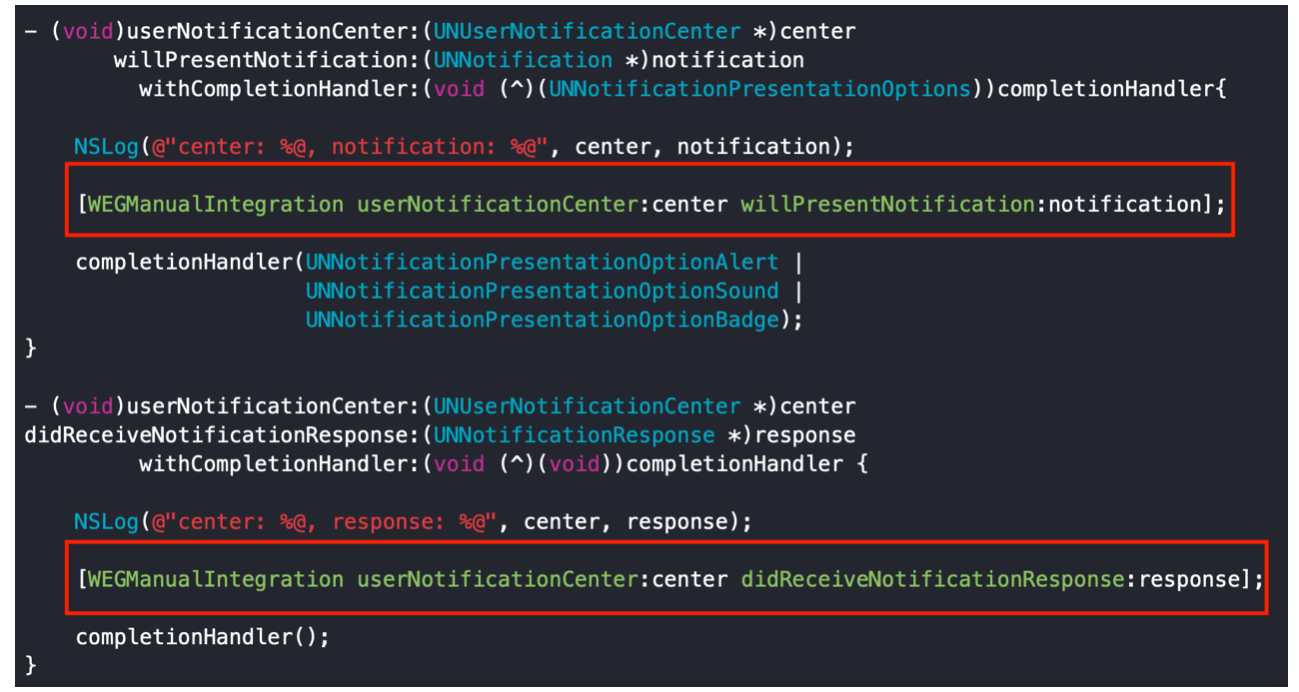
Click to enlarge
Swift Sample Screenshot of WEGManualIntegration implementation in AppDelegate.swift file:
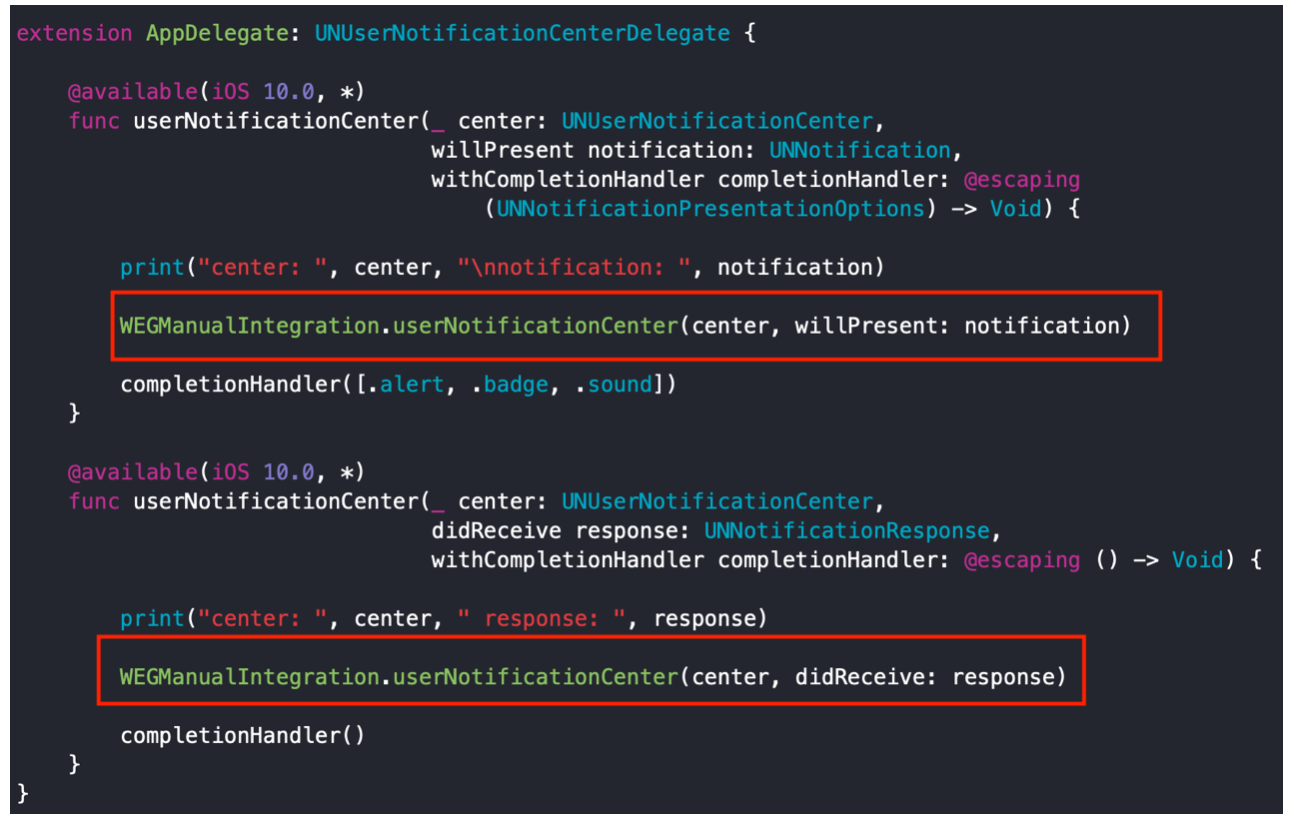
Click to enlarge
At last the AppDelegate file will look like this
import UIKit
import WebEngage

@UIApplicationMain
@objc class AppDelegate: YOUR_CODE {
    var bridge:WebEngagePlugin? = nil
    override func application(
        _ application: UIApplication,
        didFinishLaunchingWithOptions launchOptions: [UIApplication.LaunchOptionsKey: Any]?
    ) -> Bool {
       ...YOUR CODE...

        bridge = WebEngagePlugin()
        WebEngage.sharedInstance().pushNotificationDelegate = self.bridge
        WebEngage.sharedInstance().application(application, didFinishLaunchingWithOptions: launchOptions)
        // if you are using firebase or any other multiple services for push notification then add the below code or Manual Integration is ON
        if #available(iOS 10.0, *) {
          UNUserNotificationCenter.current().delegate = self as? UNUserNotificationCenterDelegate
        }
        return super.application(application, didFinishLaunchingWithOptions: launchOptions)
    }

    ...YOUR CODE....

}
// If Manual Integration is ON then add below code
extension AppDelegate: UNUserNotificationCenterDelegate {

    @available(iOS 10.0, *)
    func userNotificationCenter(_ center: UNUserNotificationCenter,
                                willPresent notification: UNNotification,
                                withCompletionHandler completionHandler: @escaping (UNNotificationPresentationOptions) -> Void) {

        print("center: ", center, "\nnotification: ", notification)
        WEGManualIntegration.userNotificationCenter(center, willPresent: notification)
        //Handle any other services messages with method swizzling disabled
        // example : firebase
        //Messaging.messaging().appDidReceiveMessage(userInfo)
        completionHandler([.alert, .badge, .sound])
    }

    @available(iOS 10.0, *)
    func userNotificationCenter(_ center: UNUserNotificationCenter,
                                didReceive response: UNNotificationResponse,
                                withCompletionHandler completionHandler: @escaping () -> Void) {

        print("center: ", center, " response: ", response)
        WEGManualIntegration.userNotificationCenter(center, didReceive: response)
        //Handle any other services messages with method swizzling disabled
        // example : firebase
        //Messaging.messaging().appDidReceiveMessage(userInfo)
        completionHandler()
    }
}
Please feel free to drop in a few lines at [email protected] in case you have any further queries. We're always just an email away!
8. Enable User Data Encryption
This feature is supported on iOS SDK version 6.15.0 or above.
Overview:
User Data Encryption strengthens the security of user information by encrypting it before storing it on the device. This ensures that sensitive data remains protected from unauthorized access. With this implementation, only the data collected by the WebEngage SDK will be encrypted, adding an extra layer of security while maintaining seamless functionality.
Enabling User Data Encryption
To enable User Data Encryption, follow these simple steps:
Step 1: Update the Info.plist File
Add the WEGUserDataEncryption Boolean key in your app’s Info.plist file and set its value to YES.

That’s it! Once enabled, all user data stored by WebEngage in local storage will be encrypted, ensuring enhanced security and protection against unauthorized access.
Updated about 1 month ago