AMP
Integrating Accelerated Mobile Pages with your WebEngage dashboard
WebEngage enables you to track user and events data for all your AMP pages through an additional integration.
Since the primary goal of AMP is to reduce the page load time for mobile devices, the framework has several restrictions and does not allow third-party scripts. For the same reason, this Web SDK will not work on your AMP Pages.
AMP Framework Restrictions
Must ReadWe recommend that you get yourself acquianted with all the concepts related to Users and Events before proceeding. Doing so will help you understand the workings of this section, better.
Here's a list of all the limitations imposed by the AMP framework:
1. Identifying Users
All AMP Page visitors will be treated as anonymous users (even if they have been previously identified on your website).
However, if an identified user visits your AMP pages and retains their cookies, then we will be able to track their interactions through the LUID assigned to them by the Web SDK..
This means that the user's activities will get recorded in their User Profile and you will be able to leverage this data to create segments, personalize messages and configure campaign targeting.
2. Tracking User Attributes
You will not be able to track any System User Attributes or Custom User Attributes for AMP Page visitors. This has been limited by the AMP framework to ensure minimal page load time.
3. Tracking Events
AMP has predefined certain user interactions that can be tracked by third-party platforms like WebEngage. This means that you will not be able to track any System Events or Custom Events apart from the Events mentioned here.
How to Integrate
Important!Please add the following code snippets only on your AMP pages. Adding these to other non-amp pages of your site may cause users to receive Web Push Notifications twice and result in unexpected web experiences.
Step 1: Enable AMP Setup in Dashboard
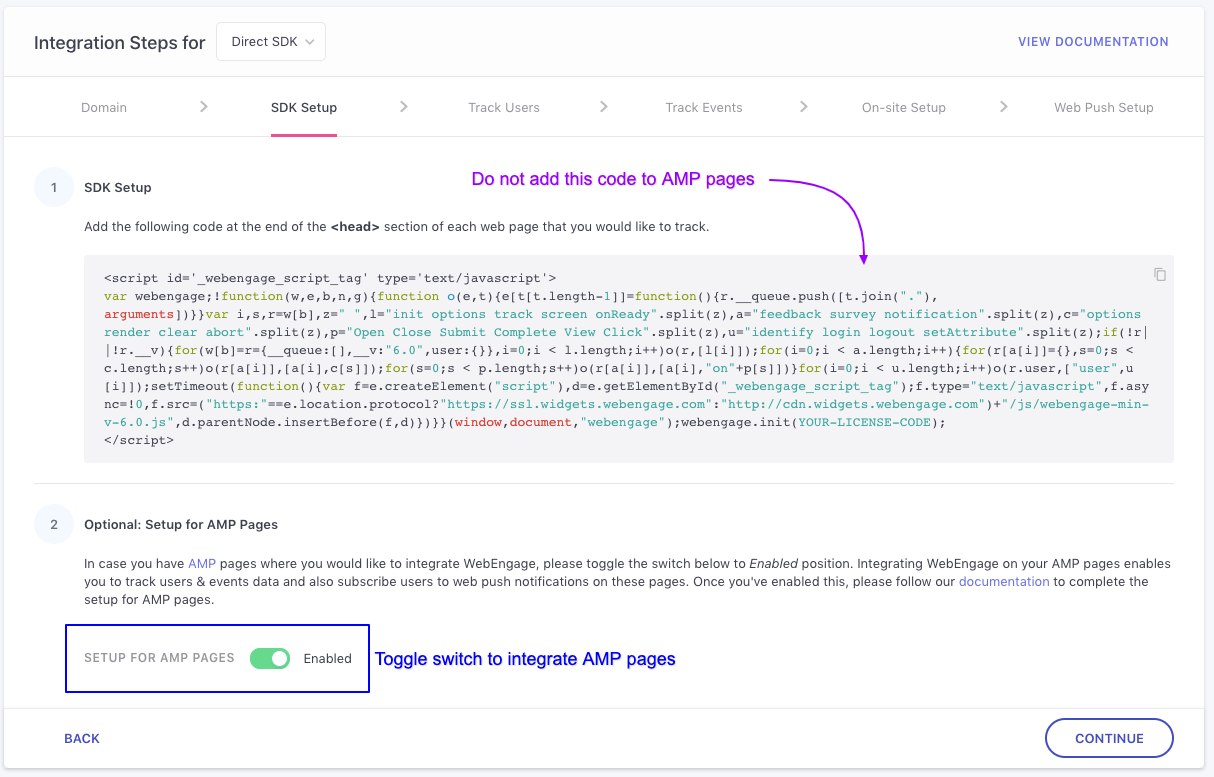
As highlighted below, navigate to Data Platform > Integrations > SDK (Configure) > Website and enable AMP setup. Please do not add the Web SDK code provided in your dashboard to AMP pages as it will not work.

Click to enlarge
Step 2: Add Code to AMP Pages
Please add the following code snippets to your AMP pages to intergate WebEngage and track user behavior as Events.
Step 2.1: Include this code to load the amp-analytics component on all your AMP pages.
<script async custom-element="amp-analytics" src="https://cdn.ampproject.org/v0/amp-analytics-0.1.js"></script>Step 2.2: Define WebEngage related configurations on all AMP Pages to track Users and Events. Here's how you can go about it:
- If You're Using WebEngage's Global Data Center: All your data is stored in our Global Data Center by default. Thus, if your dashboard URL starts with
dashboard.webengage.com, then it means you're using our Global Data Center. Please add this code to your AMP pages.
<amp-analytics id="webengage" type="webengage">
    <script type="application/json">
    {
      "vars": {
        "licenseCode": "<YOUR_PROJECT_LICENSE_CODE>",
        "region": "us"
      }
    }
    </script>
</amp-analytics>
If You're Using WebEngage's India Data Center: You will need to specifically request for your data to be stored in our India Data Center in your contract with WebEngage. Thus, if your dashboard URL starts with dashboard.in.webengage.com, then it means you're using our India Data Center. Please add this code to your AMP page.
<amp-analytics id="webengage" type="webengage">
    <script type="application/json">
    {
      "vars": {
        "licenseCode": "<YOUR_PROJECT_LICENSE_CODE>",
        "region": "in"
      }
    }
    </script>
</amp-analytics>
If You're Using WebEngage's Saudi Arabia Data Center: You will need to specifically request for your data to be stored in our Saudi Arabia Data Center in your contract with WebEngage. Thus, if your dashboard URL starts with dashboard.ksa.webengage.com, then it means you're using our Saudi Arabia Data Center. Please add this code to your AMP page.
<amp-analytics id="webengage" type="webengage">
    <script type="application/json">
    {
      "vars": {
        "licenseCode": "<YOUR_PROJECT_LICENSE_CODE>",
        "region": "ksa"
      }
    }
    </script>
</amp-analytics>
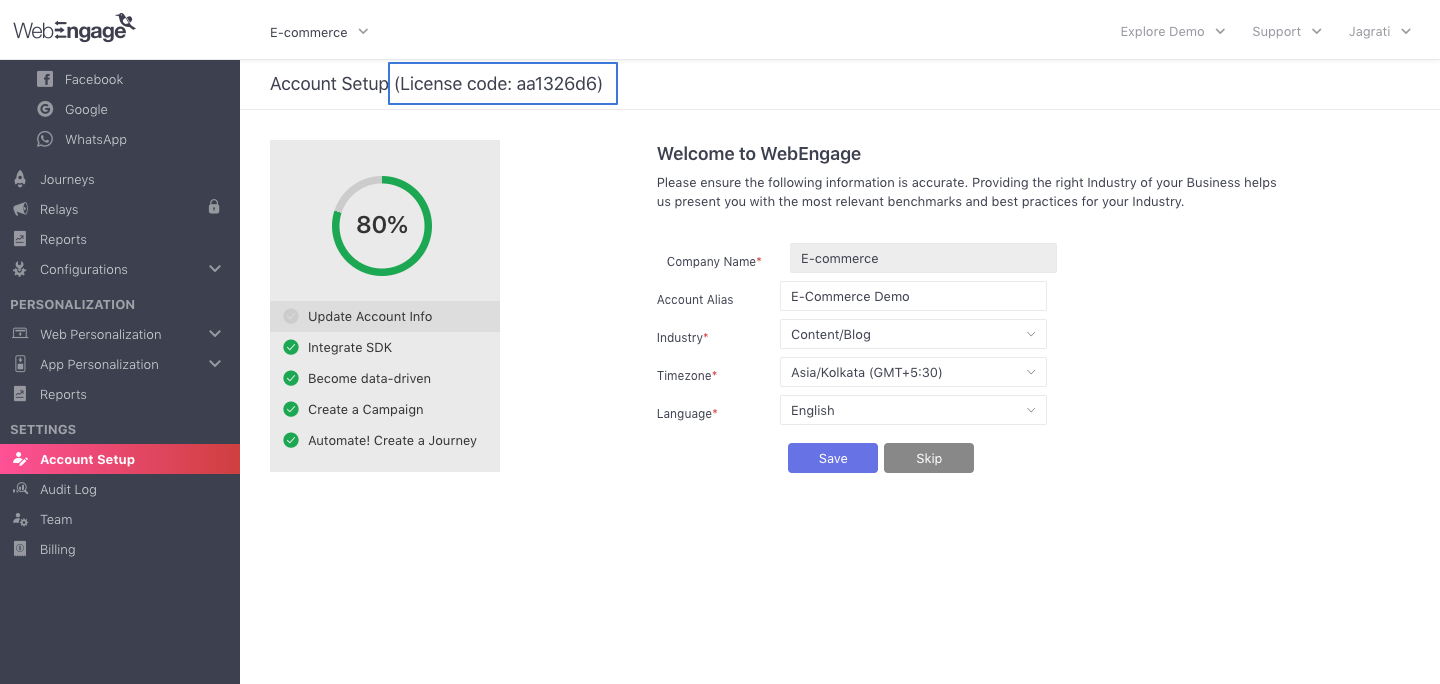
Applicable to all the code snippets provided above: Please ensure that you replace YOUR_PROJECT_LICENSE_CODE with your WebEngage license code. It can be found under the Account Setup section of your dashboard (as shown below).

Locating license code in your WebEngage account
Step 3: Configure Events Tracking
Once you add the code snippet provided under Step 2, WebEngage will start tracking all AMP Page views as the Event, Page Viewed by default.
-
You will need to set up tracking for all other user interactions like Button Clicks, Anchor Link Clicks, Page Scroll, AMP Carousel Changes, Form Submission and so on by configuring custom event tracking. (Here's a list of Events you can track on AMP Pages & a detailed read on the various behavioral tracking features of AMP)
-
Please ensure that the WebEngage amp-analytics tag is added only once on an AMP page. We recommend that you club all the Events that you'd like to track on the page, under the same tag (because adding the tag multiple times to track events individually will cause it to track the Event, Page Viewed multiple times for a user).
-
You can find a list of all the Events being tracked for your AMP pages under Data Management > Custom Events in your dashboard.
Filtering out AMP events from SDK eventsYou can filter out events coming from AMP pages by using the
isAMPevent. This attribute is tracked along with each event from an AMP page that contains the WebEngage AMP Analytics Integration. You use this in the Event Analytics Dashboard or while creating Segments to filter out events only from AMP pages. This is a number type attribute with a value being 1 denoting an AMP event meaning AMP event is present whenisAMP=1.
Let's walk you through a few examples to help you understand how you can implement events tracking for your AMP pages:
Example 1: Tracking Clicks on a Specific Element of Your Page
In the below code snippet we're tracking the event, Element Clicked to record each time a user clicks the HTML element with the id, test1 (ie. the CSS selector path #test1 on the page).
<amp-analytics type="webengage" id="webengage" >
  <script type="application/json">
    {
      "vars": {
        "licenseCode": "<YOUR_PROJECT_LICENSE_CODE>",
        "region": "<YOUR_DATA_CENTER_REGION>"
      },
      "requests": {
        "weClick": {
          "baseUrl": "${base}&eventName=Element Clicked&elementName=test1&attribute2Name=abc-xyz&attribute3Name=pqr-xyz"
        }
      },
      "triggers": {
        "weClickTrigger": {
          "on": "click",
          "selector": "#test1",
          "request": "weClick"
        }
      }
    }
  </script>
</amp-analytics>
With reference to the above code snippet:
-
eventNamerefers to the name of the event and can be anything you like. -
Attribute of this event is represented by the keys (i.e the attribute names):
elementName,attribute2Nameandattribute3Nameand their respective values (i.e the attribute values):test1,abc-xyzandpqr-xyz. These attribute names and values can be anything you like.
Example 2: Tracking Clicks on 2 Separate Page Elements
In the below code snippet, we have specified two separate custom events to track clicks on different elements of the page. These elements could be anything like anchor links, buttons, images, videos and so on.
<amp-analytics type="webengage" id="webengage">
  <script type="application/json">
    {
      "vars": {
        "licenseCode": "<YOUR_PROJECT_LICENSE_CODE>",
        "region": "<YOUR_DATA_CENTER_REGION>"
      },
      "requests": {
        "Click1": {
          "baseUrl": "${base}&eventName=Element Clicked&elementName=test1&attribute2Name=abc-xyz1&attribute3Name=pqr-xyz1"
        },
        "Click2": {
          "baseUrl": "${base}&eventName=Element Clicked&elementName=test2&attribute2Name=abc-xyz2&attribute3Name=pqr-xyz2"
        }
      },
      "triggers": {
        "ClickTrigger1": {
          "on": "click",
          "selector": "#test1",
          "request": "Click1"
        },
        "ClickTrigger2": {
          "on": "click",
          "selector": "#test2",
          "request": "Click2"
        }
      }
    }
  </script>
</amp-analytics>
With reference to the above code snippet:
-
The custom events,
Click1andClick2are placeholder names and can be anything you like.Click1will be tracked when a user clicks on the element,#test1.Click2will be tracked when a user clicks on the element,#test2.
-
We have used the feature selector property of AMP to configure events tracking.
Example 3: Tracking Clicks on 2 Separate Elements as Timer Trigger Events
In the below code snippet, we are tracking 2 click events and 2 timer events that are fired every 1 min (60 seconds) and 5 mins (300 seconds), respectively.
<amp-analytics type="webengage" id="webengage" >
  <script type="application/json">
    {
      "vars": {
        "licenseCode": "<YOUR_PROJECT_LICENSE_CODE>",
        "region": "<YOUR_DATA_CENTER_REGION>"
      },
      "requests": {
        "Click1": {
          "baseUrl": "${base}&eventName=Element Clicked&elementName=test1&attribute2Name=abc-xyz1&attribute3Name=pqr-xyz1"
        },
        "Click2": {
          "baseUrl": "${base}&eventName=Element Clicked&elementName=test2&attribute2Name=abc-xyz2&attribute3Name=pqr-xyz2"
        },
        "Timer1": {
          "baseUrl": "${base}&eventName=Time Spent On Page&timeSpent=1"
        },
        "Timer5": {
          "baseUrl": "${base}&eventName=Time Spent On Page&timeSpent=5"
        }
      },
      "triggers": {
        "ClickTrigger1": {
          "on": "click",
          "selector": "#test1",
          "request": "Click1"
        },
        "ClickTrigger2": {
          "on": "click",
          "selector": "#test2",
          "request": "Click2"
        },
        "TimerTrigger1": {
          "on": "timer",
          "timerSpec": {
            "interval": 60,
            "maxTimerLength": 1800
          },
          "request": "Timer1"
        },
        "TimerTrigger5": {
          "on": "timer",
          "timerSpec": {
            "interval": 300,
            "maxTimerLength": 1800
          },
          "request": "Timer5"
        }
      }
    }
  </script>
</amp-analytics>
With reference to the above code snippet:
-
The Custom Events,
Click1andClick2will be tracked as and when a user clicks on the specified elements -#test1and#test2, respectively. -
The Custom Event,
Timer1will be tracked for a user after 1 min (interval = 60 seconds), only if the conditions specified under"TimerTrigger1"are met. -
Similarly, the Custom Event,
Timer5wil be tracked for a user after 5 mins (interval = 300 seconds), only if the conditions specified under"TimerTrigger1"are met. If not, then the event will not be fired.
Congratulations!You have successfully intergated your AMP pages with WebEngage and are tracking Page Views and specific Events performed by your users. Please note that it may take up to a few minutes for this data to reflect in your dashboard.
Please feel free to drop in a few lines at [email protected] in case you have any further queries. We're always just an email away!
Updated 3 months ago