Unity.Android
This Unity Package is only for Android and will not work on any other platform
1. Installation
For a Fresh Installation
Step 1: Download the WebEngageUnityAndroid.unitypackage
Step 2: Import the downloaded unitypackage into your Unity project through Assets > Import Package > Custom Package
Step 3: Replace the AAR file at Assets/Plugins/Android/webengage-android-unity-X.X.X.aar with the latest webengage-android-unity.aar.
Upgrading WebEngage SDK from 3.18.0 to 3.20.+You need to add the dependency for [HTML cleaner] (https://mvnrepository.com/artifact/net.sourceforge.htmlcleaner/htmlcleaner) to support rich push notification.
Kindly add the artifact toAssets/Plugins/Android/
Updating the Native WebEngage SDK within the Unity Wrapper
Replace the AAR file at Assets/Plugins/Android/webengage-android-unity-X.X.X.aar with the latest webengage-android-unity.aar.
2. Initialization
Step 1: Add the following meta-data tags in the Assets/Plugins/Android/AndroidManifest.xml file of your Unity project.
<?xml version="1.0" encoding="utf-8"?>
<manifest
    ...>

    <application
    	...>

	    <meta-data android:name="com.webengage.sdk.android.key" android:value="YOUR-WEBENGAGE-LICENSE-CODE" />

	    <!-- true if development build else false -->
	    <meta-data android:name="com.webengage.sdk.android.debug" android:value="true" />

	    ...
	</application>
</manifest>
If the AndroidManifest.xml file does not exist in the Assets/Plugins/Android/ directory of your Unity project, then you can create a new AndroidManifest.xml file and copy the below code snippet in it.
<?xml version="1.0" encoding="utf-8"?>
<manifest
    xmlns:android="http://schemas.android.com/apk/res/android"
    xmlns:tools="http://schemas.android.com/tools">

    <application
        android:label="@string/app_name"
        android:icon="@drawable/app_icon">

        <meta-data android:name="com.webengage.sdk.android.key" android:value="YOUR-WEBENGAGE-LICENSE-CODE" />

        <meta-data android:name="com.webengage.sdk.android.debug" android:value="true" />

        <activity
            android:name="com.unity3d.player.UnityPlayerActivity"
            android:configChanges="fontScale|keyboard|keyboardHidden|locale|mnc|mcc|navigation|orientation|screenLayout|screenSize|smallestScreenSize|uiMode|touchscreen">

            <intent-filter>

                <action
                    android:name="android.intent.action.MAIN" />

                <category
                    android:name="android.intent.category.LAUNCHER" />

                <category
                    android:name="android.intent.category.LEANBACK_LAUNCHER" />
            </intent-filter>

            <meta-data
                android:name="unityplayer.UnityActivity"
                android:value="true" />
        </activity>
    </application>
</manifest>
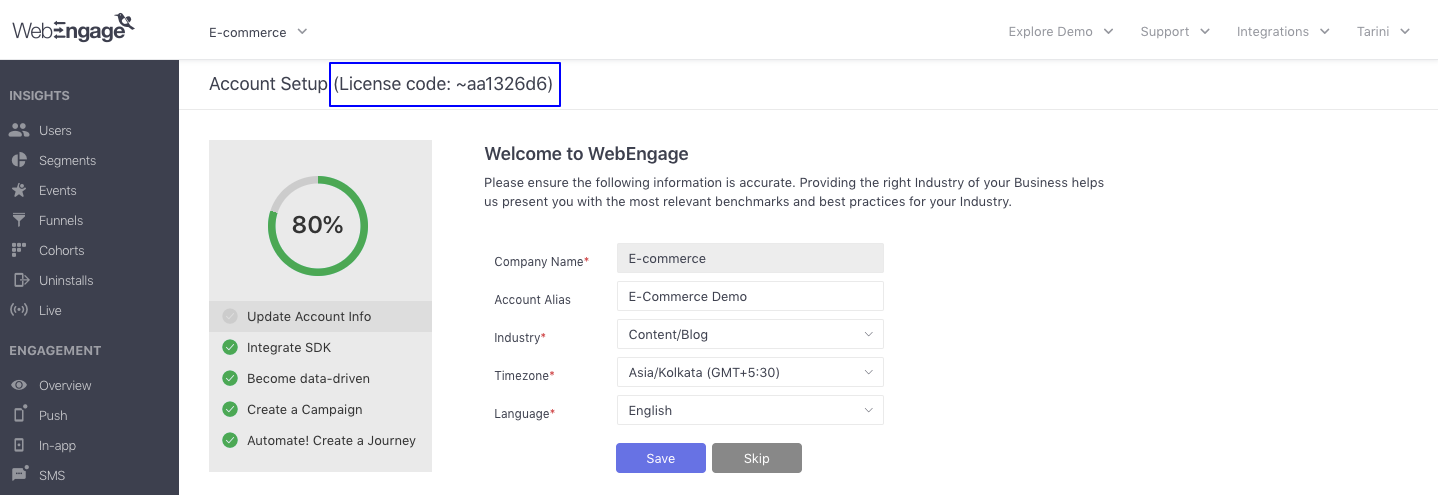
Make sure you replaceYOUR_WEBENGAGE_LICENSE_CODE with your WebEngage license code. As shown below, naviagte to the Account Setup section to find your license code.

Locating your WebEngage license code
Step 2: Initialize the WebEngage SDK at start of your application.
using WebEngageBridge;
...

public class YourScript : MonoBehaviour
{
    private void Awake()
    {
        WebEngage.Engage();
        ...
    }
    ...
}
3. Attribution Tracking
Step 1: Make sure that you are using webengage-android-unity.aar version 3.16.0 or above.
Step 2: Download the latest version of Android Install Referrer library (aar).
Step 3: Add the aar file to your Unity project at the location /Assets/Plugins/Android/installreferrer-X.X.X.aar.
Please note
App Installedevent andFirst Acquisition Detailsdata in user profile will not be tracked on your Android app unless you follow the above step.
Congratulations!You have successfully integrated WebEngage with your app and are sending user session data to WebEngage. Please note that it may take up to a few minutes for data to reflect in your dashboard.
Please feel free to drop in a few lines at [email protected] in case you have any further queries. We're always just an email away!
Updated 3 months ago
We recommend that you implement the following integrations with your app before releasing it with WebEngage for the first time: