Getting Started
The WebEngage SDK allows you to track user behavior, manage user profiles, and deliver personalized push and in-app messages. This guide covers the minimum steps to get the SDK running in your iOS app.
What this guide completes:
- Installation: Adding the SDK via SPM or CocoaPods.
- Configuration: Setting your License Code and Data Center.
- Verification: Confirming the SDK is successfully sending data.
Prerequisites
Before we begin, ensure you have the following:
- Xcode 14.1 or later.
- An iOS project targeting iOS 12.0 or later.
1. Identify your region
Your data is stored in a specific Data Center based on your account location. You must define this region for the SDK to initialize successfully.
| Dashboard Host URL | Region | SDK Config value (Region specifc) |
|---|---|---|
| dashboard.webengage.com | Global Data Center (US) | US |
| dashboard.in.webengage.com | India Data Center (IN) | IN |
| dashboard.ksa.webengage.com | Saudi Arabia Data Center (KSA) | KSA |
| dashboard.eug.webengage.com | Europe Frankfurt (EUG) | EUG |
Note: Depending on your host URL above, you will use the corresponding SDK config value: .US, .IN, or .KSA, .EUG
2. Locate your WebEngage License Code
- Log in to your WebEngage Dashboard.
- Navigate to Settings → Project.
- Copy your License Code (e.g.,
abcd1234).
Finding your WebEngage License Code
SDK Installation
Integration through Swift Package Manager
Swift Package Manager (SPM) is a tool for managing the distribution of Swift code. It’s integrated with the Swift build system to automate the process of downloading, compiling, and linking dependencies.
To install the SDK through SPM, follow the below steps:
-
Open the project in XCode.
-
Navigate to File -> Add Package Dependencies.
-
Enter repository URL:
https://github.com/WebEngage/webengage-ios-sdk.git -
Under the dependency rule, select Branch > mainor Up to Next Major Version > select the versionand click Add Package.
-
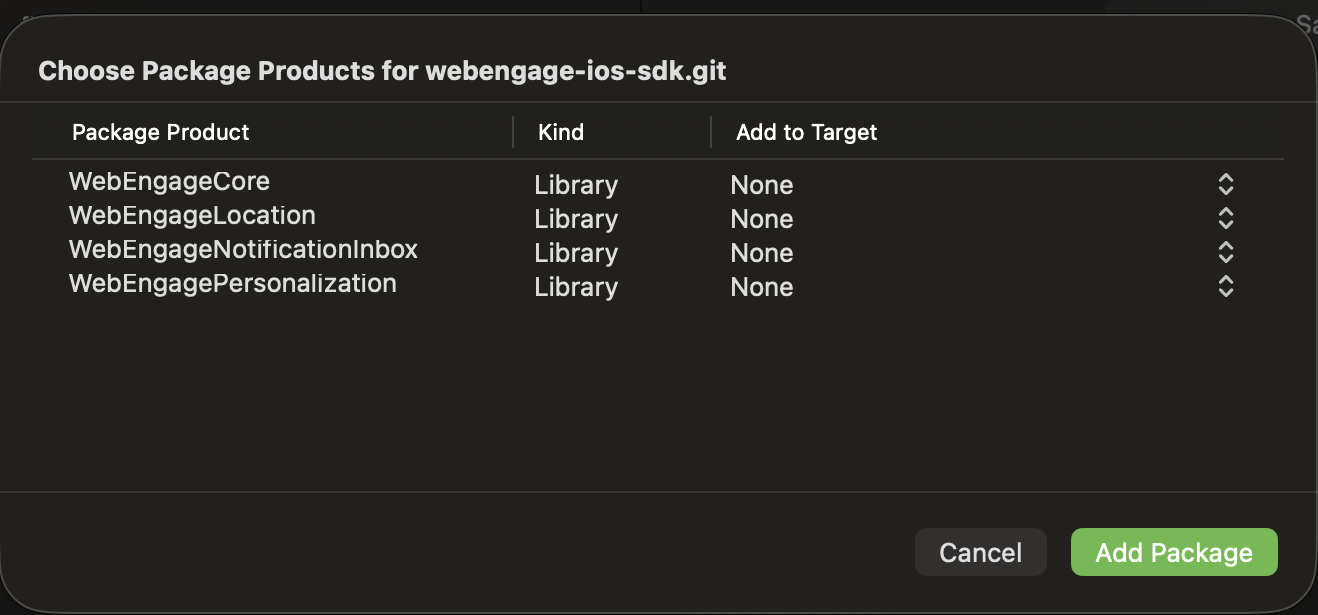
Choose Package Products from the list.
-
Packages mapping : Choose the products you need from the list:
Package Requirement Description WebEngageCoreRequired Base SDK for user tracking, events, and screen tracking. WebEngageLocationOptional Enables location‑based tracking and region‑aware campaigns. WebEngagePersonalizationOptional App In-line Content allows you to insert content directly into your app's screen without disturbing the user experienceSupports App In-line content. WebEngageNotificationInboxOptional Notification Inbox is a powerful feature through which your users can have a unified and streamlined notification experience, where they can easily access and manage their notifications in one place.
-
-
Under Add to Target select the SDK you want to integrate.
Information
CocoaPods is being deprecated. WebEngage recommends using Swift Package Manager for all new integrations. If your project requires CocoaPods, see the CocoaPods Integration Guide.
SDK Initialization
To integrate WebEngage into your iOS app, you must first configure your Info.plist and then initialize the SDK in your AppDelegate. You can choose between two approaches depending on whether you want a static or dynamic setup.
- Approach 1 : Configuration in Info.plist (Static)
- Approach 2: Configuration in Builder pattern (Dynamic)
Choose one of the two methods below to start the SDK within your
Choose only one of the two options below. Do not implement both methods in your project, as this will lead to initialization conflicts.
Approach 1 : Configuration in Info.plist (Static)
Use this if you prefer keeping all configurations in your Plist file. The SDK will automatically read the license code and environment from the keys defined in plist.
Core Configuration Keys : add these keys to your Info.plist
| Key | Type | Description |
|---|---|---|
WEGLicenseCode | String | Your unique WebEngage license code. |
WEGEnvironment | String | DEFAULT (US), IN (India), KSA (Saudi Arabia), or EUG (Europe Franfurt) |
WEGLogLevel | String | DEFAULT or VERBOSE (for detailed debugging). |
WEGAlternateAppSupport | Boolean | Set to YES if running multiple apps under one License Code. |
Add below code in AppDelegate file
func application(_ application: UIApplication, didFinishLaunchingWithOptions launchOptions: [UIApplication.LaunchOptionsKey: Any]?) -> Bool {

    // Initializing WebEngage SDK
    WebEngage.sharedInstance().application(application, didFinishLaunchingWithOptions: launchOptions)

    return true
}
Approach 2 : Available in only version 6.20.0 and above
Use this approach if you need to set configurations programmatically.
Note: Values set here will override the corresponding values in your Info.plist.
The builder pattern initialization is available only from v6.20.0 and above; earlier versions must use the basic Info.plist based approach
// 1. Setup Configuration
let config = WebEngageConfig.builder()
    .setLicenseCode("LICENSE_CODE")
    .setEnvironment(.US) // .US, .IN, EUG, or .KSA based on your data center
		.setReportingStrategy(.Buffer)
    .setDebugMode(true) // Enable debug logs (disable for production)
    .setApnRegister(true)
    .setNotificationDelegate(self)
    .build()

// 2. Initialize SDK
WebEngage.sharedInstance().application(UIApplication.shared,
                                              didFinishLaunchingWithOptions: launchOptions,
                                              webengageConfig: config)
Configuration Mappings
| Property | Method | Description |
|---|---|---|
| License Code | setLicenseCode: | Your unique WebEngage Project ID. |
| Debug Mode | setDebugMode: | Set to YES to see detailed SDK logs in Xcode. |
| Region/Env | setEnvironment: | Defines the Data Center (.US, .IN, .KSA, or EUG). |
| Reporting | setReportingStrategy: | Controls how often data is synced (.Buffer or .ForceSync). |
| APNs Register | setApnRegister: | Set to YES to let WebEngage handle Push token registration automatically. |
Verify Integration
Once you’ve added the code, run your app on a physical device or simulator.
-
Check Xcode Logs: Open the Xcode console and filter for [WebEngage]. You should see:
Verification complete. WebEngage SDK initiated.
-
Dashboard Check: Go to your WebEngage Dashboard → Data Platform → Integrations. Your iOS SDK Set up status should show
successin sometime.
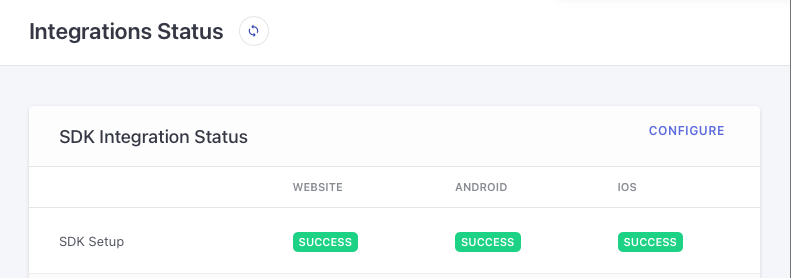
WebEngage Dashboard → Data Platform → Integrations
Updated about 1 month ago
So, what's next?
We recommend that you implement the following integrations before releasing your app with WebEngage SDK for the first time: