Configuring 1-step Opt-in
A step-by-step guide to setting up Web Push opt-in (Only for HTTPS domains)
Please NoteThis document is an extension of Web Push channel configuration. Please ensure the following before proceeding:
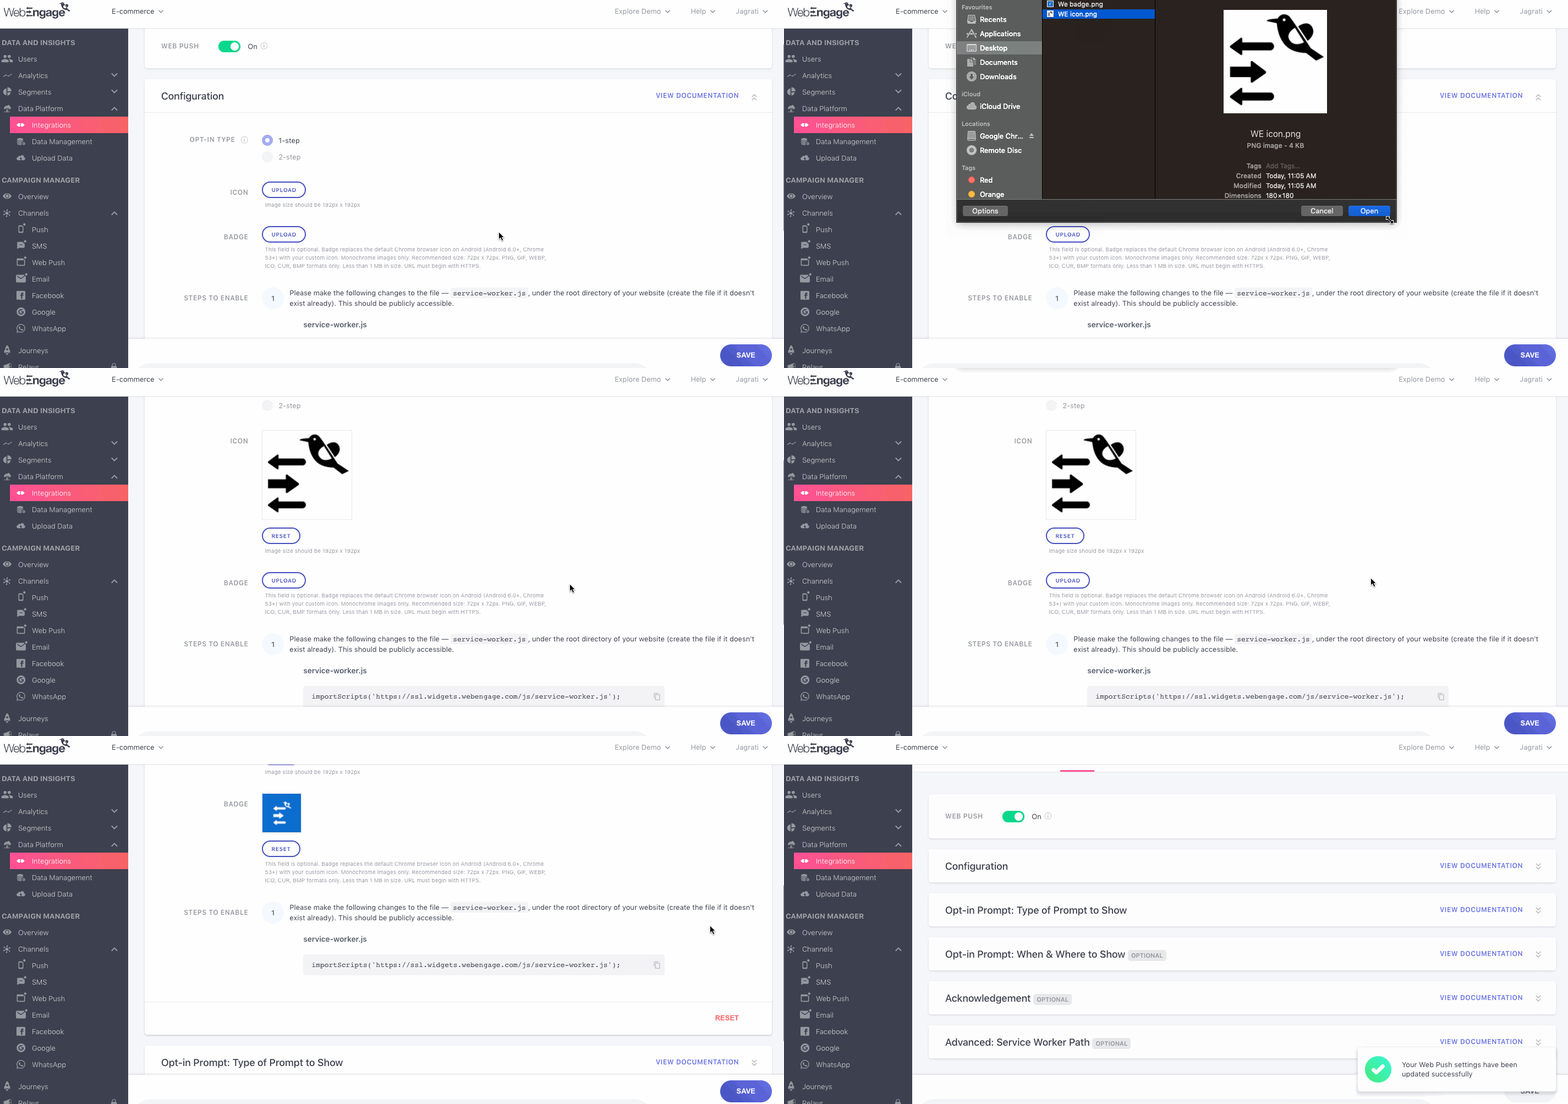
Click to enlarge
As shown above, here are a few mandatory steps to enable 1-step opt-in for your users:
Step 1: Upload Icon & Badge
(Badge is applicable only to Chrome v56+ x Android v6+)
Step 1: Upload your site icon. It'll be shown in all your Web Push Notifications by default.
- You can always choose to add a dynamically personalized icon while creating the campaign. (Step-by-step guide)
Step 2: You can also choose to show your custom site badge (instead of Chrome's logo) in Web Push Notifications that are delivered to Chrome x Android users by uploading it here. (Or you couldadd it while creating the Web Push campaign.)
- A few guidelines for uploading the custom badge:
- The badge must be monochrome as RGB colors are not supported by the OS browser.
- We recommend a width:height ratio of 1:1 with the ideal image size being 72px by 72px.
- Please upload the image in .png, .gif, .webp, .ico, .cur, .bmp formats only, in a file size not exceeding 1MB.
Step 2: Add Code to the Root Directory of Your Website
Add the below code snippet in the service-worker.js file under the root directory of your website.
If You're Using WebEngage's Global Data Center: All your data is stored in our Global Data Center by default. Thus, if your dashboard URL starts with dashboard.webengage.com, then it means you're using our US Data Center.
importScripts('https://ssl.widgets.webengage.com/js/service-worker.js');If You're Using WebEngage's India Data Center: You will need to specifically request for your data to be stored in our India Data Center in your contract with WebEngage. Thus, if your dashboard URL starts with dashboard.in.webengage.com, then it means you're using our India Data Center.
importScripts('https://widgets.in.webengage.com/js/service-worker.js');If You're Using WebEngage's Saudi Arabia Data Center: You will need to specifically request for your data to be stored in our Saudi Arabia Data Center in your contract with WebEngage. Thus, if your dashboard URL starts with dashboard.ksa.webengage.com, then it means you're using our Saudi Arabia Data Center.
importScripts('https://widgets.ksa.webengage.com/js/service-worker.js');- Please create a service worker file if it doesn't exist.
- Please ensure that the
service-worker.jsfile is publicly accessible to ensure that you can send Web Push campaigns through your WebEngage dashboard. - If you’re already registering your own service worker, then please set
webpush.registerServiceWorkertofalseso that WebEngage can stop registering the same service worker. (How to implement configuration flags)
Congratulations!Web Push Opt-in has been set up for your account! You can now start creating Web Push campaigns for all your subscribers.
OR
Step 3 (Optional): Select Opt-in Prompt Type
By default, all 1-Step Opt-In prompts are shown as per Box prompt. You can change this prompt type to another prompt type as per the steps below.
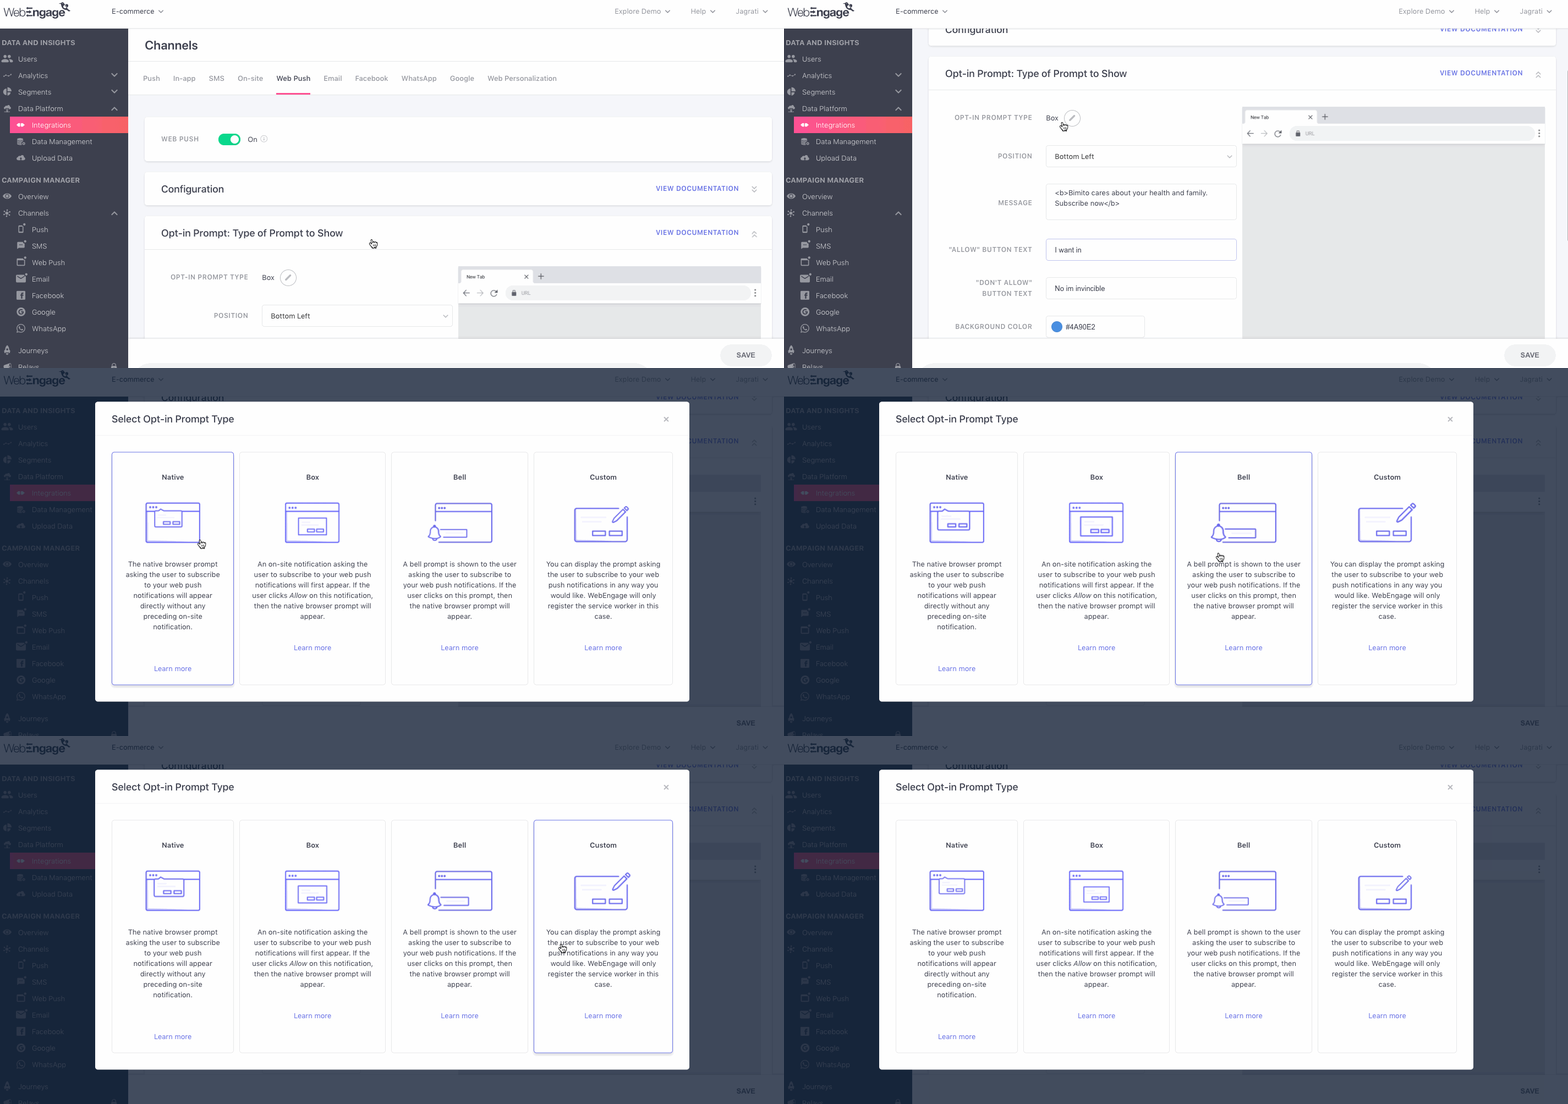
Click to enlarge
As shown above:
Step 1: Click the Edit icon placed next to the field, Opt-in Prompt Type.
Step 2: Select a style - Native/ Box/ Bell/ Custom.
Let's quickly walk you through all the prompt styles:
Native
Highlight: Easy 1-click opt-in for users, no fuss.
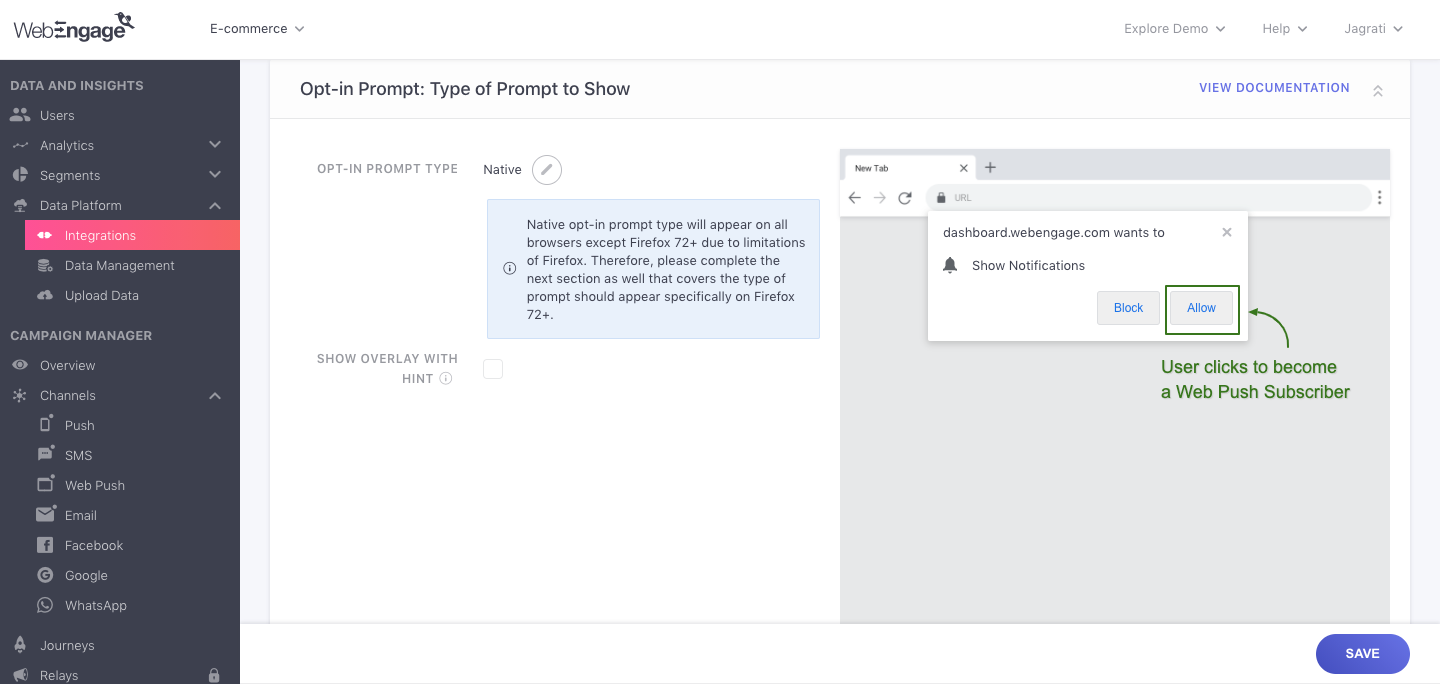
Click to enlarge
As shown above, the native browser-based prompt will appear on the top left under the search bar of the browser. Users will need to click on the Allow button to subscribe to your Web Push Notifications.
Please NoteThe Native Prompt will appear on all browsers except Firefox 72+ due to certain permission restrictions..
Thus, you will Therefore, if you select Native opt-in prompt type, you will have to complete an additional section in the channel configuration that specifies how the opt-in prompt should appear on Firefox 72+ as per the steps here.
Customizing Native Prompt
Enable Show Overlay With Hint to block the screen background and draw attention to the prompt with a message. In doing so, desktop users will experience the Box Prompt as shown below. (not applicable to mobile browsers)
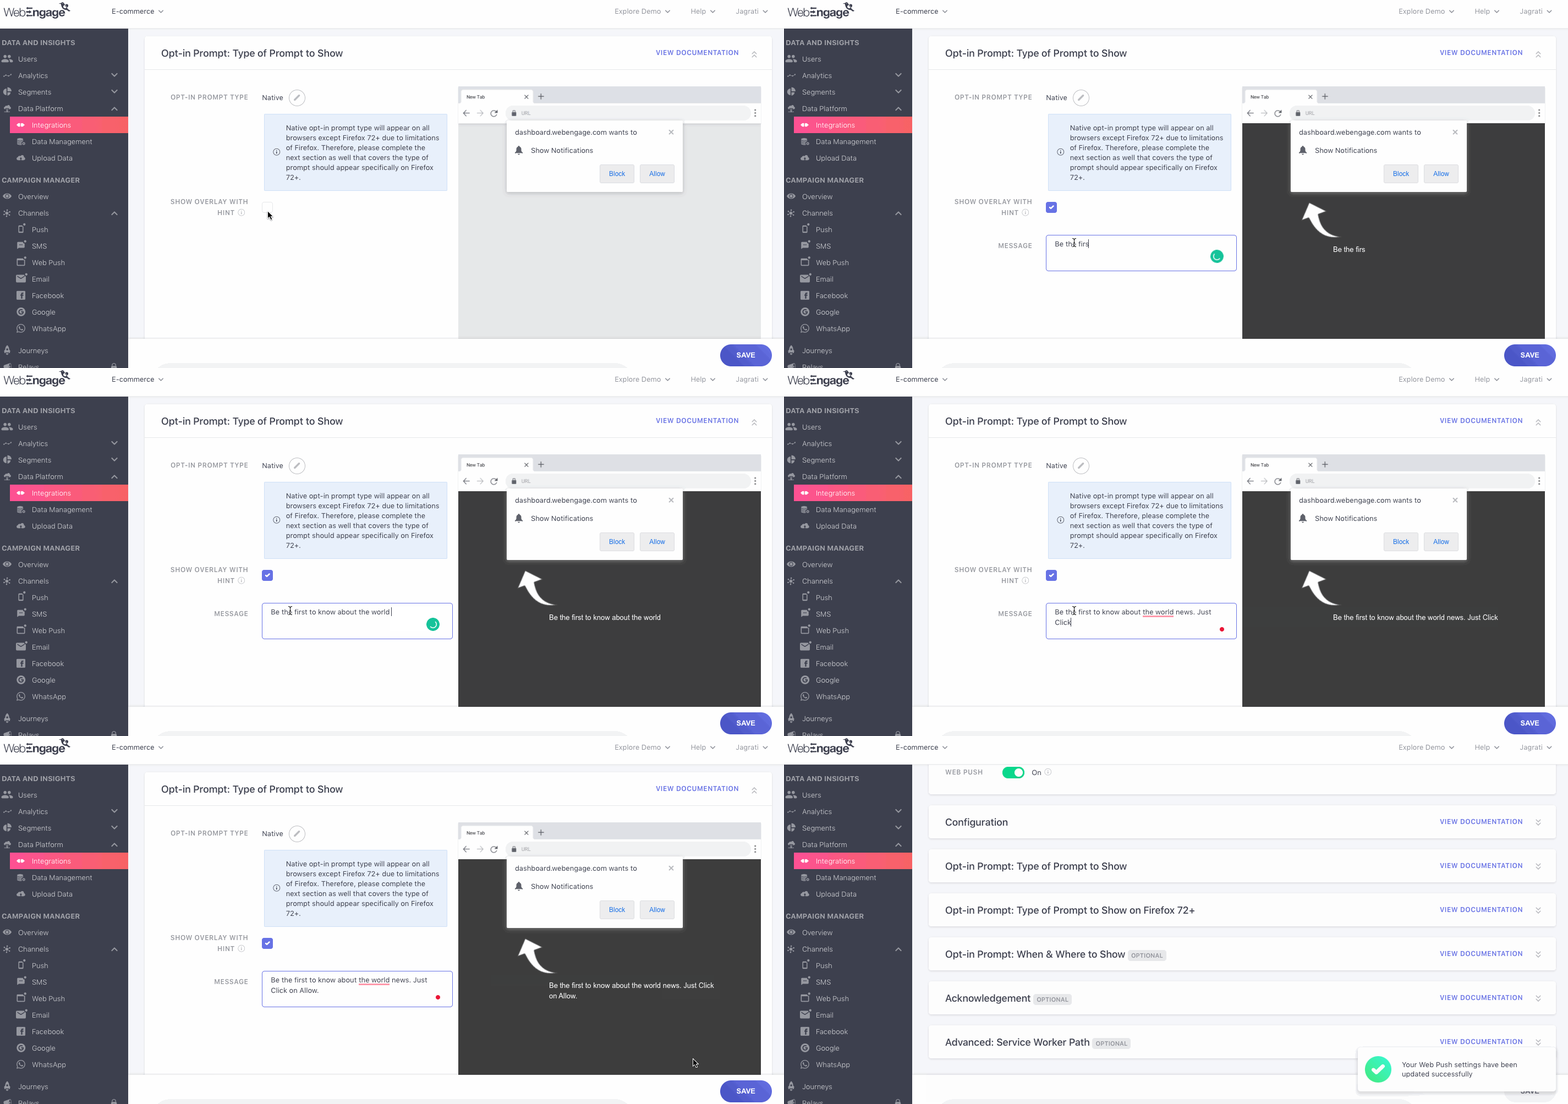
Click to enlarge
Box
Highlight: Conveys the value proposition of subscribing to your Web Push Notifications through a brief message.
Click to enlarge
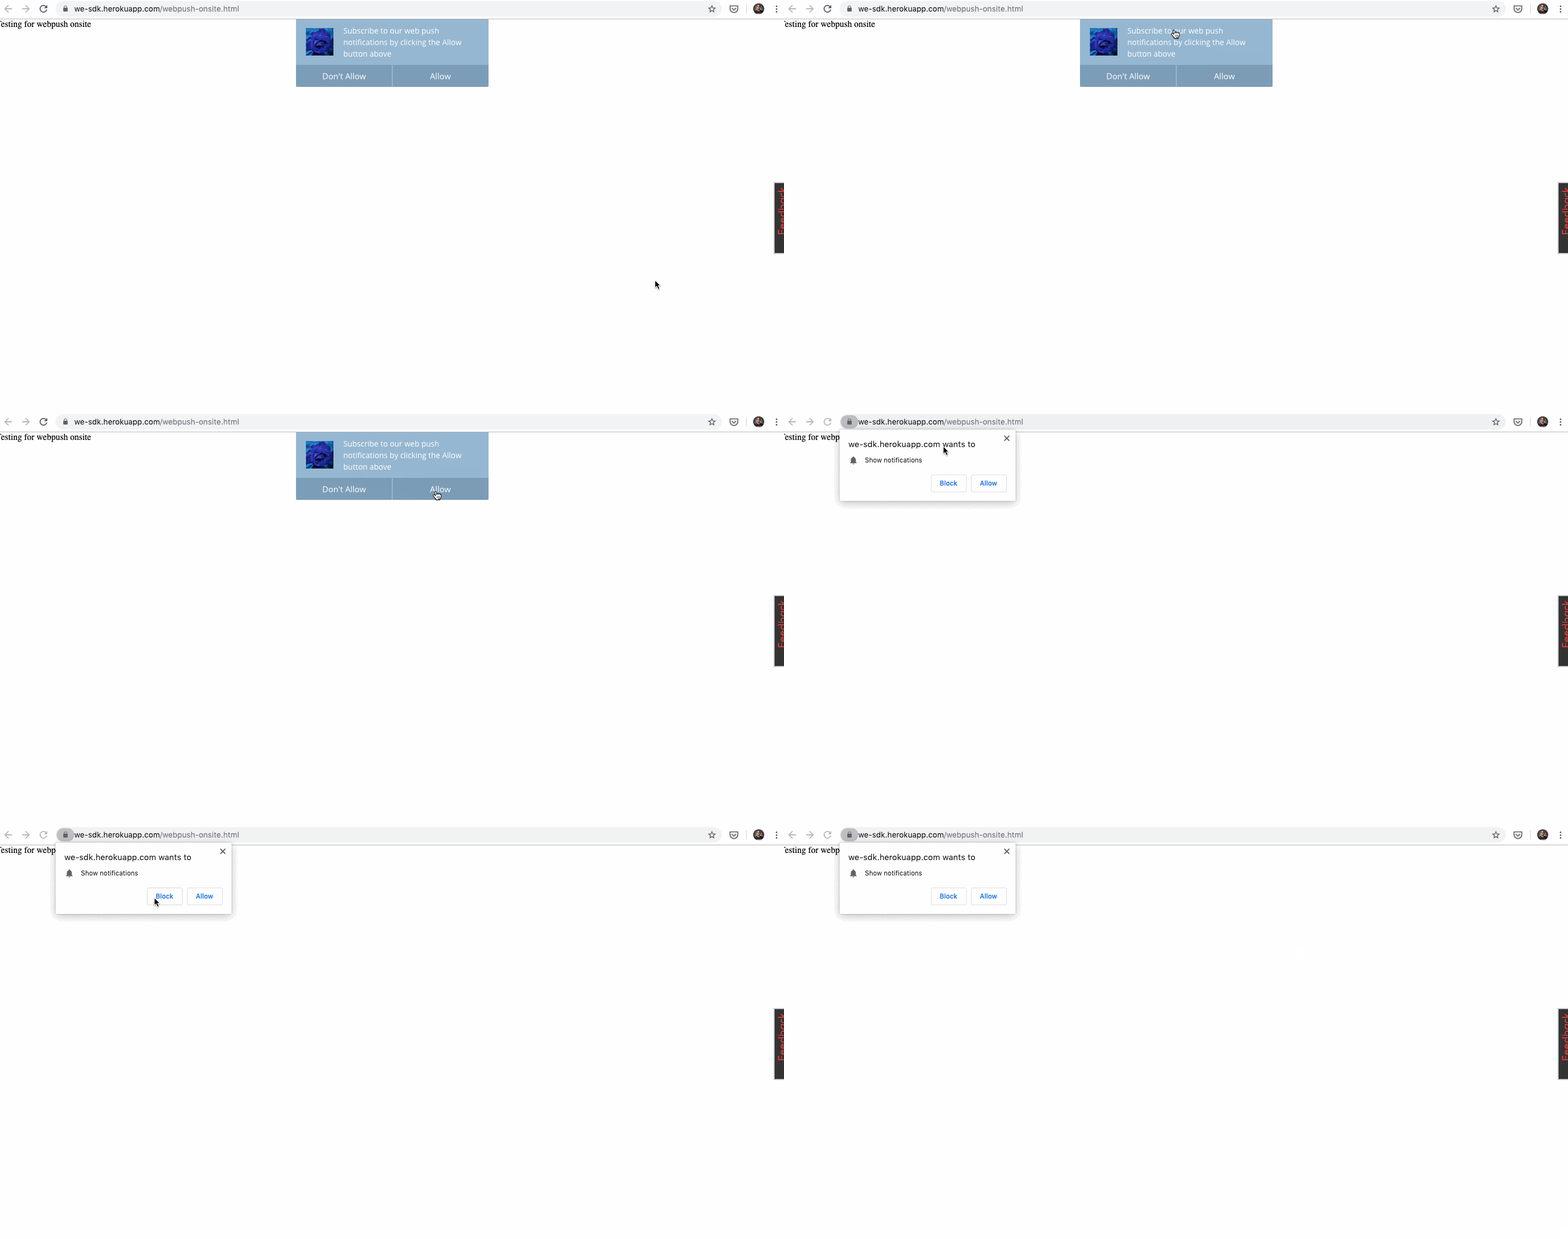
As shown above, users will first see a Box Prompt, nudging them to subscribe to your channel.
- If the Allow button is clicked, then the user will be shown the Native Browser Prompt.
- Users will need to confirm their subscription by clicking the Allow button on the native prompt.
- If a user clicks Allow on the Box Prompt and Don't Allow on Native Browser Prompt, then they will remain unsubscribed.
Customizing Box Prompt
Let's quickly walk you through how you can customize the Box Prompt's appearance, text, and functionality as per your needs.
Click to enlarge
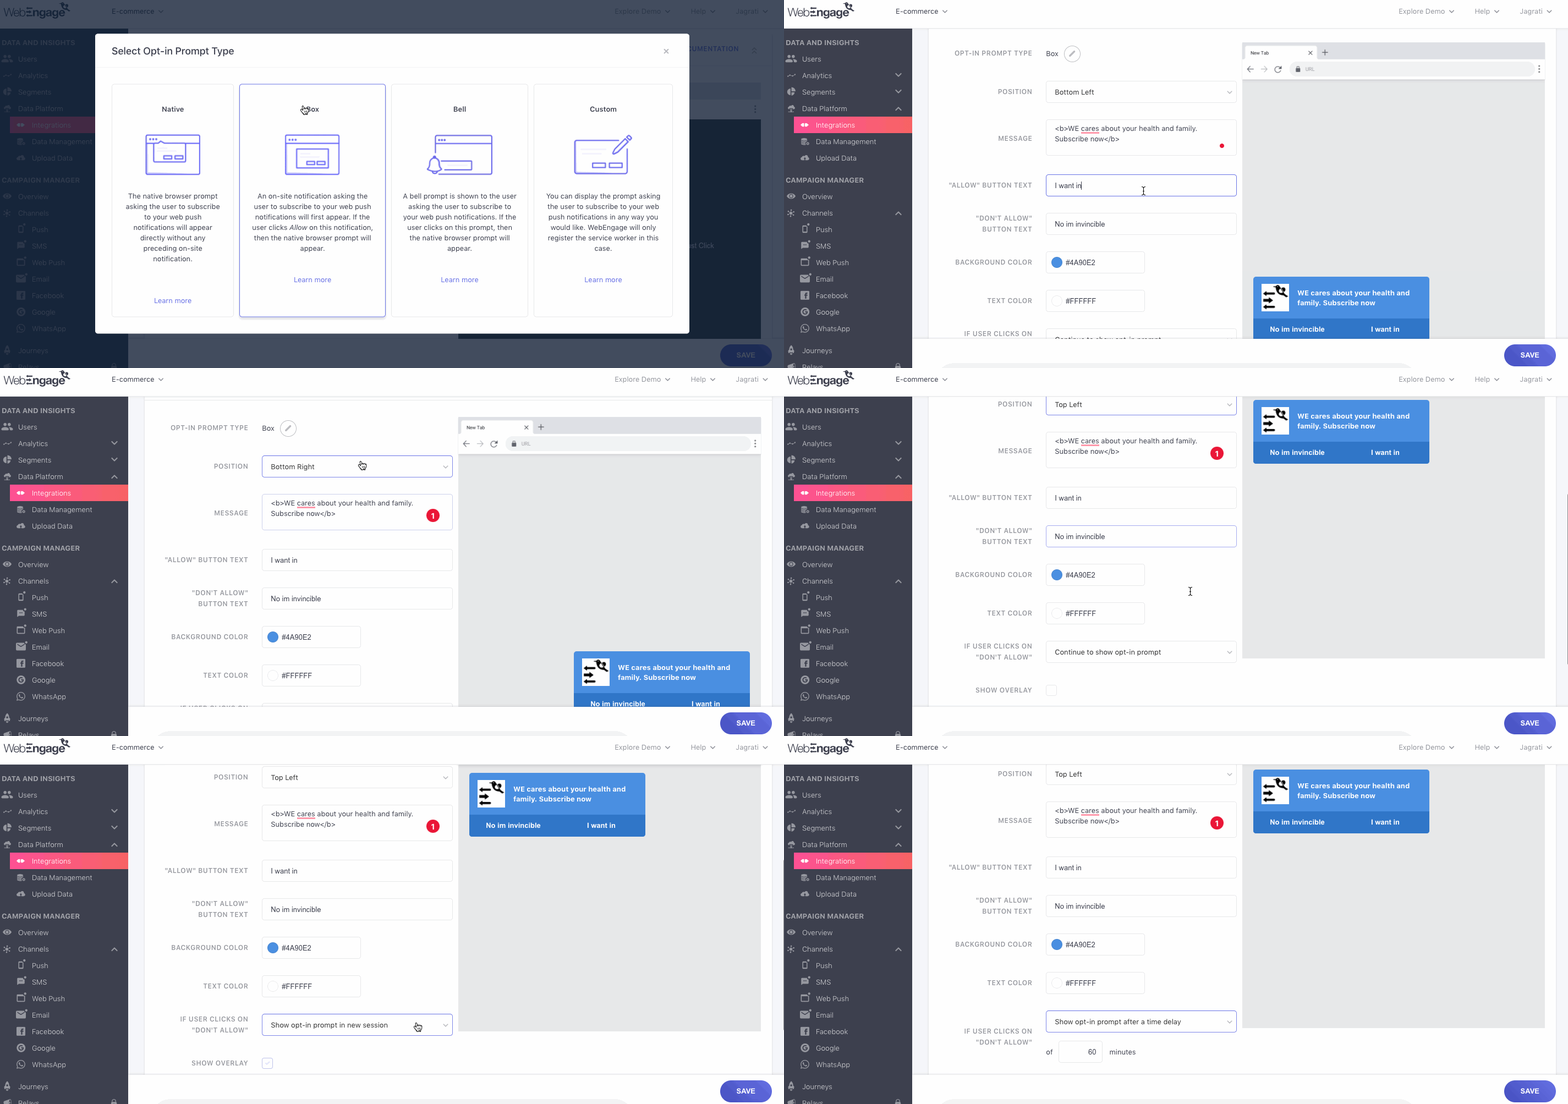
As shown above:
Step 1: Customize the bell icon's position by selecting an option from the field, Position.
Step 2: Add a custom message for the prompt in the field, Message.
Step 3: Change the Allow Button Text to something more warm and friendly.
Step 4: Change the Don't Allow Button Text to something less dismissive.
Step 5: Customize the Box Prompt's background and text as per your brand guidelines through the fields, Background Color, and Text Color, respectively.
Step 6 (Important): Determine what happens when a user clicks theDon't Allow Button on the Box Prompt. (By default, we will continue to them the opt-in prompt each time they visit your website or specified webpage/s.)
The following options can be selected here:
Never show opt-in prompt again
Show opt-in prompt in a new session
- Show opt-in prompt after a time delay of
<enter duration in minutes>Continue to show opt-in prompt
Step 5: EnableShow Overlay _to block the screen background and draw attention to the _Box Prompt. In doing so, desktop users will experience the Box Prompt as shown above.
Step 6: If Show Overlay is enabled, then enabling the field, Hide Prompt If Overlay is Clicked helps you ensure that notification gets dismissed on doing so. (Most users would rather click where their mouse was before the prompt appeared instead of navigating to the Don't Allow button to dismiss it.)
Bell
Highlight: Minimally intrusive, doesn't disrupt your user's browsing experience.
Bell prompt
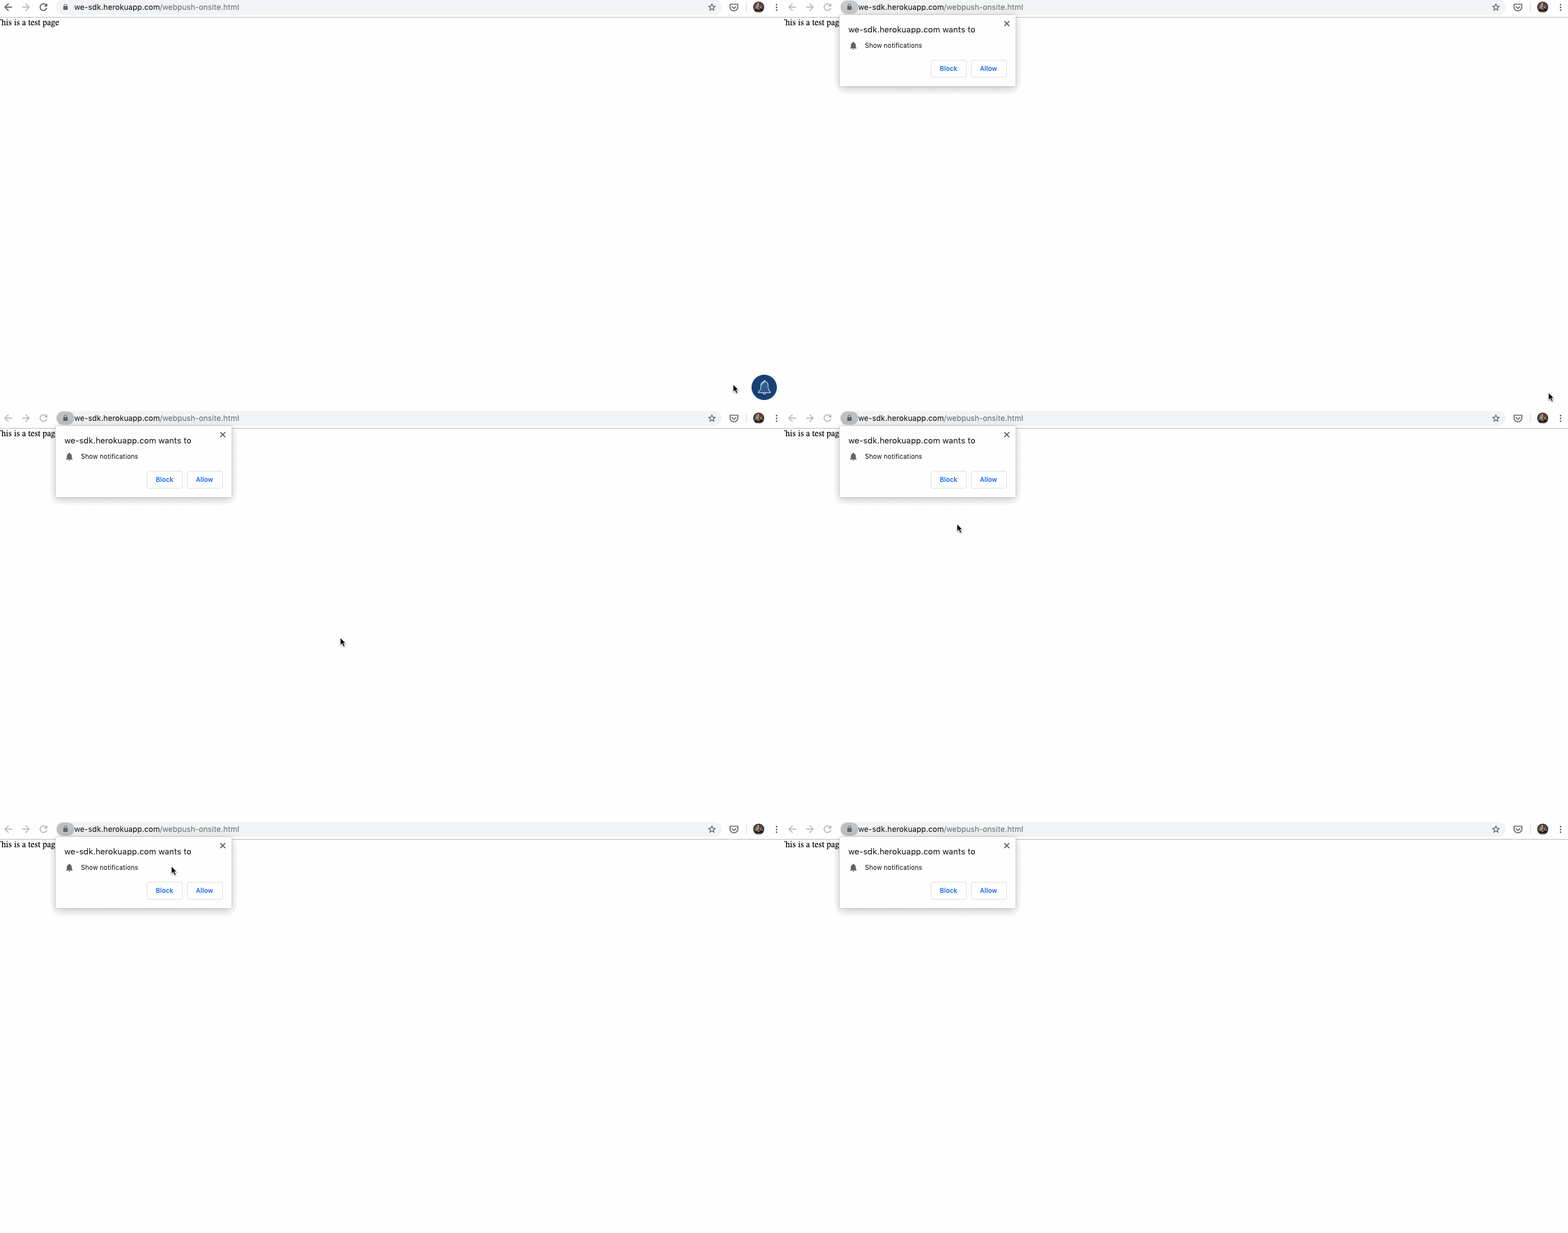
As shown above, users will first see a Bell Prompt nudging them to subscribe to your channel.
- If the Allow button is clicked, then the user will be shown the Native Browser Prompt.
- Users will need to confirm their subscription by clicking the Allow button on the native prompt.
Customizing Bell Prompt
Click to enlarge
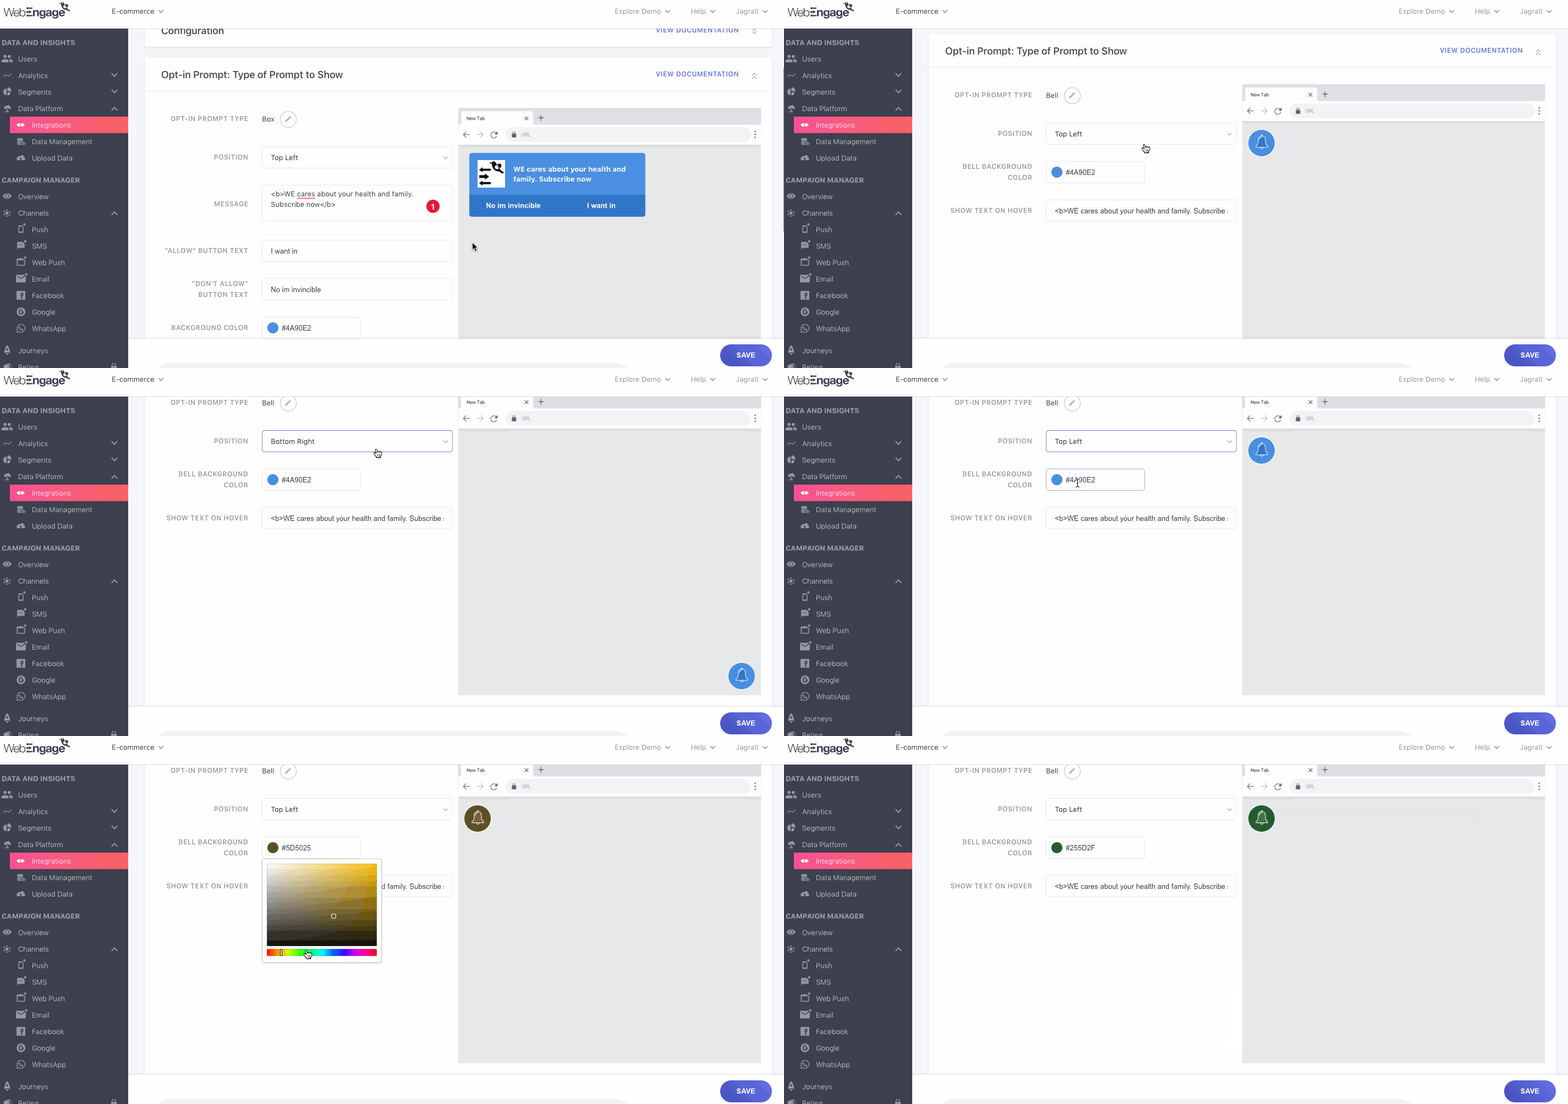
As shown above:
Step 1: Define Bell icon's position by selecting an option from the field, Position.
Step 2: Customize Bell icon's color by selecting a shade from the Bell Background Color palette.
Custom
You can control how and when the Native Browser Prompt is shown to your users by selecting this option.
However, in this case, WebEngage will not show the prompt to your users, we will only register the service worker. You will need to use our JavaScript API to customize, trigger, and show the prompt to nudge users to subscribe.
Step 3 (Additional): Select Opt-in Prompt Type for Firefox & Safari 16+
(Applicable only if you selectNative prompt in the previous step).
Firefox and Safari 16+ do not allow the native browser opt-in prompt to be shown without explicit permission from a user. Hence, you will need to set up a preceding opt-in prompt for it. *(Detailed read on Mozilla's permission restrictions & Safari browser support)
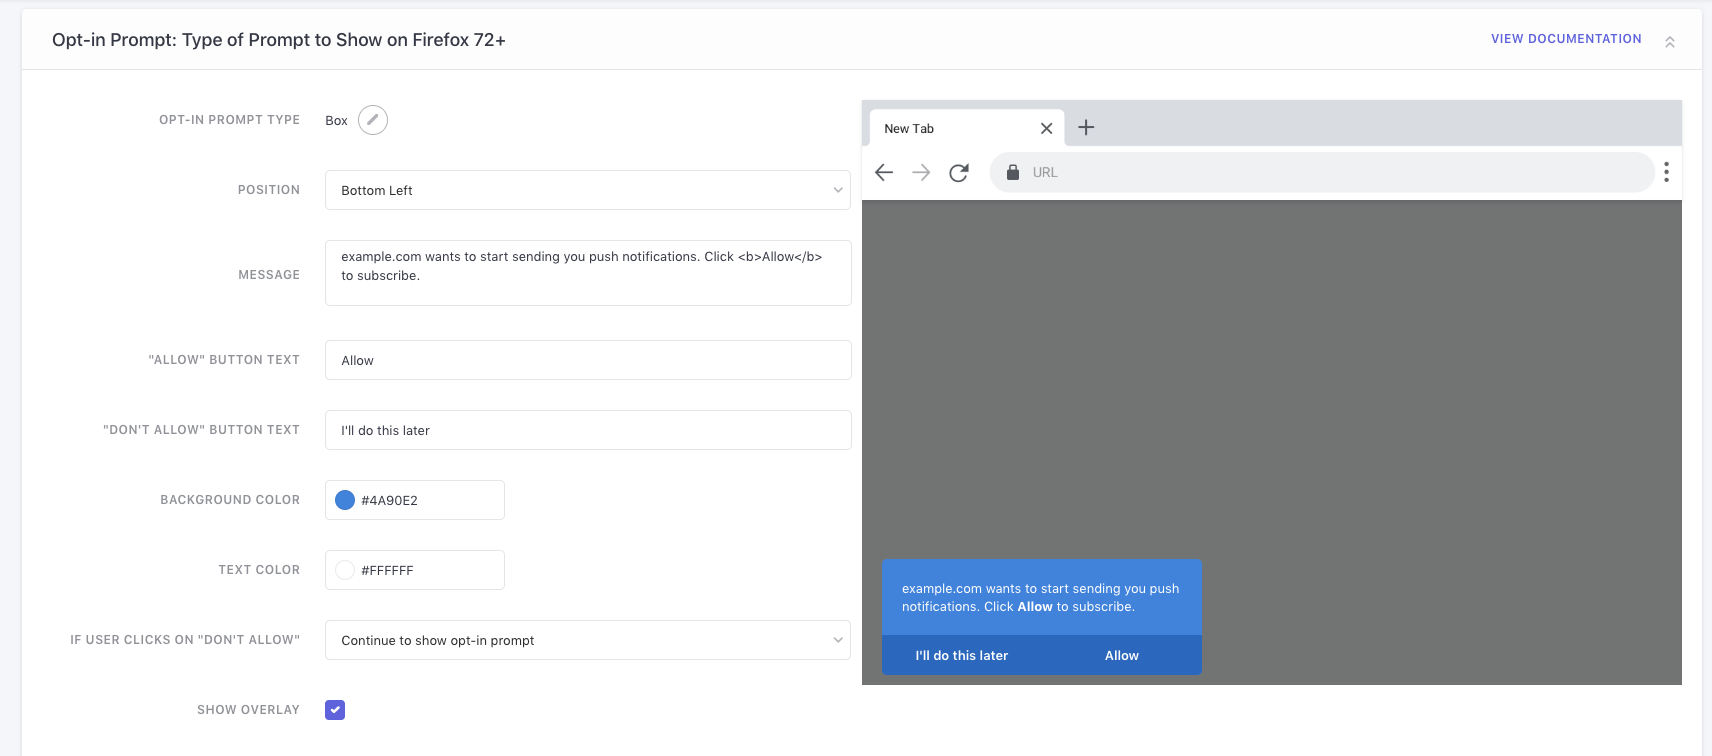
As shown above, using this section you can set up to a Box or Bell prompt to obtain permission for triggering the Native opt-in prompt. The Native prompt will continue to be displayed as it is on all other browsers including Firefox v71 and all lower versions.
WebEngage integration snippet update for enabling Safari Web Push
To enable web push for Safari, add the below script in WebEngage integration snippet:
webengage.options("safariWebPush",true)Step 4 (Optional): Define When & Where To Show
By default, the Opt-in prompt is shown to all users as soon as they start their session on any webpage. It's shown each time an unsubscribed user re-visits your site.
Using this section, you can modify the default settings by specifying:
- The type of users that must be engaged with the prompt. (How it works)
- The page(s) on which it must be displayed (Where). (How it works)
- The context (When) in which a user must be shown the opt-in prompt. (How it works)
Here's how you can configure it:
Step 4.1: Define Whom To 'Show To'
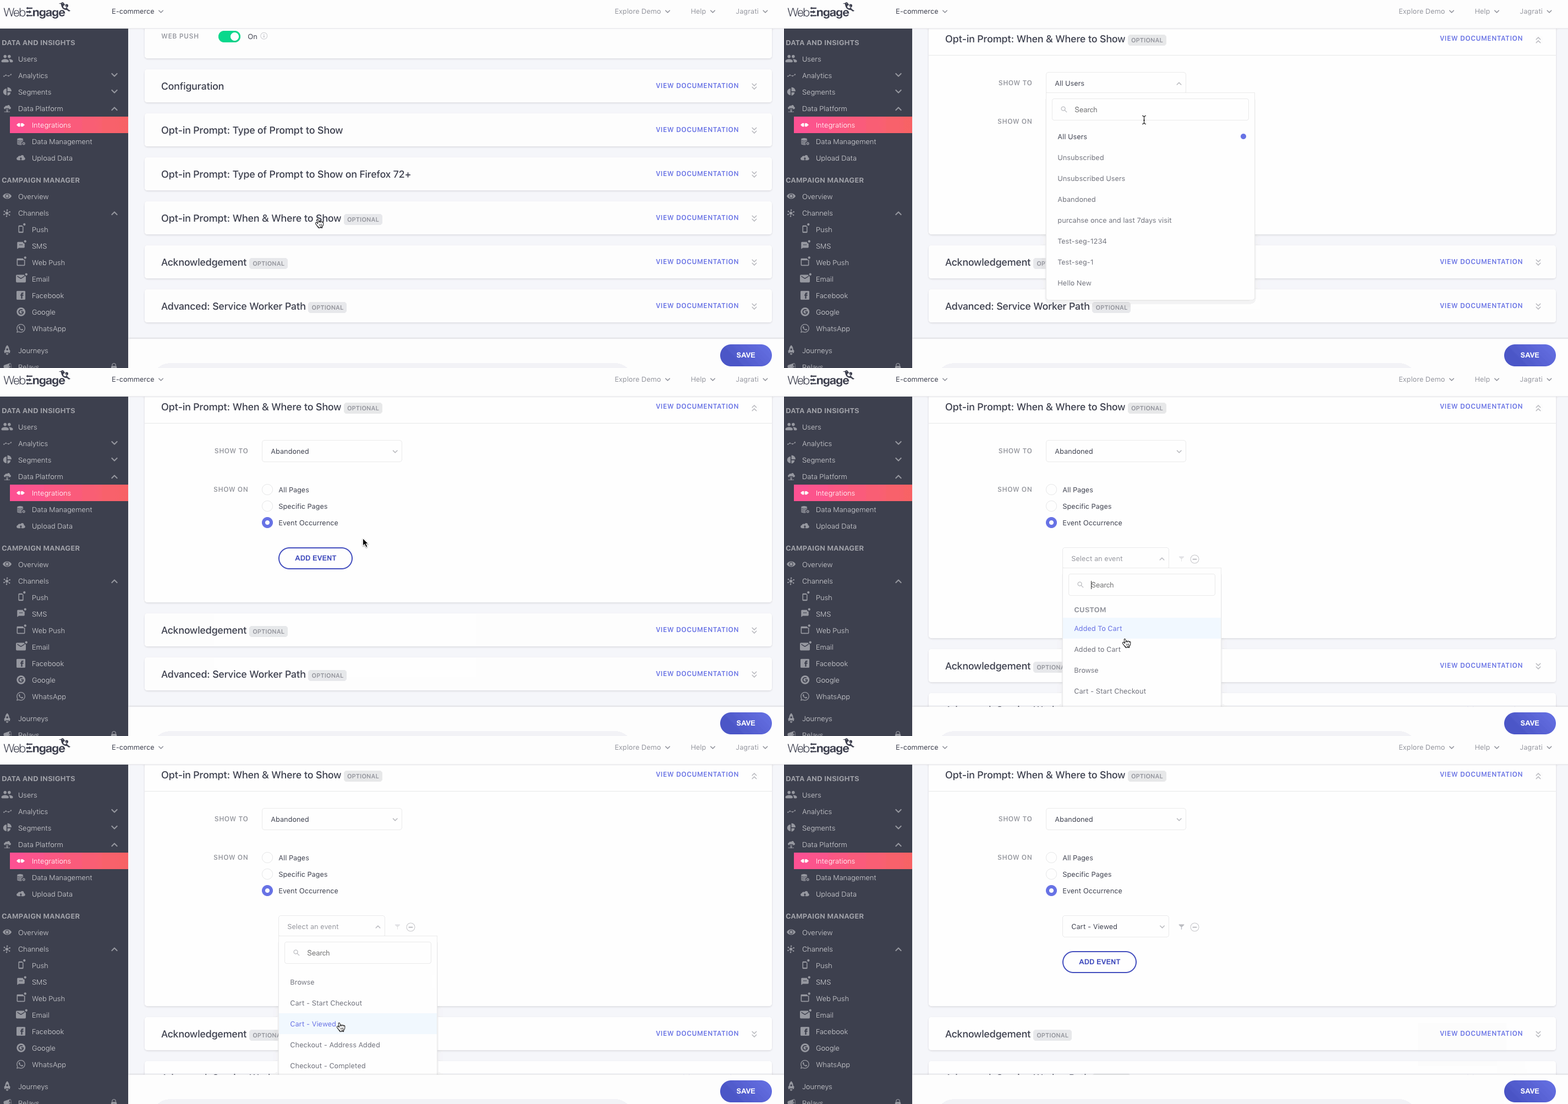
Click to enlarge
By default, the Web Push opt-in prompt is shown to all your users. However, you can choose to narrow down the target audience by selecting a segment from the dropdown, as shown above.
- This can be changed anytime you like and will not affect the existing list of subscribers.
Haven't Created a Segment Yet?
Step 4.2: Define Where To 'Show On'
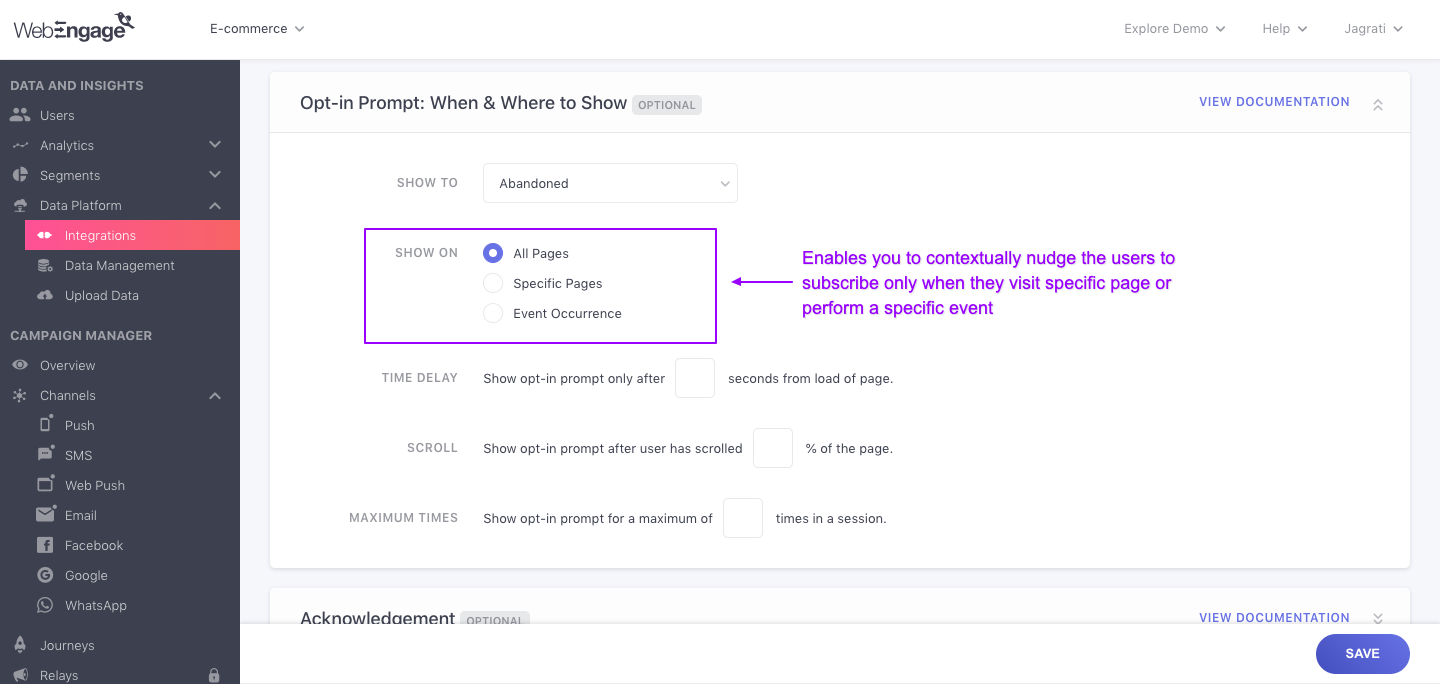
Click to enlarge
-
SelectAll Pages to show the opt-in prompt as soon as a user lands on a webpage
-
SelectSpecific Page to selectively curate only those users as subscribers who visit certain pages of your website (How to define)
-
SelectOccurrence of Event to selectively curate only those users as subscribers who perform certain actions on your website (How to define)
Show on Specific Page
Selecting this option enables you to show the Web Push opt-in prompt only on select pages of your site like product review pages, order tracking pages, loyalty program pages, and so on. (Pages that indicate user's high intent to continue their relationship with you - making them the ideal target audience for initiating Web Push subscription.)
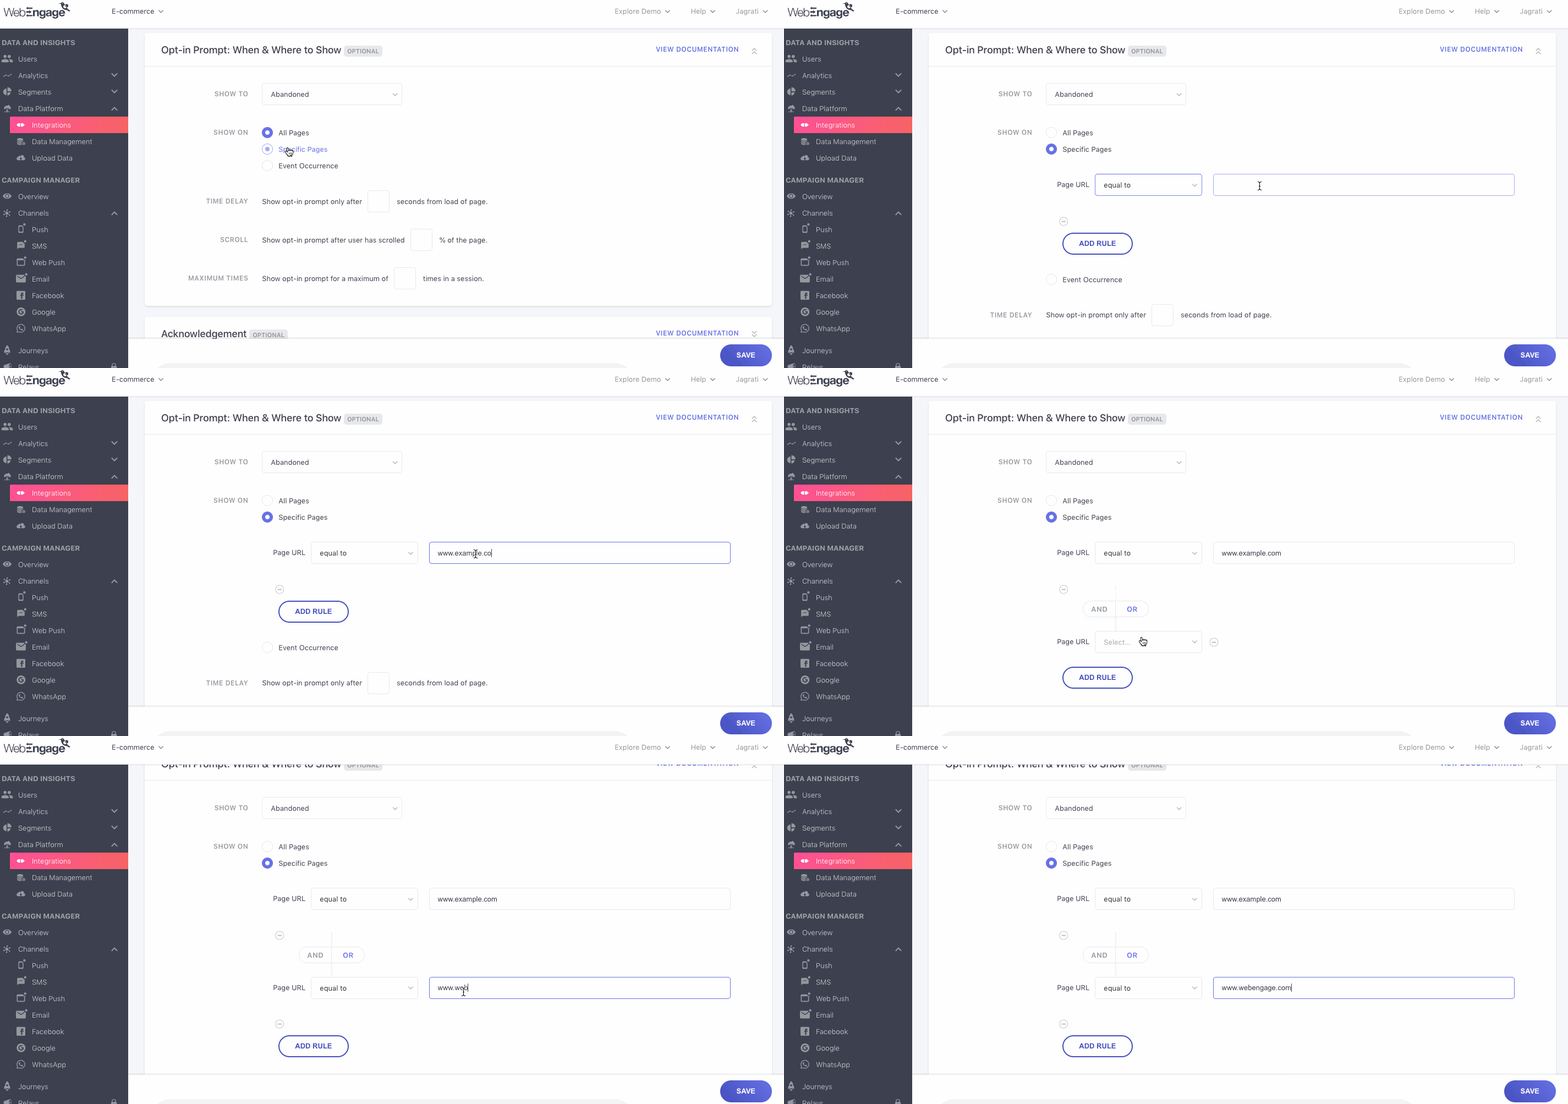
Click to enlarge
Step 1: Add Page URL
Add the URL of the page where you want the prompt to show up.
Step 2: Combine Multiple URLs with AND/OR Logic
As shown above, you can choose to specify multiple pages on which the opt-in prompt must be shown by clicking the Add Rule Button. In doing so, you will be able to combine the URLs by AND/OR Logic.
How It Works: Combining Page URLs by AND/OR LogicAND: Implies that only those users will be shown the Web Push opt-in prompt who have visited all the defined URLs (helping you narrow down the target audience).
OR: Implies that all users who visit either of the defined URLs will be shown the Web Push opt-in prompt (helping you widen the target audience).
Show on Occurrence of Event
Must ReadPlease ensure that you have a robust understanding of Events and Event Attributes before proceeding. Doing so will help you understand this section, better.
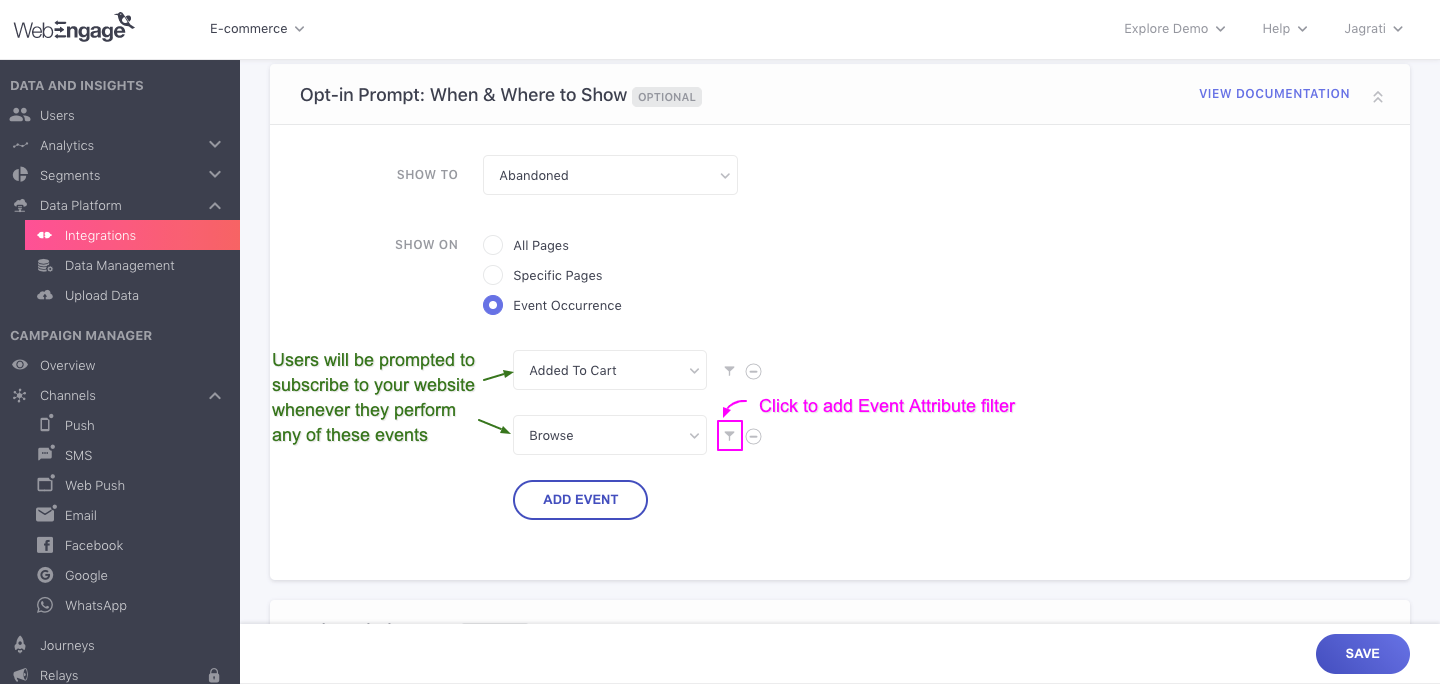
Selecting this option enables you to show the opt-in prompt whenever an event happens eg. whenever the user purchases something when he is likely to subscribe to your notifications given that a successful transaction has taken place.
Click to enlarge
Step 1: Select Event
Click the dropdown to select from a list of all the Custom Events and System Events being tracked for your dashboard.
Step 2: Define Scope of Occurrence by Adding Event Attribute Filters
You can further define the scope of occurrence of the Event by adding Event Attribute filters to it.
- Click the filter icon to select Event Attributes.
- Multiple Event Attributes can be combined by the AND/OR Logic.
How It Works: Combining Event Attribute Filters by AND/OR LogicAND: Implies that the Web Push opt-in prompt will be shown only to those users who perform the Event in the context of all the Event Attributes. (Helps you narrow down the target audience)
OR: Implies that the Web Push opt-in prompt will be shown to all users who perform the Event in the context of any one of the Event Attributes. (Helps you widen the target audience)
Step 3: ClickAdd Event to Specify More Events
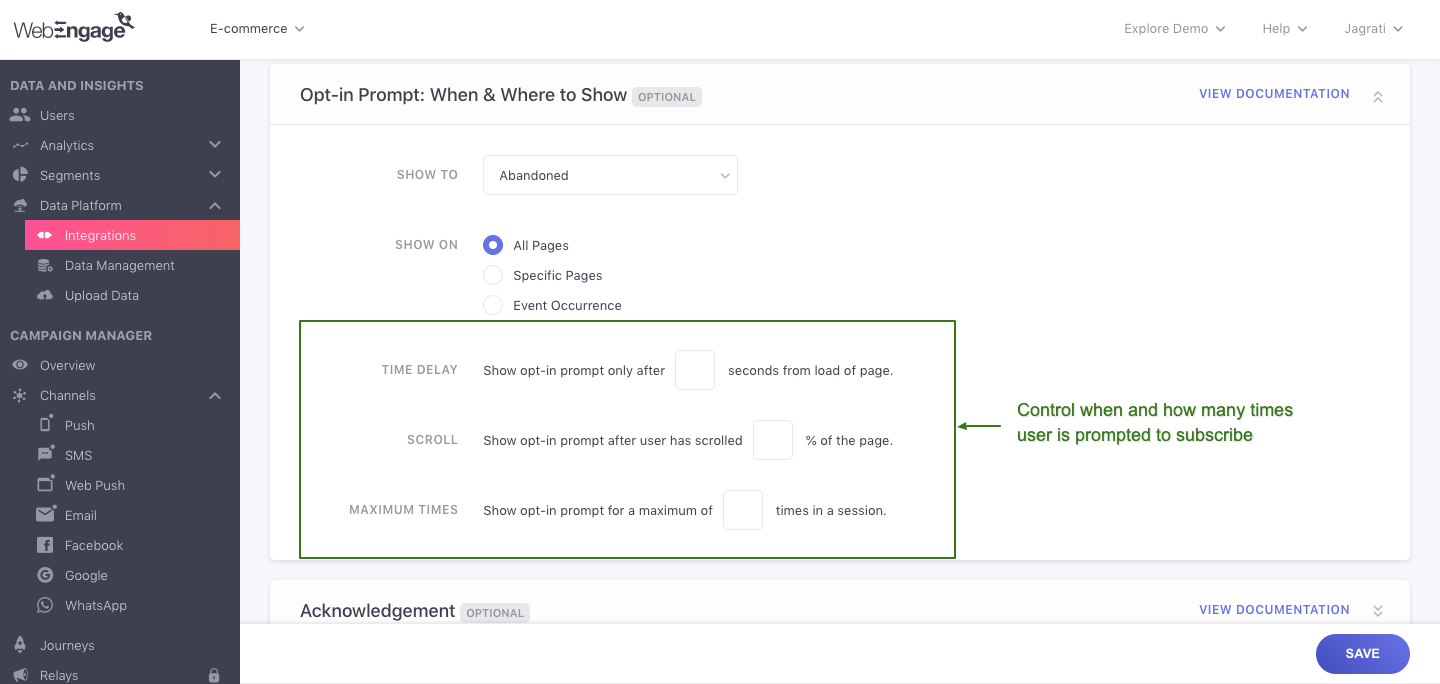
Step 4.3: Configure Delay Time, Scroll % & Max. Display Limit
(Not applicable ifEvent Occurrence is selected at Step 5.2: Where to 'Shown On')
Click to enlarge
Add Time Delay: You can choose to delay the appearance of the opt-in prompt by a few seconds after a user lands on a webpage. As highlighted above, specify the duration and you're good to go!
Define Scroll %: You can choose to contextually show the Web Push opt-in prompt to users only if they've scrolled through a certain percentage of your webpage.
-
This is a great way to capitalize on user intent and show the opt-in prompt to only high-intent users (as they've expressed interest by scrolling down to a specific section of the webpage).
-
As highlighted above, specify the percentage and you're good to go!
Define 'Maximum Times' Message Can Be Shown: Nudging a user to opt-in until they half-heartedly give in, or abandon your website completely is not the best strategy. This is why you can set an upper cap on the number of times a user can be shown the prompt in an on-going session.
- As highlighted above, specify the upper cap and you're all set!
Step 5 (Optional): Configure Opt-in Acknowledgement
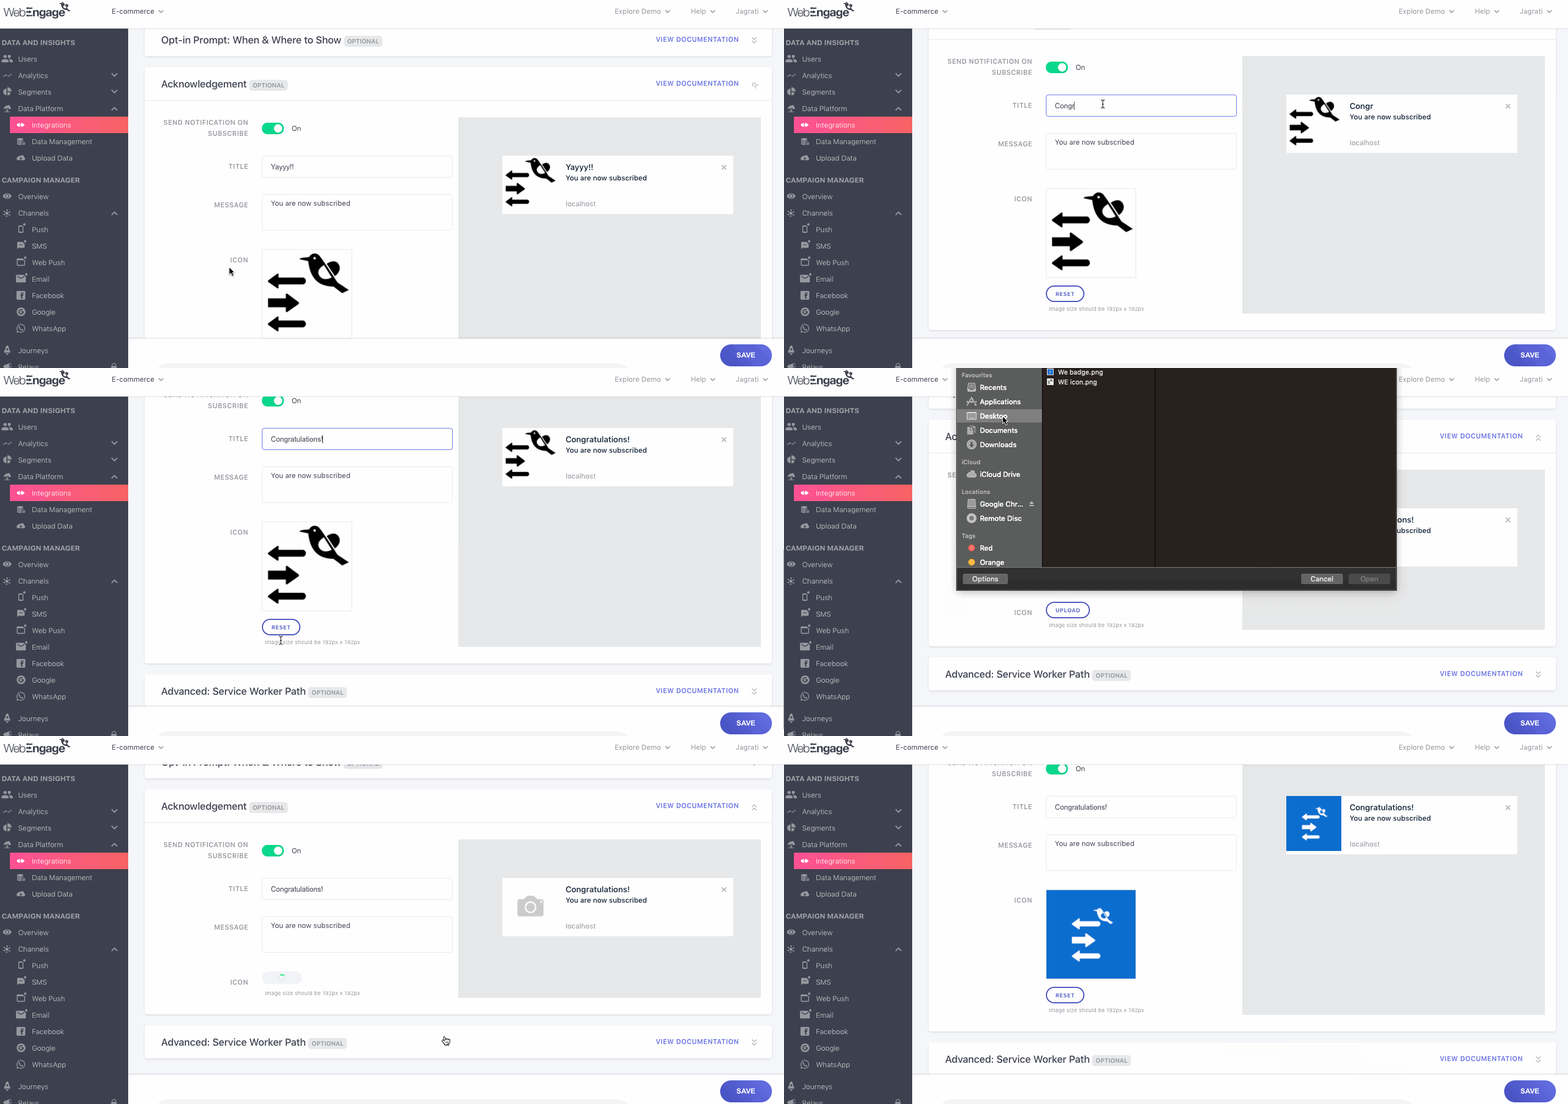
By default, no subscription acknowledgment is sent to users once they've opted-in to your channel. Using this section, you can set up a custom notification to welcome users to your subscribers' community.
Here's how you can go about it:
Click to enlarge
Step 1: Click the toggle switch to enable the acknowledgment notification.
Step 2: Customize the Title and Message as per your engagement strategy.
Step 3: Upload a custom icon (warm, friendly and welcoming image recommended!)
Step 6 (Optional): Add Service Worker Path
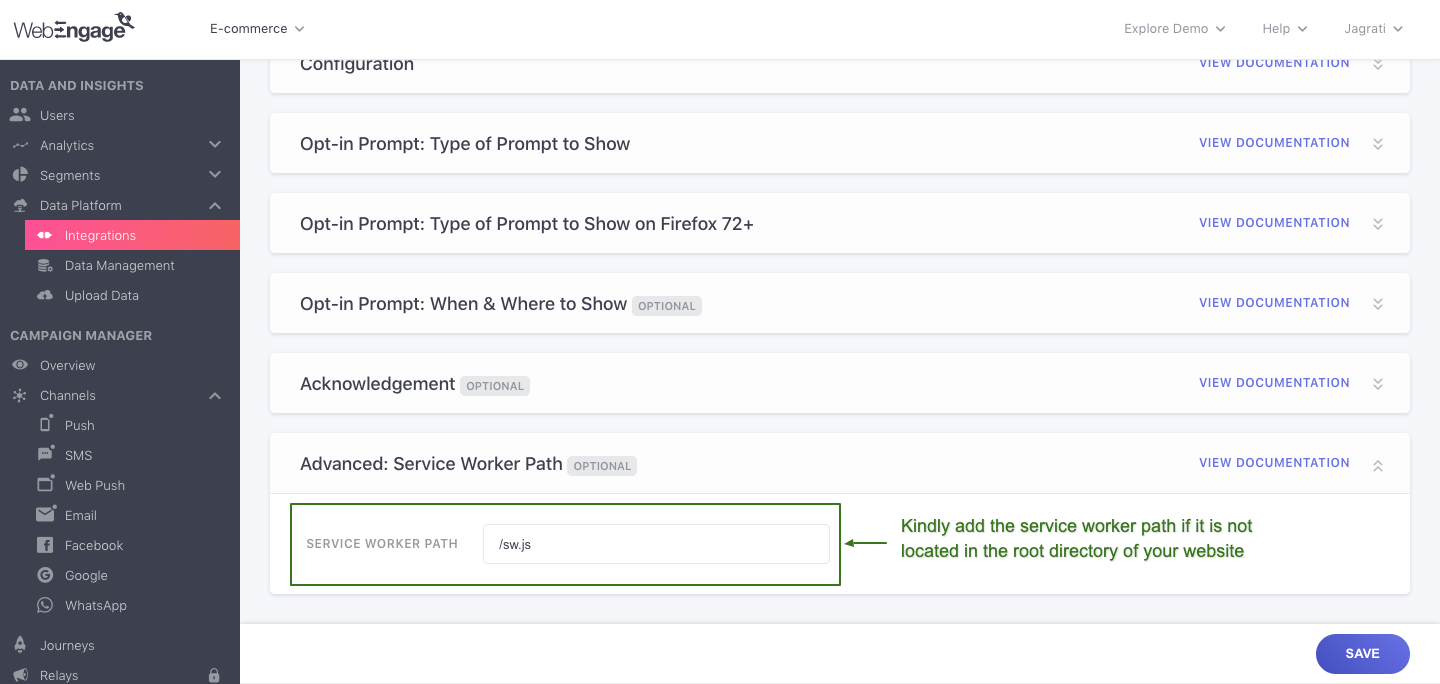
We assume that your service worker file is located in the root directory of your website with the filename service-worker.js. If this is not the case, then you can change the directory path and filename settings by adding it under the section, Advanced: Service Worker Path (as highlighted below).
Click to enlarge
Please NoteIf your service worker is located in another directory (and not the root directory) like
xyz, then the WebEngage Web Push Notification will work only for that specific directory, i.e./xyzand/xyz/.
Service Worker Integration in Django
Django doesn’t allow the service-worker.js to be put directly in the root directory. But, you can resolve this issue by treating it as Django View in the routes config and adding the actual JavaScript service worker file in the templates directory.
Step by step guidelines:
Step -1: Create a templates directory in your project and add its configuration in the settings.py file under TEMPLATES (Reference Django doc).
ImportantKindly ignore Step-1 if the directory and configurations are already added.
# Sample code

TEMPLATES = [
    {
        'BACKEND': '<backend_name>',
        'DIRS': ['templates'],
        'APP_DIRS': True,
    },
]
Step- 2: Add a service-worker.js file containing WebEngage’s code in the templates directory.
Step- 3:Create a route for the service worker view in urls.py. This will create a route for service-worker.js in the root directory.
# Sample code

from django.views.generic import TemplateView
from django.conf.urls import url

urlpatterns = [
    url(r'^service-worker.js', (
            TemplateView.as_view(template_name="service-worker.js", content_type='application/javascript', )
        ),
        name='service-worker.js'
    ),
]
Step- 4: Complete the rest of the web push channel configuration in the dashboard.
Congratulations! You're all set to use Web Push as a channel of engagement in WebEngage. Please feel free to drop in a few lines at [email protected] in case you have any queries or feedback. We're always just an email away :)
Updated 3 months ago
Let's help you launch your first Web Push Campaign!