Legacy SDK v0.0.8
GETTING STARTED
1. Install WebEngage plugin
Use the below command to install WebEngage plugin for both Android and iOS platforms.
cordova plugin add cordova-plugin-webengage --fetchFollow the below steps for iOS platform:
- Download the SDK file here. Extract the downloaded ZIP file. You will find two directories in the extracted ZIP:
xc7andxc8. If you are using Xcode 7 use theWebengage.frameworkwithin thexc7directory. For Xcode 8 and above use the one inxc8. - Select the name of the project in the project navigator. The project editor appears in the Editor area of the Xcode workspace window.
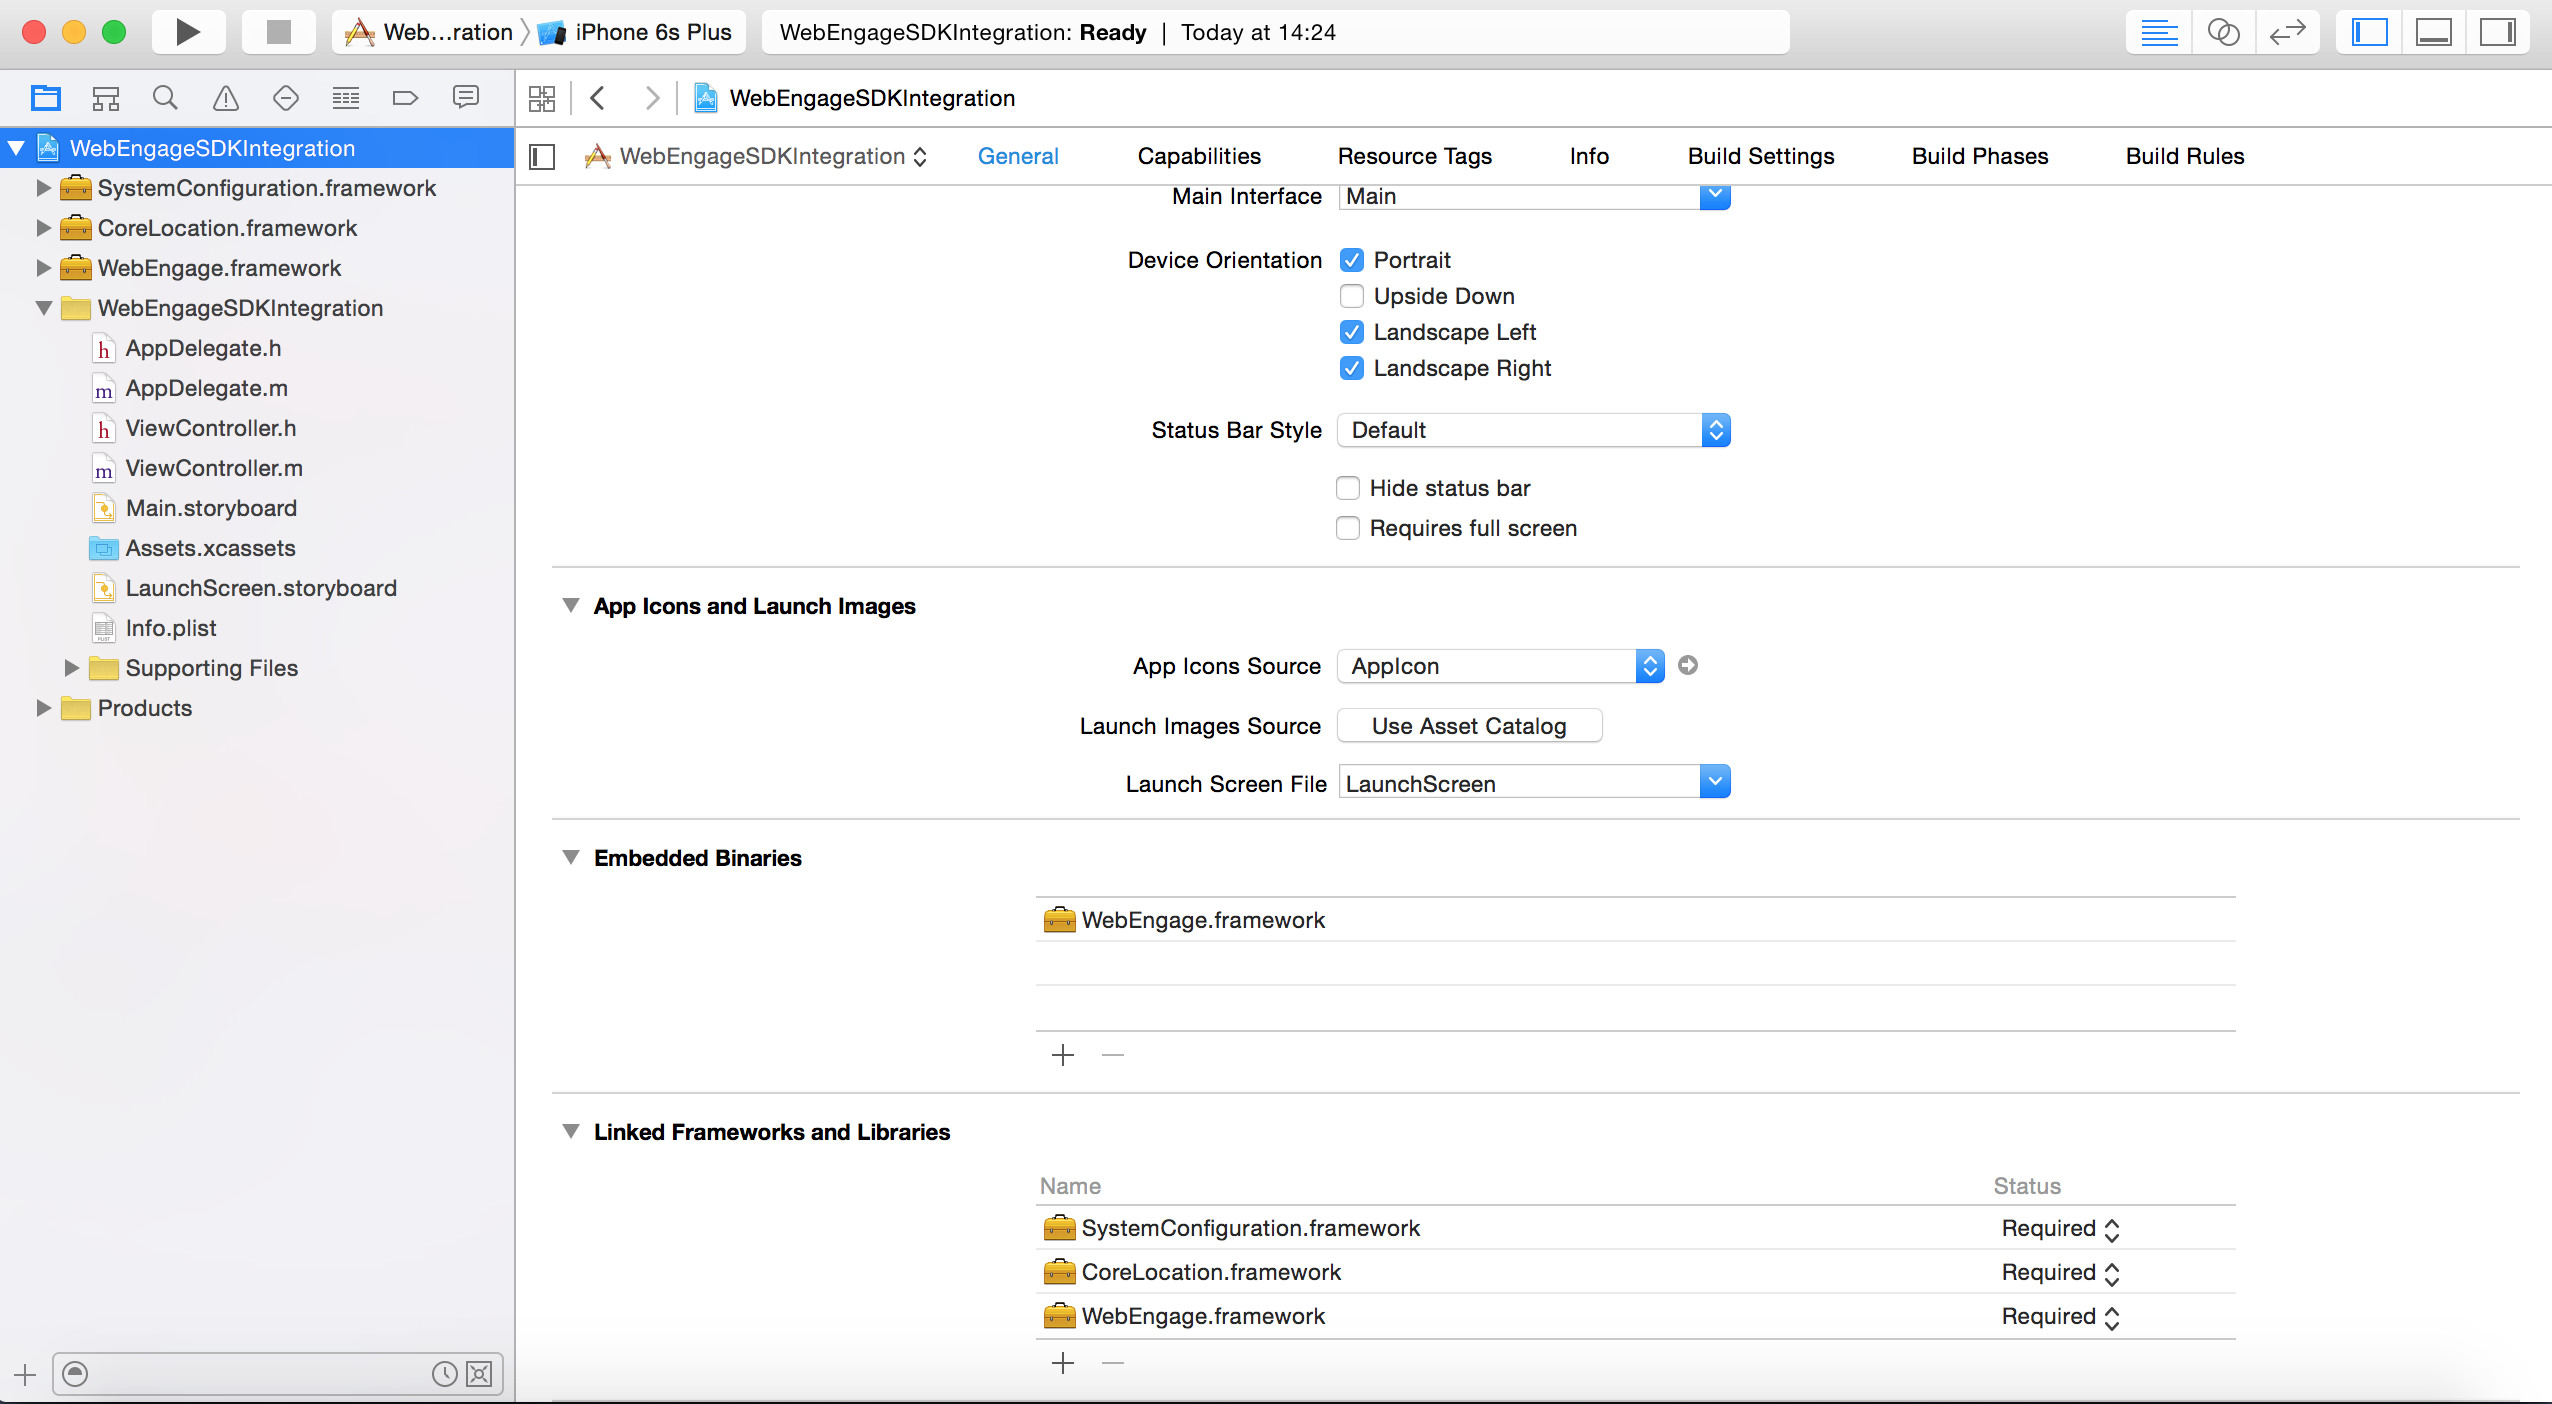
- Click on the General tab at the top of project editor.
- In the section Embedded Binaries click on the "+" button to open the file chooser for your project. Open
WebEngage.frameworkand select Copy if needed option. This will copy the framework to your project directory. - Under Linked Frameworks and Libraries click the "+" button and add
SystemConfiguration.frameworkandCoreLocation.framework.
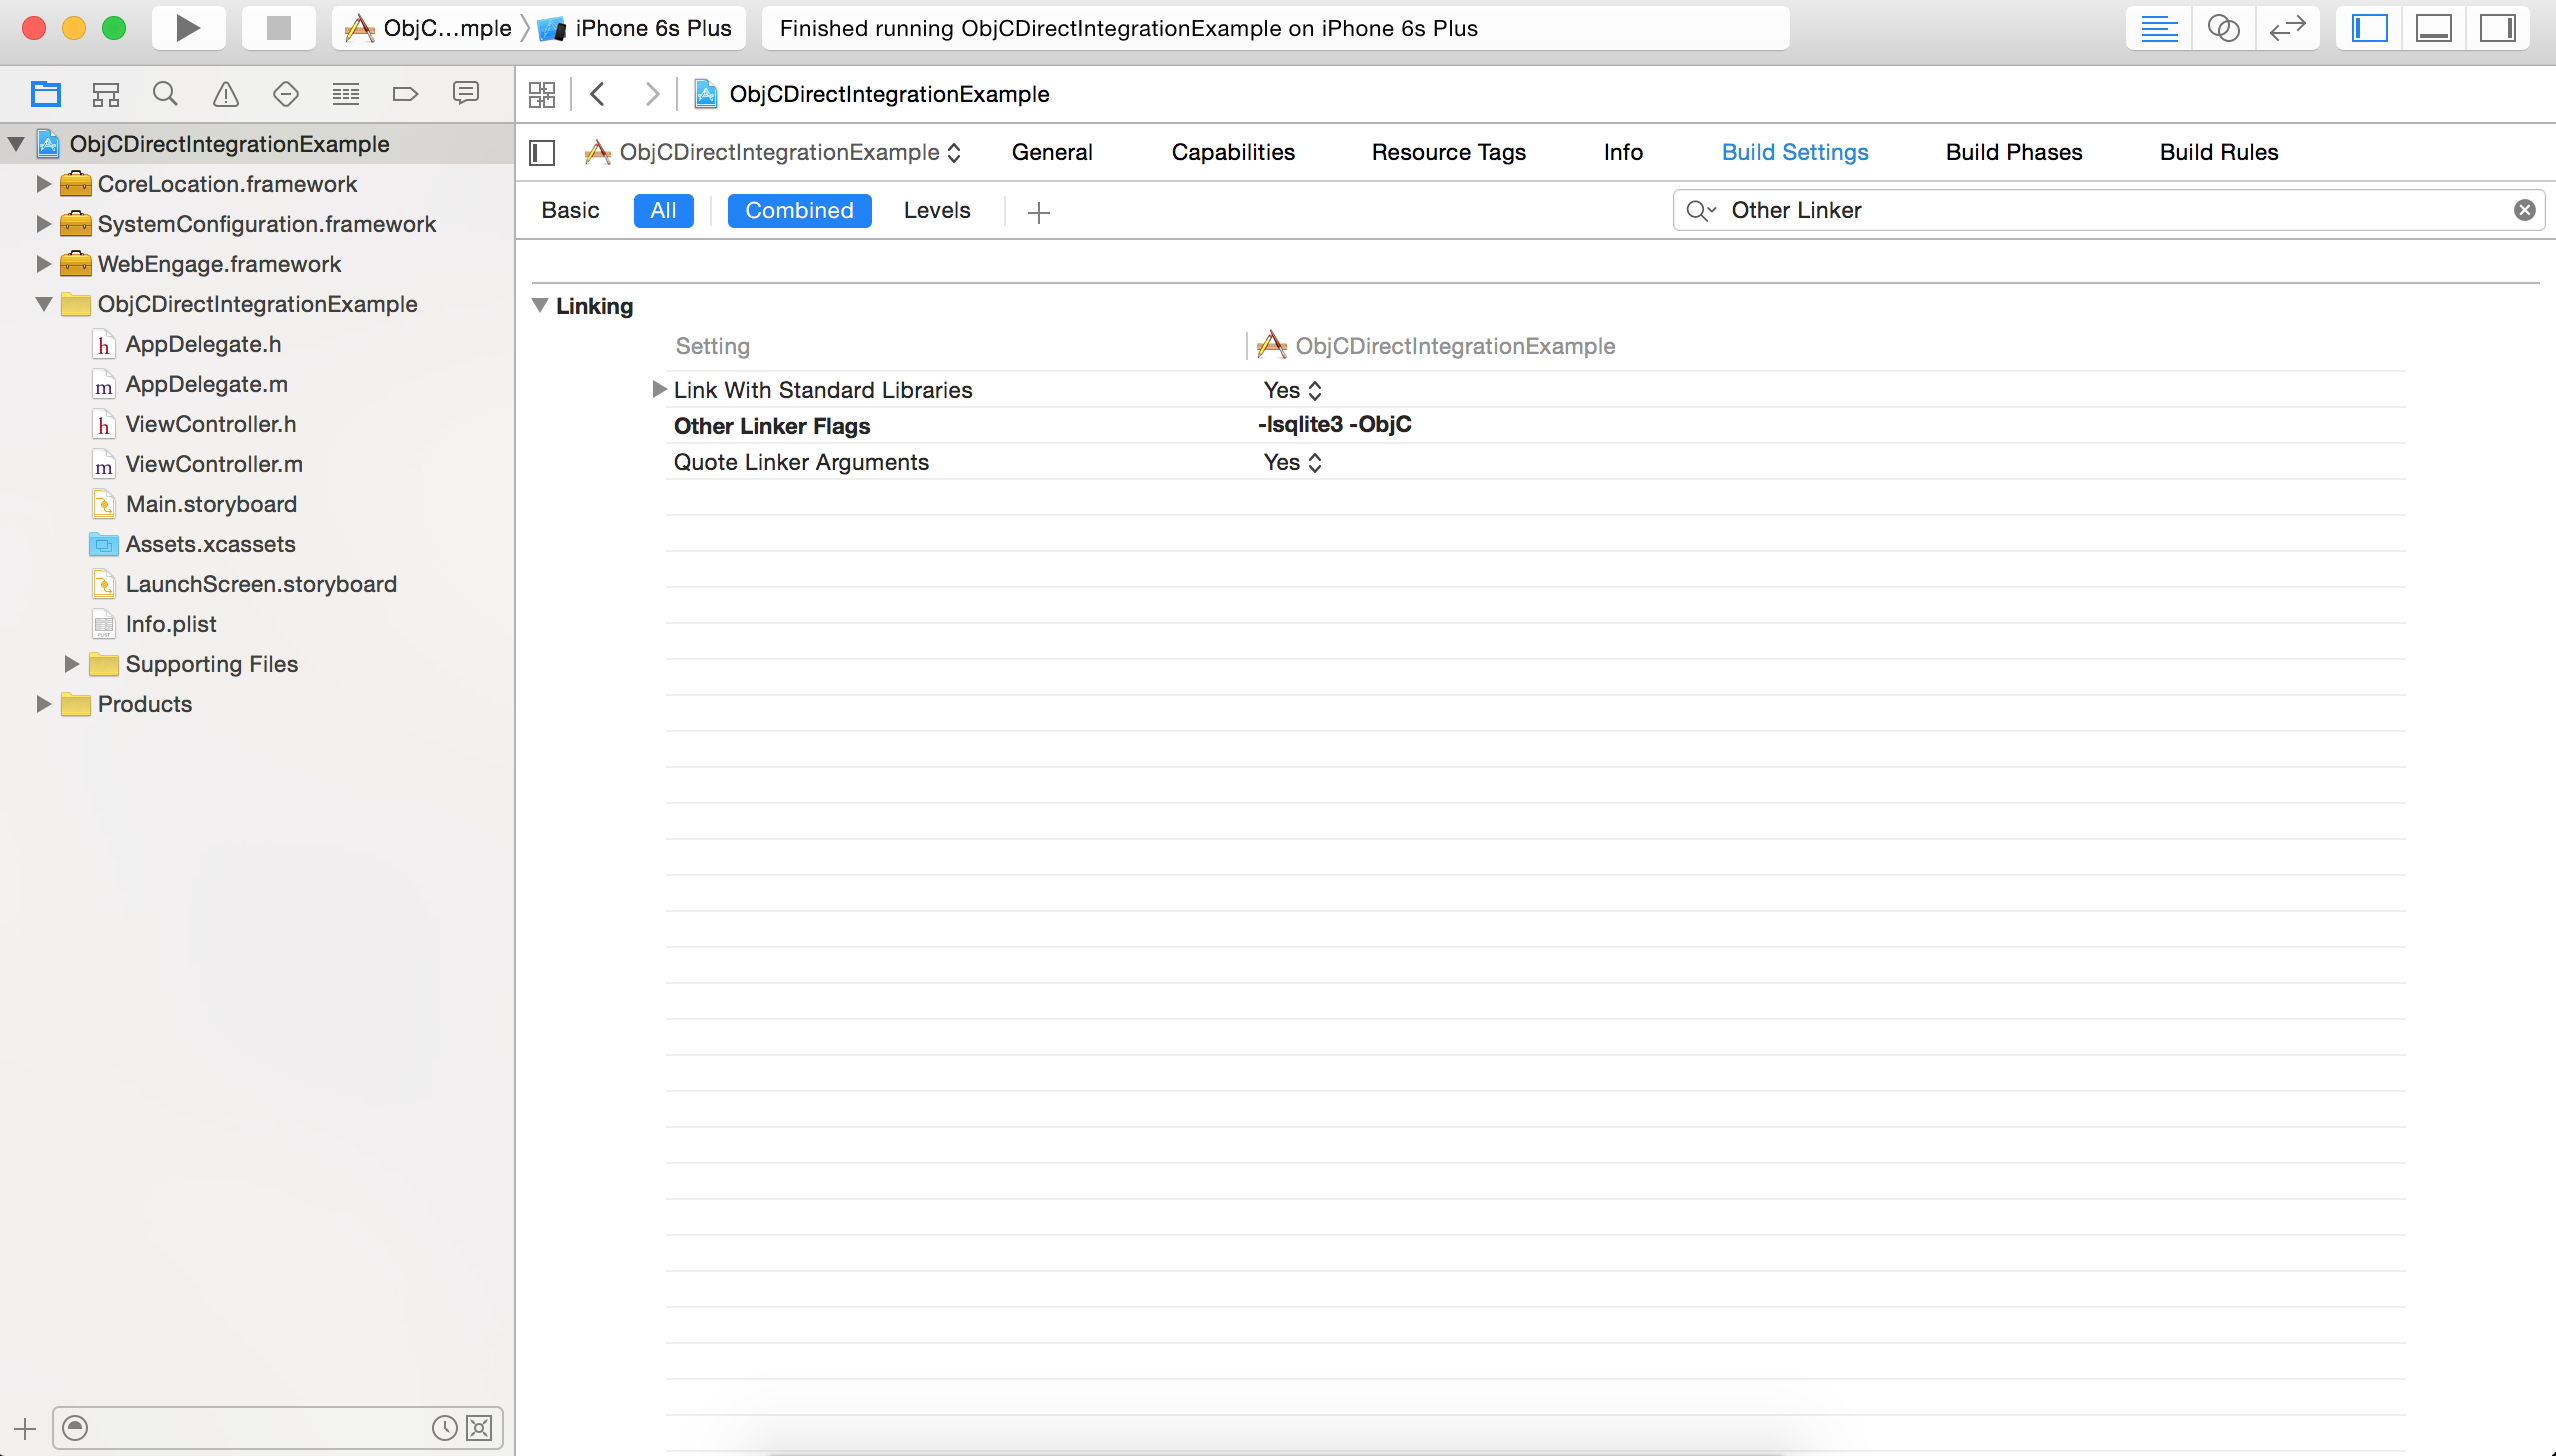
- In the 'Build Settings' tab of the project editor, search for
Other Linker Flagsoption. Add-lsqlite3and-ObjCunder it as shown below.
- Enable Push Notifications
a. Enter Project Navigator view.
b. Select your main app target from the expanded sidebar or from the dropdown menu, then select the Capabilities tab.
c. If Push Notifications isn't enabled, click the switch to add the "Push Notifications" entitlement to your app. If you are using Xcode 8 or above, ensure that aYOUR-APP-NAME.entitlementsfile has been added to your project.

2. Integrate the SDK
Follow the below steps to integrate WebEngage SDK.
1. Add global configuration
Open we_config.xml file from the plugins\cordova-plugin-com-webengage directory inside your app's root directory. All global configurations go under the config tag.
a. licenseCode: Obtain your license code from the header title of the Account Setup section of your WebEngage dashboard and paste it within the licenseCode tag.
b. debug: This is optional. Debug logs from WebEngage SDK are printed if the value of this tag is true. Default value of this tag is false.
<config>
  <licenseCode>~12345678</licenseCode>
  <debug>false</debug>
  ...
  ...
</config>
2. Add platform-specific configuration
Android
Add all the Android-specific configuration under the android tag under the global config tag.
packageName: Add your complete Android application package name under packageName tag.
<config>
  ...
  <android>
    ...
    <packageName>YOUR.PACKAGE.NAME</packageName>
    ...
  </android>
</config>
iOS
No mandatory configuration is required for iOS app. For advanced configuration, check the Other configurations section.
3. Initialize the plugin
In your onDeviceReady callback, call webengage.engage.
onDeviceReady: function() {

/**
Additional WebEngage options and callbacks to be
registered here before calling webengage.engage()
**/

webengage.engage();
}
Next steps
Congratulations! You have now successfully integrated WebEngage with your Hybrid app and are now sending user session data to WebEngage.
Note that it may take a few minutes for your data to show up on the WebEngage dashboard. We suggest you meanwhile proceed to read the next sections to learn how to:
- Track user properties as attributes
- Track user actions as events
- Integrate push messaging
- Integrate in-app messaging
TRACKING USERS
All user related APIs are part of WebEngage Hybrid SDK's user object.
Identifying users
WebEngage SDK automatically creates a unique ID (LUID) which the WebEngage backend uses to uniquely identify users. These are “anonymous” profiles to which you can assign unique User IDs (CUID). Assigning a CUID helps collect the user's activity and information across systems in a single unified profile.
A user profile's ID once assigned, cannot be changed. Although ID can be any String that uniquely identifies users in your system, we recommend using system generated user IDs from your database instead of information that can change over time such as email addresses, usernames or phone numbers.
The usual places to assign IDs are
- On user signups
- On user logins
- On screen or page views where user identity becomes known
- When the user context changes
Constraint:
- An ID can be of maximum 100 characters.
You can assign an ID by calling the login method. All attributes, events and session information accumulated before this API has been called get associated to an anonymous user created by default. Once login is called, all of this stored information is attributed to this identified user.
webengage.user.login('9SBOkLVMWvPX');
Make sure you callloginas soon as the user logs in to your application, or whenever earliest you are able to identify the user.
webengage.user.logout();
Make sure you calllogoutwhen the logged-in user logs out, or you do not want to attach any future event, session or user data with this user, untilloginis called again.
User attributes
There is often additional identifying information, such as name and email address, associated with user profiles. WebEngage provides setters for assigning these attributes to users. These attributes can be used to segment users and target campaigns to a specific group. Additionally, they can be referred to personalize campaign messages to each user.
Attributes can be set on “anonymous” profiles as well.
Each session has its own user attributes, but they get copied from one session to the next. This is in contrast to event parameters, which may take on different values per event. For this reason, you generally use user attributes for things that do not change much within the session, or with which you want the entire session associated.
Setting system attributes
Constraint:
Stringtype attribute values must be less than 1000 characters long. Any characters beyond that will be truncated.
Email
webengage.user.setAttribute('we_email', '[email protected]');Hashed Email
If you are averse to passing your users' personally identifiable information, WebEngage enables you to pass hashed email IDs and to set up private Email Service Provider API endpoints at your end.
webengage.user.setAttribute('we_hashed_email', '144e0424883546e07dcd727057fd3b62');Birth Date in yyyy-mm-dd format
webengage.user.setAttribute('we_birth_date', '1986-08-19');Phone Number
webengage.user.setAttribute('we_phone', '+551155256325');
TheStringwe_phonemust be in E.164 format, eg. +551155256325, +917850009678.
Hashed Phone Number
If you are averse to passing your users' personally identifiable information, WebEngage enables you to pass hashed phone numbers and to set up private SMS Service Provider API endpoints at your end.
webengage.user.setAttribute('we_hashed_phone', 'e0ec043b3f9e198ec09041687e4d4e8d');Gender
webengage.user.setAttribute('we_gender', 'male');
Gender values can be one ofmale,femaleorother.
First Name
webengage.user.setAttribute('we_first_name', 'John');Last Name
webengage.user.setAttribute('we_last_name', 'Doe');Company
webengage.user.setAttribute('we_company', 'Alphabet Inc.');Setting custom attributes
You can use setAttribute to attach custom attributes to the user, as illustrated in following sections.
Simple custom user attributes
User attributes of the data types String, Number, Boolean and Date are called simple custom user attributes. They can be used to both create user segments as well as to personalize campaigns.
Constraints:
- Attribute names must be less than 50 characters long.
Stringtype attribute values must be less than 1000 characters long. Any characters beyond that will be truncated. - In addition to the system attributes, you can create at most 25 user attributes of each data type.
- You cannot start your attribute names with
we_.
String attribute
webengage.user.setAttribute("Category", "GOLD");Number attribute
webengage.user.setAttribute("Value Index", 5.06);Boolean attribute
webengage.user.setAttribute("Inactive", false);Date attribute
webengage.user.setAttribute("Registered On", new Date("2015-11-09T10:01:11.000Z"));You can define multiple user attributes in one go using JavaScript Object. The keys of this Object will be attribute names and values will be respective attribute values. These attribute values must be one of the simple or complex attribute types.
webengage.user.setAttribute({

    /* System attributes */
    "we_first_name" : "John",
    "we_last_name" : "Doe",
    "we_email" : "[email protected]",
    "we_gender" : "male",

    /* Strings */
    "Category" : "GOLD",

    /* Numbers */
    "Value Index" : 5.06,

    /* Booleans */
    "Inactive" : false,

    /* Dates */
    "Registered On" : new Date("2015-11-09T10:01:11.000Z"),

    "Contact Number 1" : "+44628976359",
    "Contact Number 2" : "+44776977507",

    "Address Flat"     : "Z-62",
    "Address Building" : "Pennant Court",
    "Address Locality" : "Penn Road",
    "Address City"     : "Wolverhampton",
    "Address State"    : "West Midlands",
    "Address PIN"      : "WV30DT"

});
Complex custom user attributes
User attributes of Array and Object data types are called complex custom user attributes. Array can contain any type of simple or complex attributes. They can be used to personalize campaigns as shown below.
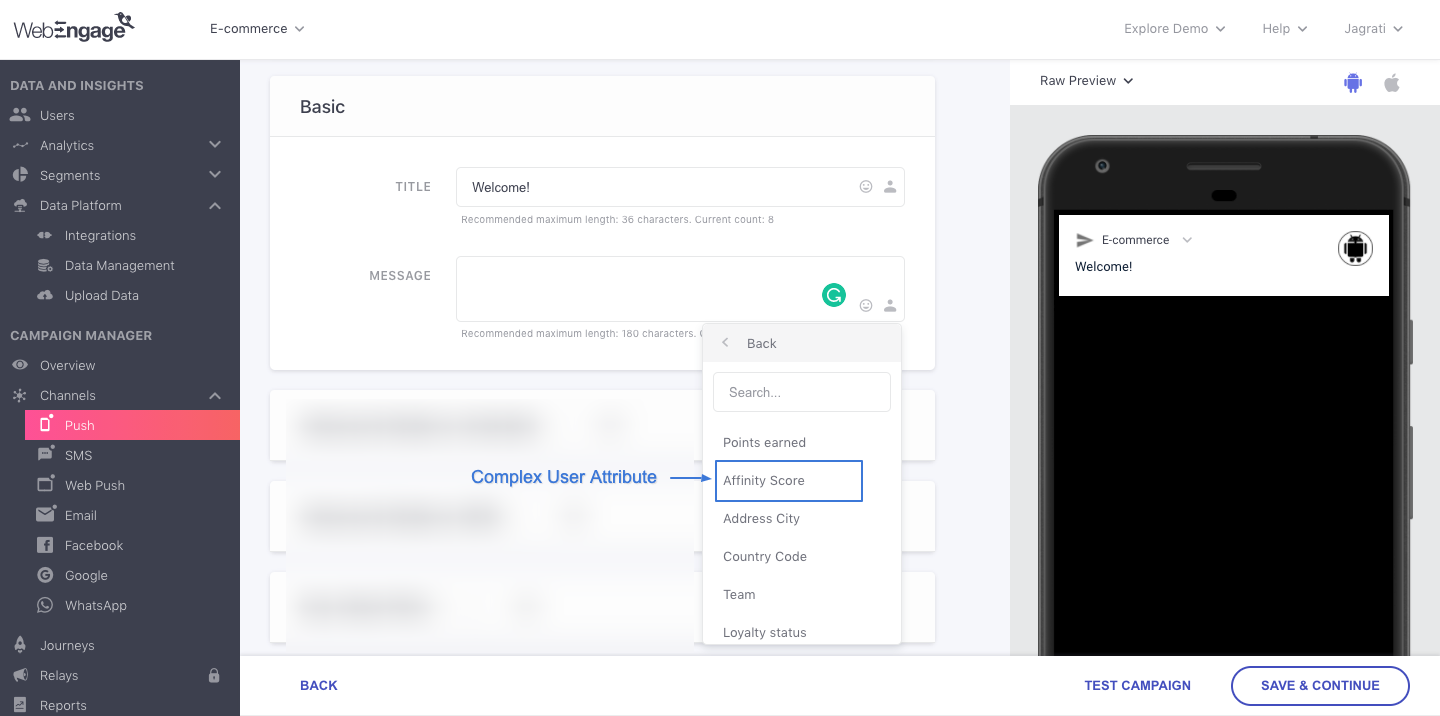
Click to enlarge
Note that you will not be able to use complex attributes as segment filters, as you can see in the segment creation screen below.
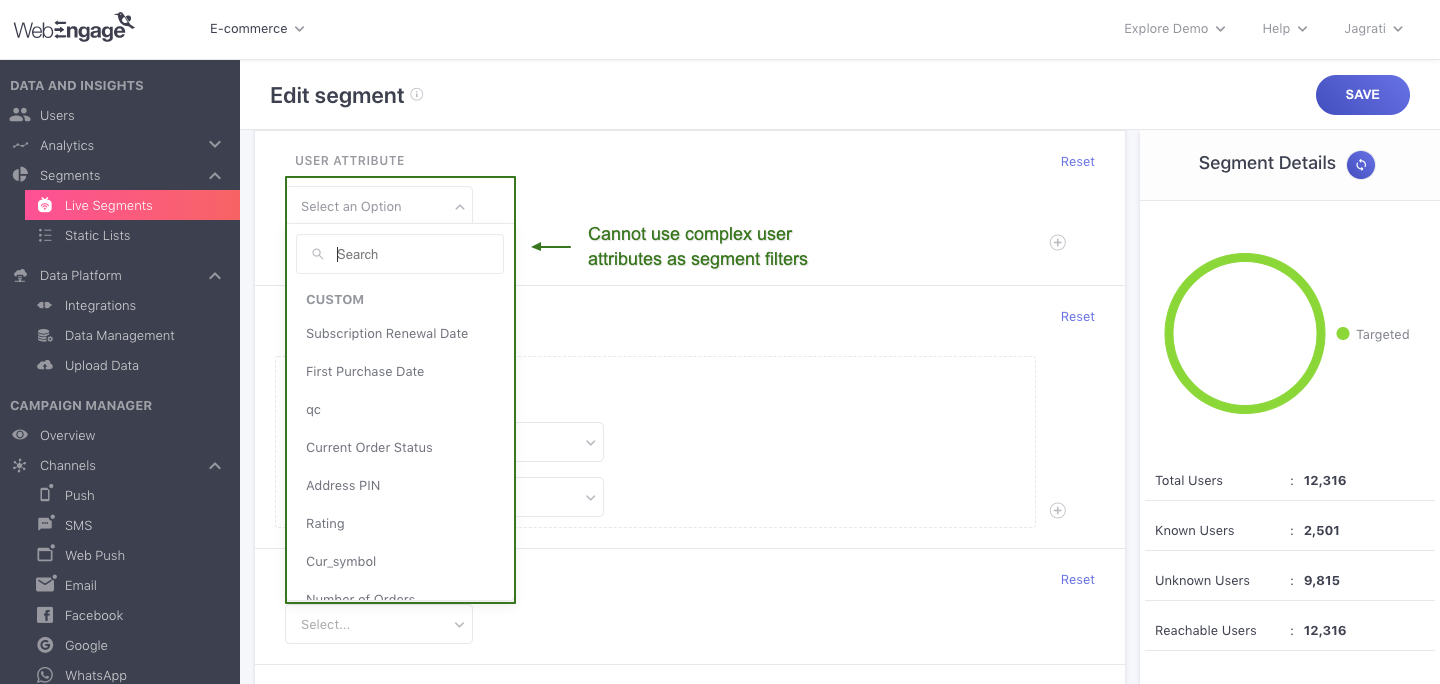
Click to enlarge
Array attribute
Array values must be one of the simple or complex attribute types.
webengage.user.setAttribute("Brand affinity", [
    "Hugo Boss",
    "Armani Exchange",
    "GAS",
    "Brooks Brothers"
]);
Object attribute
Values in the Object must be one of the simple or complex attribute types.
webengage.user.setAttribute("Address", {
    "Flat"     : "Z-62",
    "Building" : "Pennant Court",
    "Locality" : "Penn Road",
    "City"     : "Wolverhampton",
    "State"    : "West Midlands",
    "PIN"      : "WV30DT"
});
TRACKING EVENTS
Any action of interest done by a user is an event. For example, in case of an e-commerce app when a user adds an item to the shopping cart, the app would want to record the "Added to Cart" event along with the product details and price. Events may also be actions carried out by your system in the context of a user, say to track the user's inactivity or to notify departure of a shipment.
Each event has a name and an optional set of attributes describing the event in detail as necessary. An event attribute is a piece of data associated with an event. In the above example, product details and price are the “Added to Cart” event attributes. We recommend you make your events human readable - as an example, you can use a verb in the past tense like “Product Searched” and “Added to Cart”.
Event tracking lets you track user actions in your app, which enables you to create user segments and engagement campaigns based on this activity. We have put together a list of event templates for you to refer to.
System events
WebEngage starts tracking some events automatically as soon as you integrate the SDK. These are called System Events and they track your users’ interactions with your app and campaigns. Note that 2 system events are not tracked automatically - User Login and User Logout.
System events make it easier to analyze user behavior and optimize your marketing around common business goals such as driving user registrations or purchases. You can use custom events for any other user actions you want to track.
Following is the list of WebEngage system events.
Following is the list of WebEngage system events. sdk_id attribute ('Platform' on WebEngage dashboard) of these events signifies the SDK. sdk_id is 2 for Android and 3 for iOS.
Event | Event name |
|---|---|
App Installed |
|
App Upgraded |
|
App Crashed |
|
App Uninstalled |
|
User Login |
|
User Logout |
|
Device Registered for Push Notifications |
|
Campaign Conversion |
|
Push (Mobile) Sent |
|
Push (Web & Mobile) Accepted |
|
Push (Web & Mobile) Rejected |
|
Push (Mobile) Received |
|
Push (Web & Mobile) Dismiss |
|
Push (Web & Mobile) Impression |
|
Push (Web & Mobile) Click |
|
Push (Mobile) Rating Submitted |
|
Push (Mobile) Carousel Item Viewed |
|
APNs Registration Failed |
|
In-app Notification View |
|
In-app Notification Click |
|
In-app Notification Dismiss |
|
Custom events
Custom events enable you to track user actions in your app. Events can be tracked using the track method of WebEngage Hybrid SDK.
Constraints:
- Event names must be less than 50 characters long.
- Event attributes can be of these data types:
String,Number,Boolean,Date,Array,Object. - Event attribute names must be less than 50 characters long.
Stringtype attribute values must be less than 1000 characters long. - You cannot start your event or event attribute names with
we_. - You can create at most 25 event attributes of each data type across all instances of an event.
- If event attribute value is
ArrayorObject, it cannot be used to create user segments. It can only be used to personalize campaigns.
Use webengage.track to send an event with some (optional) associated data to WebEngage as illustrated below.
webengage.track(eventName, [eventData]);You can pass event data as illustrated below.
webengage.track("Added To Cart", {
    /* Numbers */
    "Product ID" : 1337,
    "Price"      : 39.80,
    "Quantity"   : 1,

    /* Strings */
    "Product"    : "Givenchy Pour Homme Cologne",
    "Category"   : "Fragrance",
    "Currency"   : "USD",

    /* Boolean */
    "Discounted" : true
});

webengage.track("Order Placed", {
    "Amount"             : 808.48,
    "Product 1 SKU Code" : "UHUH799",
    "Product 1 Name"     : "Armani Jeans",
    "Product 1 Price"    : 300.49,
    "Product 1 Size"     : "L",
    "Product 2 SKU Code" : "FBHG746",
    "Product 2 Name"     : "Hugo Boss Jacket",
    "Product 2 Price"    : 507.99,
    "Product 2 Size"     : "L",

    /* Date */
    "Delivery Date"      : new Date("2017-01-09T00:00:00.000Z"),

    "Delivery City"      : "San Francisco",
    "Delivery ZIP"       : "94121",
    "Coupon Applied"     : "BOGO17"
});
Complex event attributes
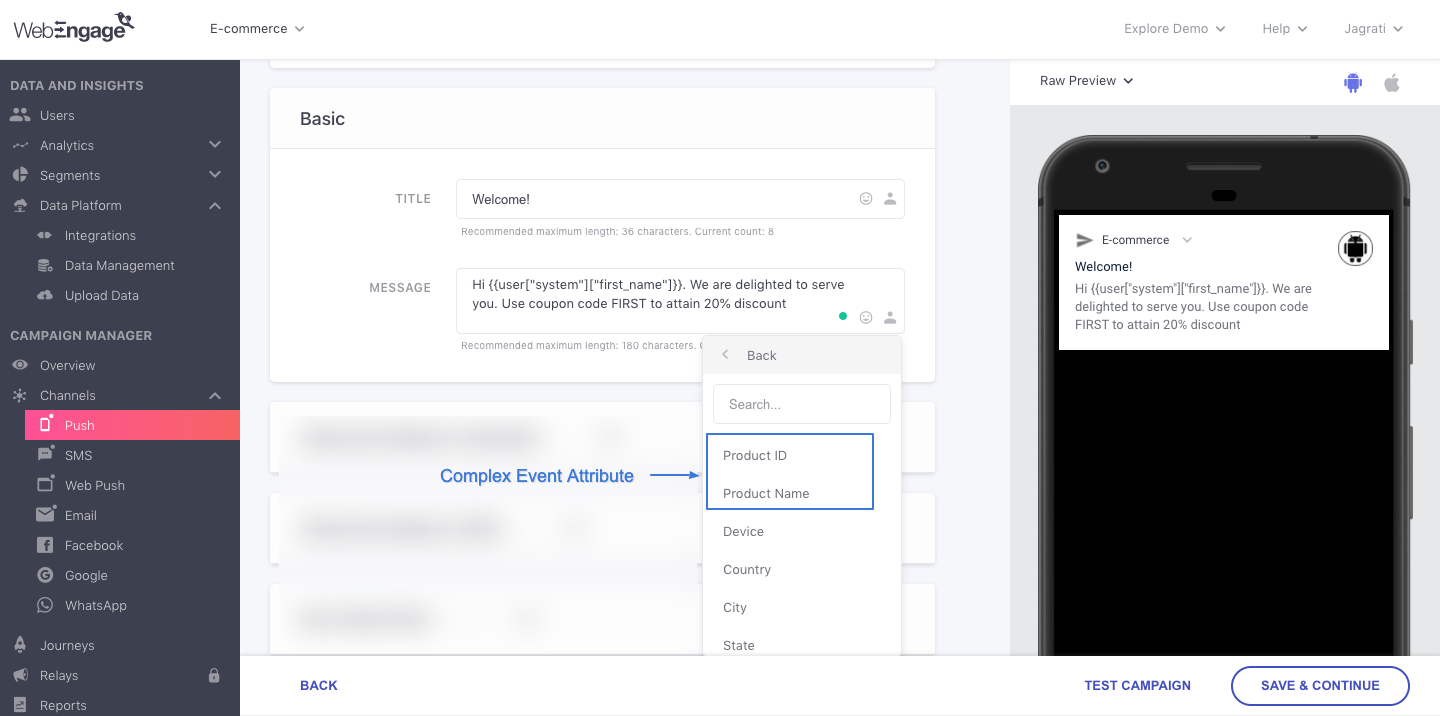
WebEngage allows you to pass complex event attributes as Array and Object data types. You will be able to use these complex attributes to personalize campaigns as shown below.
Click to enlarge
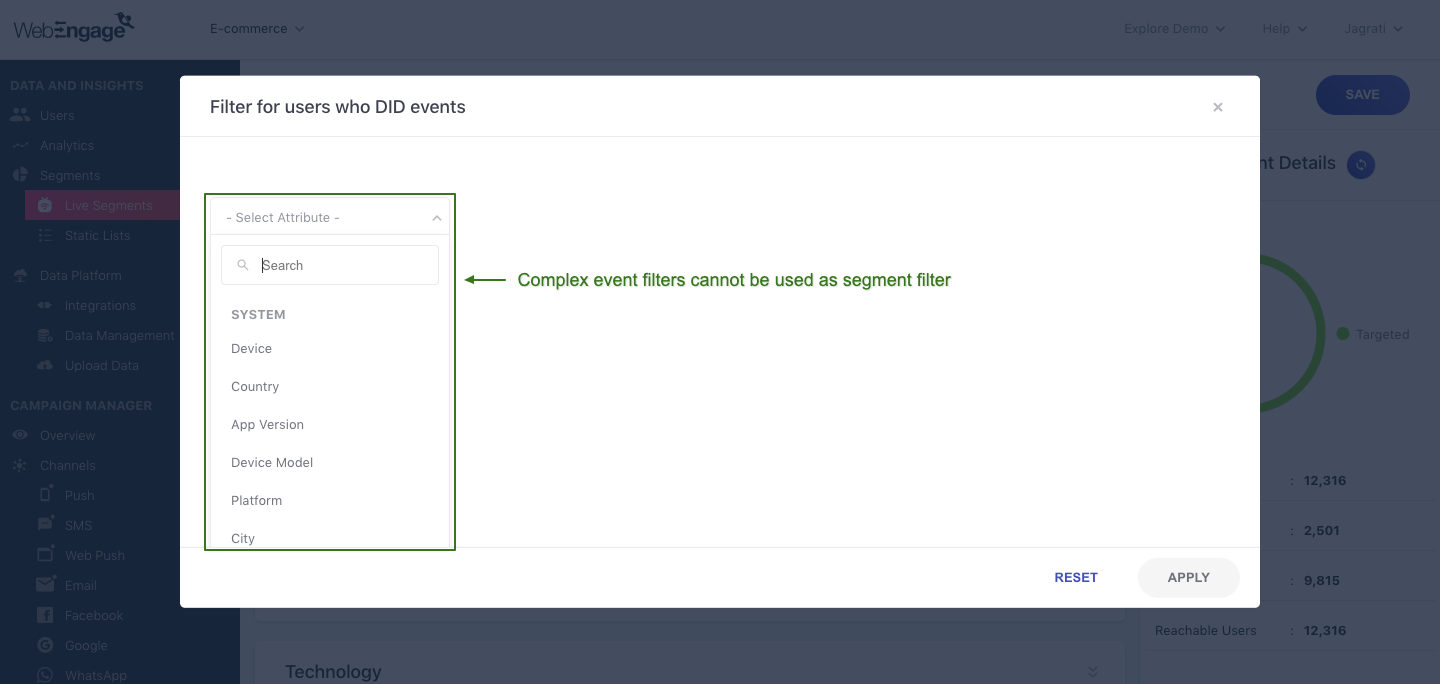
Note that you will not be able to use complex attributes as segment filters, as you can see in the segment creation screen below.
Click to enlarge
You can pass complex event attributes as illustrated below.
webengage.track("Order Placed", {
    "Amount"   : 2300,

    /* Date */
    "Delivery Date" : new Date("2017-01-09T00:00:00.000Z"),

    /* Complex nested data */
    "Products" : [
        {
            "SKU Code": "UHUH799",
            "Product Name": "Armani Jeans"
            "Price": 300.49,
            "Details": {
                "Size": "L"
            }
        },
        {
            "SKU Code": "FBHG746",
            "Product Name": "Hugo Boss Jacket"
            "Price": 507.99,
            "Details": {
                "Size": "L",
            }
        },
    ],

    /* Objects */
    "Delivery Address": {
        "City": "San Francisco",
        "ZIP": "94121"
    },

    /* Arrays */
    "Coupons Applied": [
        "BOGO17"
    ]
});
PUSH MESSAGING
Push notifications are messages that pop up on mobile devices. App publishers can send them at any time; even if the recipients aren’t currently engaging with the app or using their devices.
Before continuing, please be sure that you have completed all of the steps in Getting started.
Android
All Android push related configurations go under the android tag under the global config tag of we_config.xml file. You can find this file in the plugins\cordova-plugin-com-webengage directory inside your app's root directory. You can configure your push messages using the tags listed below.
autoPushRegister
The allowed values for this tag are false (default) and true. If this is set to true, WebEngage SDK will automatically handle GCM/FCM push registration and messaging provided that the corresponding GCM/FCM project number (Sender ID) is provided under pushProjectNumber tag.
If set to false, WebEngage SDK will not handle push registration and messaging in which case pushProjectNumber tag should not be configured.
pushProjectNumber
Add your GCM/FCM Sender ID under this tag only if you have set autoPushRegister as true.
<pushProjectNumber>123456789012</pushProjectNumber>pushSmallIcon
Provide the path to your custom icon which will be used as small icon while displaying push messages. If this is not provided, then application default icon will be used as push small icon.
<pushSmallIcon>@drawable/ic_launcher</pushSmallIcon>pushLargeIcon
Provide the path to your custom icon which will be used as large icon while displaying push messages. If this is not provided, then application default icon will be used as push large icon.
<pushLargeIcon>@drawable/ic_launcher</pushLargeIcon>pushAccentColor
This tag accepts a hex code of the color which will be used as push accent color.
<pushAccentColor>#FF0000</pushAccentColor>iOS
There are no configurations required for iOS push messaging.
IN-APP MESSAGING
In-app messages allow you to engage with your users using templated creatives, while they are active in your mobile app. In-app messages are effective for
- content that is relevant in the context of what the user user is doing in your app right now,
- content that isn’t time-sensitive enough to warrant a push notification, and
- communicating with users who have push messaging turned off.
When creating in-app campaigns on WebEngage dashboard, you decide the conditions under which the in-app message should display. You can trigger in-app messages to display when a particular WebEngage event is tagged.
Message placement
Screens are web pages in the hybrid app which can have associated properties. WebEngage SDK allows you to tag whenever a user sees a screen in your hybrid app pages. These tags allow you to pinpoint screens in your app where you would later render in-app messages using WebEngage dashboard. A hybrid app can have multiple screens and vice versa is also possible. Note that screens are only usable for targeting in-app engagements.
Every screen can be associated with some contextual data, which can be part of the targeting rule for in-app messages. Your app can update the data associated with a screen using webengage.screen as shown below.
webengage.screen accepts two parameters: Screen Name (String) and Screen Data (Object). You can call webengage.screen with either both screen name and screen data as parameters or any one of these.
webengage.screen("Purchase Screen", {
    "productId": "~hs7674",
    "price" : 1200
});
webengage.screeninforms WebEngage SDK that the user has navigated to a new screen. Any previously set screen data is lost. We recommend that you only tag those hybrid app pages as screens where you want to display in-app messages.
CALLBACKS
Callbacks are useful for understanding the lifecycle stages of WebEngage messages. All WebEngage callbacks are called on the main thread. All callbacks must be registered in onDeviceReady before the webengage.engage() call.
Push message callbacks
webengage.push.onClick
webengage.push.onClick allows you to register a callback function which is executed when the user taps on a received push notification. This callback should be registered in onDeviceReady before the webengage.engage() call.
The callback handler receives two parameters:
deeplink: The deep link URLStringassociated with the push messagecustomData: Custom dataObjectpassed from the dashboard
onDeviceReady: function() {

  webengage.push.onClick(function(deeplink, customData) {
    console.log("Push clicked");
  });

  ...
  ...

  webengage.engage();
}
If this callback is registered in iOS, the deep link will not be opened automatically. Your app is supposed to handle it. For Android, the deep link is fired irrespective.
In-app message callbacks
webengage.notification.onShown
webengage.notification.onShown allows you to register a callback function which is executed after an in-app notification is shown to the user.
The callback handler receives one parameter:
inAppData: The dataObjectfor the shown in-app notification
onDeviceReady: function() {

  webengage.notification.onShown(function(inAppData) {
    console.log("In-app shown");
  });

  ...
  ...

  webengage.engage();
}
webengage.notification.onDismiss
webengage.notification.onDismiss allows you to register a callback function which is executed after an in-app notification is closed by the user.
The callback handler receives one parameter:
inAppData: The dataObjectfor the shown in-app notification
onDeviceReady: function() {

  webengage.notification.onDismiss(function(inAppData) {
    console.log("In-app dismissed");
  });

  ...
  ...

  webengage.engage();
}
webengage.notification.onClick
webengage.notification.onClick allows you to register a callback function which is executed after an in-app notification is clicked by the user.
The callback handler receives two parameters:
inAppData: The dataObjectfor the shown in-app notificationactionId: TheStringidentifier for the action button
onDeviceReady: function() {

  webengage.notification.onClick(function(inAppData, actionId) {
    console.log("In-app shown");
  });

  ...
  ...

  webengage.engage();
}
Data received from in-app callbacks adheres to the below format.
{
  "description": null,
  "id": "173050749",
  "actions": [
    {
      "actionEId": "~3284c402",
      "actionText": "Hello",
      "actionLink": "http://www.google.com",
      "actionCategory": "CTA",
      "actionTarget": "_top",
      "isPrime": true,
      "type": "EXTERNAL_URL"
    }
  ],
  "layoutId": "~483819e",
  "showTitle": true,
  "canMinimize": true,
  "layoutAttributes": {
    "exitAnimation": "FADE_OUT",
    "fullscreen": true,
    "wvHeight": 100,
    "image_url": "https://s3-ap-southeast-1.amazonaws.com/wk-static-files/~2024c585/6035287f-62e3-4c6b-8d56-e893941da6bf.png",
    "posX": 0,
    "animDuration": 1000,
    "type": "BLOCKING",
    "posY": 0,
    "wvWidth": 100,
    "entryAnimation": "FADE_IN"
  },
  "title": null,
  "config": {
    "closeIconColor": "#FFFFFF",
    "hideLogo": false,
    "c2aTextColor": "#FFFFFF",
    "c2aTextFont": "Sans-Serif",
    "c2aBackgroundColor": "#4A90E2"
  },
  "canClose": true,
  "notificationEncId": "13cjj4m",
  "direction": "ltr",
  "isActive": true
}
ADVANCED
Other configurations
Android
All Android specific configurations go under the android tag under the global config tag in we_config.xml. You can find this file in the plugins/cordova-plugin-com-webengage directory inside your app's root directory.
1. locationTracking
The allowed values for this property are and true (default) and false. Set this property to true to enable location tracking.
<config>
  ...
  <android>
    ...
    <locationTracking>true</locationTracking>
    ...
  </android>
</config>
iOS
All the iOS specific configurations go under the ios tag under the global config tag in we_config.xml. You can find this file in the plugins/cordova-plugin-com-webengage directory inside your app's root directory.
1. backgroundLocation
The allowed values for this property are false (default) and true. If set to true, WebEngage SDK will track location updates in the background for the user.
2. apnsAutoRegister
The allowed values for this property are true(default) and false. If the property is missing or the value is anything other than false, WebEngage SDK will handle automatic registration of the device with Apple Push Notification service.
In case your app handles APNs registration or uses some other third-party tool for the same, this property should be tagged as false.
3. WEGEnableLocationAuthorizationRequest
The allowed values are NO(default), IN_USE and ALWAYS. If the value of the property is IN_USE or ALWAYS, WebEngage SDK will launch location permission dialog at the initial launch of the app, seeking permission to use location:
- Either when the app is in use only (
IN_USE)
NSLocationWhenInUseUsageDescriptionproperty configuration is required for this. - Or always (
ALWAYS)
NSLocationAlwaysUsageDescriptionproperty configuration is required for this.
If this property is not present, or its value is set to anything other than IN_USE or ALWAYS, WebEngage SDK will not launch the location permission dialog. The onus of seeking the location permission in this case would lie on your app.
Location based features will work as long as the app has requisite permissions, whether those permissions were triggered by WebEngage SDK or the app itself.
WEGEnableLocationAuthorizationRequestmust be set toALWAYSif you want to run campaigns based on geo-fenced segments.
4. NSLocationWhenInUseUsageDescription
This is a standard iOS app Info.plist property. This property is optional but is required if the value of WEGEnableLocationAuthorizationRequest property is IN_USE. If you do not provide this property, iOS will restrict launching the location permission dialog.
5. NSLocationAlwaysUsageDescription
This is a standard iOS app Info.plist property. This property is optional but is required if the value of WEGEnableLocationAuthorizationRequest property is ALWAYS. If you do not provide this property, iOS will restrict launching the location permission dialog.
<config>
    ...
    <ios>
      <backgroundLocation>false</backgroundLocation>
      <apnsAutoRegister>true</apnsAutoRegister>
      <WEGEnableLocationAuthorizationRequest>NO</WEGEnableLocationAuthorizationRequest>
      <NSLocationAlwaysUsageDescription>Your location is required for geo-fencing</NSLocationAlwaysUsageDescription>
    </ios>
    ...
    ...
</config>
Updated 3 months ago