

Flutter
Flutter is an open-source UI software development kit created by Google. It enabled you to develop apps for Android, iOS, Linux, Mac, Windows, Google Fuchsia, and the web from a single codebase. The WebEngage Flutter Mobile SDK supports all the latest OS versions of Android and iOS. Currently, the plugin is only available for Android and iOS; the Web is not supported.
Sample ApplicationCheck this out for the sample
main.dart.
Here's how you can integrate the WebEngage SDK with your Flutter apps:
Prerequisites
1. Identify your region
Your data is stored in a specific Data Center based on your account location. You must define this region for the SDK to initialize successfully.
| Dashboard Host URL | Region | SDK Config value (Region specifc) |
|---|---|---|
| dashboard.webengage.com | Global Data Center (US) | US |
| dashboard.in.webengage.com | India Data Center (IN) | IN |
| dashboard.ksa.webengage.com | Saudi Arabia Data Center (KSA) | KSA |
| dashboard.eug.webengage.com | Europe Frankfurt (EUG) | EUG |
Note: Depending on your host URL above, you will use the corresponding SDK config value: .US, .IN, or .KSA, .EUG
2. Locate your WebEngage License Code
- Log in to your WebEngage Dashboard.
- Navigate to Settings → Project.
- Copy your License Code (e.g.,
abcd1234).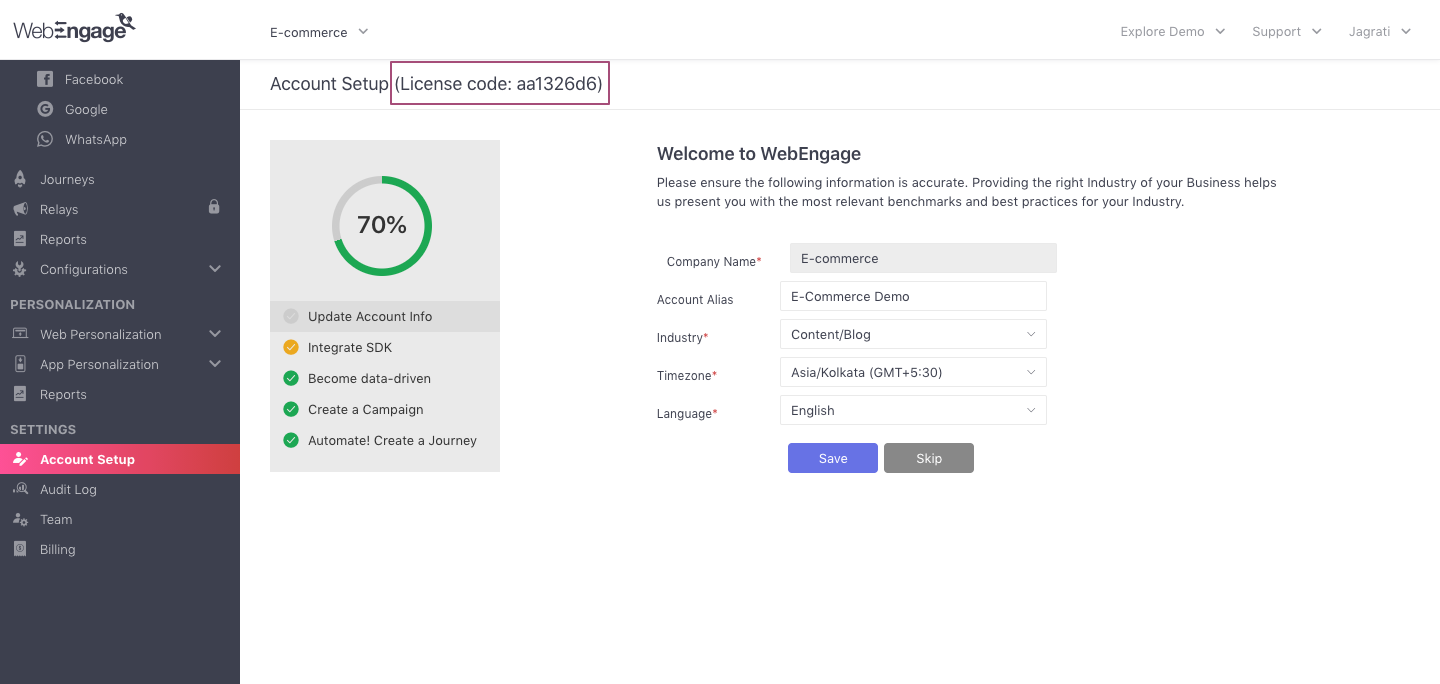
Finding your WebEngage License Code
1. Installation
dependencies:
webengage_flutter:
Flutter version supportWebEngage Plugin 1.0.3 and above supports Flutter 2.2 (null-safety).
Use 1.0.2, if your application does not support Flutter null-safety.
Step 2: Run flutter packages get to install the SDK.
2. Android Initialization
Step 1: Initialize WebEngage in main.dart in initState();
WebEngagePlugin _webEngagePlugin = new WebEngagePlugin();Step 2: Add your custom Application class to your android project.
public class MainApplication extends FlutterApplication {
    @Override
    public void onCreate() {
        super.onCreate();

    }
}
class MainApplication : FlutterApplication() {
fun onCreate() {
super.onCreate()
}
}Add the entry in the application tag for your Application class in the AndroidManifest.class
<application
        android:name=".MainApplication"
.....
Step 3: Initialize WebEngage Android SDK in your 'MainApplication' class.
import io.flutter.app.FlutterApplication;
import com.webengage.webengage_plugin.WebengageInitializer;
import com.webengage.sdk.android.WebEngageConfig;
import com.webengage.sdk.android.WebEngage;
import com.webengage.sdk.android.LocationTrackingStrategy;

public class MainApplication extends FlutterApplication {
    @Override
    public void onCreate() {
        super.onCreate();
         WebEngageConfig webEngageConfig = new WebEngageConfig.Builder()
                .setWebEngageKey("YOUR_LICENCSE_CODE")
                .setAutoGCMRegistrationFlag(false)
                .setLocationTrackingStrategy(LocationTrackingStrategy.ACCURACY_BEST)
                .setDebugMode(true) // only in development mode
                .build();
        WebengageInitializer.initialize(this, webEngageConfig);
    }
}
import io.flutter.app.FlutterApplication;
import com.webengage.webengage_plugin.WebengageInitializer;
import com.webengage.sdk.android.WebEngageConfig;
import com.webengage.sdk.android.WebEngage;
import com.webengage.sdk.android.LocationTrackingStrategy;
class MainApplication : FlutterApplication() {
override fun onCreate() {
super.onCreate()
val webEngageConfig = WebEngageConfig.Builder()
.setWebEngageKey("YOUR_LICENCSE_CODE")
.setAutoGCMRegistrationFlag(false)
.setLocationTrackingStrategy(LocationTrackingStrategy.ACCURACY_BEST)
.setDebugMode(true) // only in development mode
.build()
WebengageInitializer.initialize(this, webEngageConfig)
}
}Step 4: Configuring Data Center
Approach 1: Available from Android SDK 4.20.1 and above only
While configuring SDK, you can set your DataCenter via the below property defined:
@Override
public void onCreate() {
  super.onCreate();
  WebEngageConfig webEngageConfig = new WebEngageConfig.Builder()
              .setEnvironment(Environment.US) //US (US), IN (India), KSA (Saudi Arabia), or EUG (Europe Franfurt)
    ...
}
override fun onCreate() {
super.onCreate()
val webEngageConfig = WebEngageConfig.Builder()
.setEnvironment(Environment.US) //US (US), IN (India), KSA (Saudi Arabia), or EUG (Europe Franfurt)
...
}Approach 2: Supported for all versions of SDK.
Addmeta-data under in the AndroidManifest.xml file
Thus, depending on your data center, add the appropriate meta-data under the application tag of your AndroidManifest.xml file:
| Data Center | Meta Data Tag |
|---|---|
| Global (US) | <meta-data android:name="com.webengage.sdk.android.environment" android:value="us" /> |
| India | <meta-data android:name="com.webengage.sdk.android.environment" android:value="in" /> |
| Saudi Arabia | <meta-data android:name="com.webengage.sdk.android.environment" android:value="ksa" /> |
| Europe (Franfurt) | <meta-data android:name="com.webengage.sdk.android.environment" android:value="eug" /> |
Step 5: Disable automatic backup inside the application tag in your AndroidManifest.xml file.
<application
        ...
        android:allowBackup="false"
        ....
                >
If your application needs allowBackup to be set as true, then follow the steps below:
a. Create backup rules inside res/xml folder (res/xml/my_backup_rules.xml)
<?xml version="1.0" encoding="utf-8"?>
    <full-backup-content>
        <exclude domain="sharedpref" path="webengage_prefs.txt.xml" />
        <exclude domain="sharedpref" path="webengage_volatile_prefs.txt.xml" />
        <exclude domain="database" path="event_data.db" />
        <exclude domain="database" path="http_data.db" />
        <exclude domain="database" path="user_data.db" />
        <exclude domain="file" path="we_http_cache" />
b. Add backup file inside application tag in your AndroidManifest.xml
<application
        ...
        android:allowBackup="true"
         android:fullBackupContent="@xml/my_backup_rules">
Attribution Tracking (Only Android)
Add the following Google Install referrer library in your app/build.gradle file (ensure that the SDK version being used is >= 3.16.0):
dependencies {
  implementation 'com.android.installreferrer:installreferrer:2.2'
}
Please Note
App Installedevent andFirst Acquisition Detailsdata in user profile will not be tracked on your Android app unless you follow the above step.
Google Advertisement ID changes (Android 13 and above)
In late 2021, Google announced updates to Google Play service policies in relation to collecting Android Advertising ID. Read here to more about the changes.
Due to these changes, to access the device's Advertising ID, apps targeting Android 13 (API 33) and higher will need to declare a regular Google Play services permission in their manifest file.
The permission is granted at installation time because it is not a run-time authorization.
SDK changes
The AD ID permission is now declared in the SDK's AndroidManifest.xml as of WebEngage Android SDK V3.21.0. The SDK's manifest automatically combines with your app's manifest when the app is developed, adding the permission even if the app doesn't explicitly declare it. There won't be a collision if the permission is present in both the app and the SDK.
<manifest ...>
    <!-- Required only if your app targets Android 13 or higher. -->
    <uses-permission android:name="com.google.android.gms.permission.AD_ID"/>

    <application ...>
        ...
    </application>
</manifest>
Kids Apps: According to Google’s Policy, apps that target children must not transmit the Advertising ID. If you're building an app for kids and you are using SDK V3.21.0 and above, you must revoke the AD_ID permission.
<uses-permission android:name="com.google.android.gms.permission.AD_ID" tools:node="remove"/>3. iOS Initialization
Step 1: Add WebEngage configurations <your-project>/ios/<YourApp>/Info.plist file.
<dict>
	<key>WEGLicenseCode</key>
	<string>YOUR-WEBENGAGE-LICENSE-CODE</string>
	<key>WEGLogLevel</key>
	<string>VERBOSE</string>
</dict>
Step 2: Initialize WebEngage iOS SDK.
- Import the WebEngage header in your AppDelegate file
#import <WebEngage/WebEngage.h>import WebEngage
import webengage_flutter- In your didFinishLaunchingWithOptions: method notifies the WebEngage Flutter SDK of the application
@implementation AppDelegate

- (BOOL)application:(UIApplication *)application didFinishLaunchingWithOptions:(NSDictionary * launchOptions {
    ...
  	// NOTE: This should be called **only once** during app launch to initialize WebEngage
    [[WebEngage sharedInstance] application:application didFinishLaunchingWithOptions:launchOptions];

  return [super application:application didFinishLaunchingWithOptions:launchOptions];
}

@end
WebEngage.sharedInstance().application(application, didFinishLaunchingWithOptions: launchOptions)- Configuring Info.plist
Add the following property according to the data centre you are using.
| WEGEnvironment | String | DEFAULT / IN / KSA/ EUG | Mandatory At WebEngage, you can choose to host all your data at 4 data centers, US, Saudi Arabia, India or Europe (Frankfurt). By default, your data is stored in our US (or Global) Data Center. However, you can choose to host it at our India Europe (Frankfurt) or Saudi Arabia Data Center by specifying the same in your contractual agreement |
Congratulations!You have successfully integrated WebEngage with your Flutter apps and are sending user session data to WebEngage. Please note that it may take up to a few minutes for data to reflect on your dashboard.
Please feel free to drop in a few lines at [email protected] in case you have any further queries. We're always just an email away!
Updated 4 months ago
So, what's next?
We recommend that you implement the following integrations with your app before releasing it with WebEngage for the first time: