Cordova
Cordova, formerly called as PhoneGap, is a platform to build native mobile applications using HTML5, CSS and JavaScript. It acts a container for running a web application written in HTML, CSS, JS. Ionic uses Cordova to deploy native apps.
Here's how you can integrate the WebEngage SDK with your hybrid app:
1. Install WebEngage plugin
Use the below command to install WebEngage plugin for both Android and iOS platforms.
cordova plugin add cordova-plugin-webengage --fetchSteps for iOS
Installation via. CocoaPods
We provide CocoaPod support from version 1.0.1 and above.
Starting from cordova-ios version 4.3.0 and cordova-cli version 6.4.0, CocoaPod support is provided to bundle any iOS framework.
Cocoapods is a dependency manager for iOS projects and makes integration easier. If you don't have cocoapods installed, you can do it by executing the following command in your terminal:
sudo gem install cocoapodsHere, after adding the plugin just go to the ios folder in platforms and run pod install command to integrate our WebEngage framework:
pod repo update
pod install
Manual Integration
Step 1: Download the SDK file here. Extract the downloaded ZIP file.
- You will find two directories in the extracted ZIP:
xc10andxc11. If you are using Xcode 10 use theWebengage.frameworkwithin thexc10directory. For Xcode 11 and above use the one inxc11.
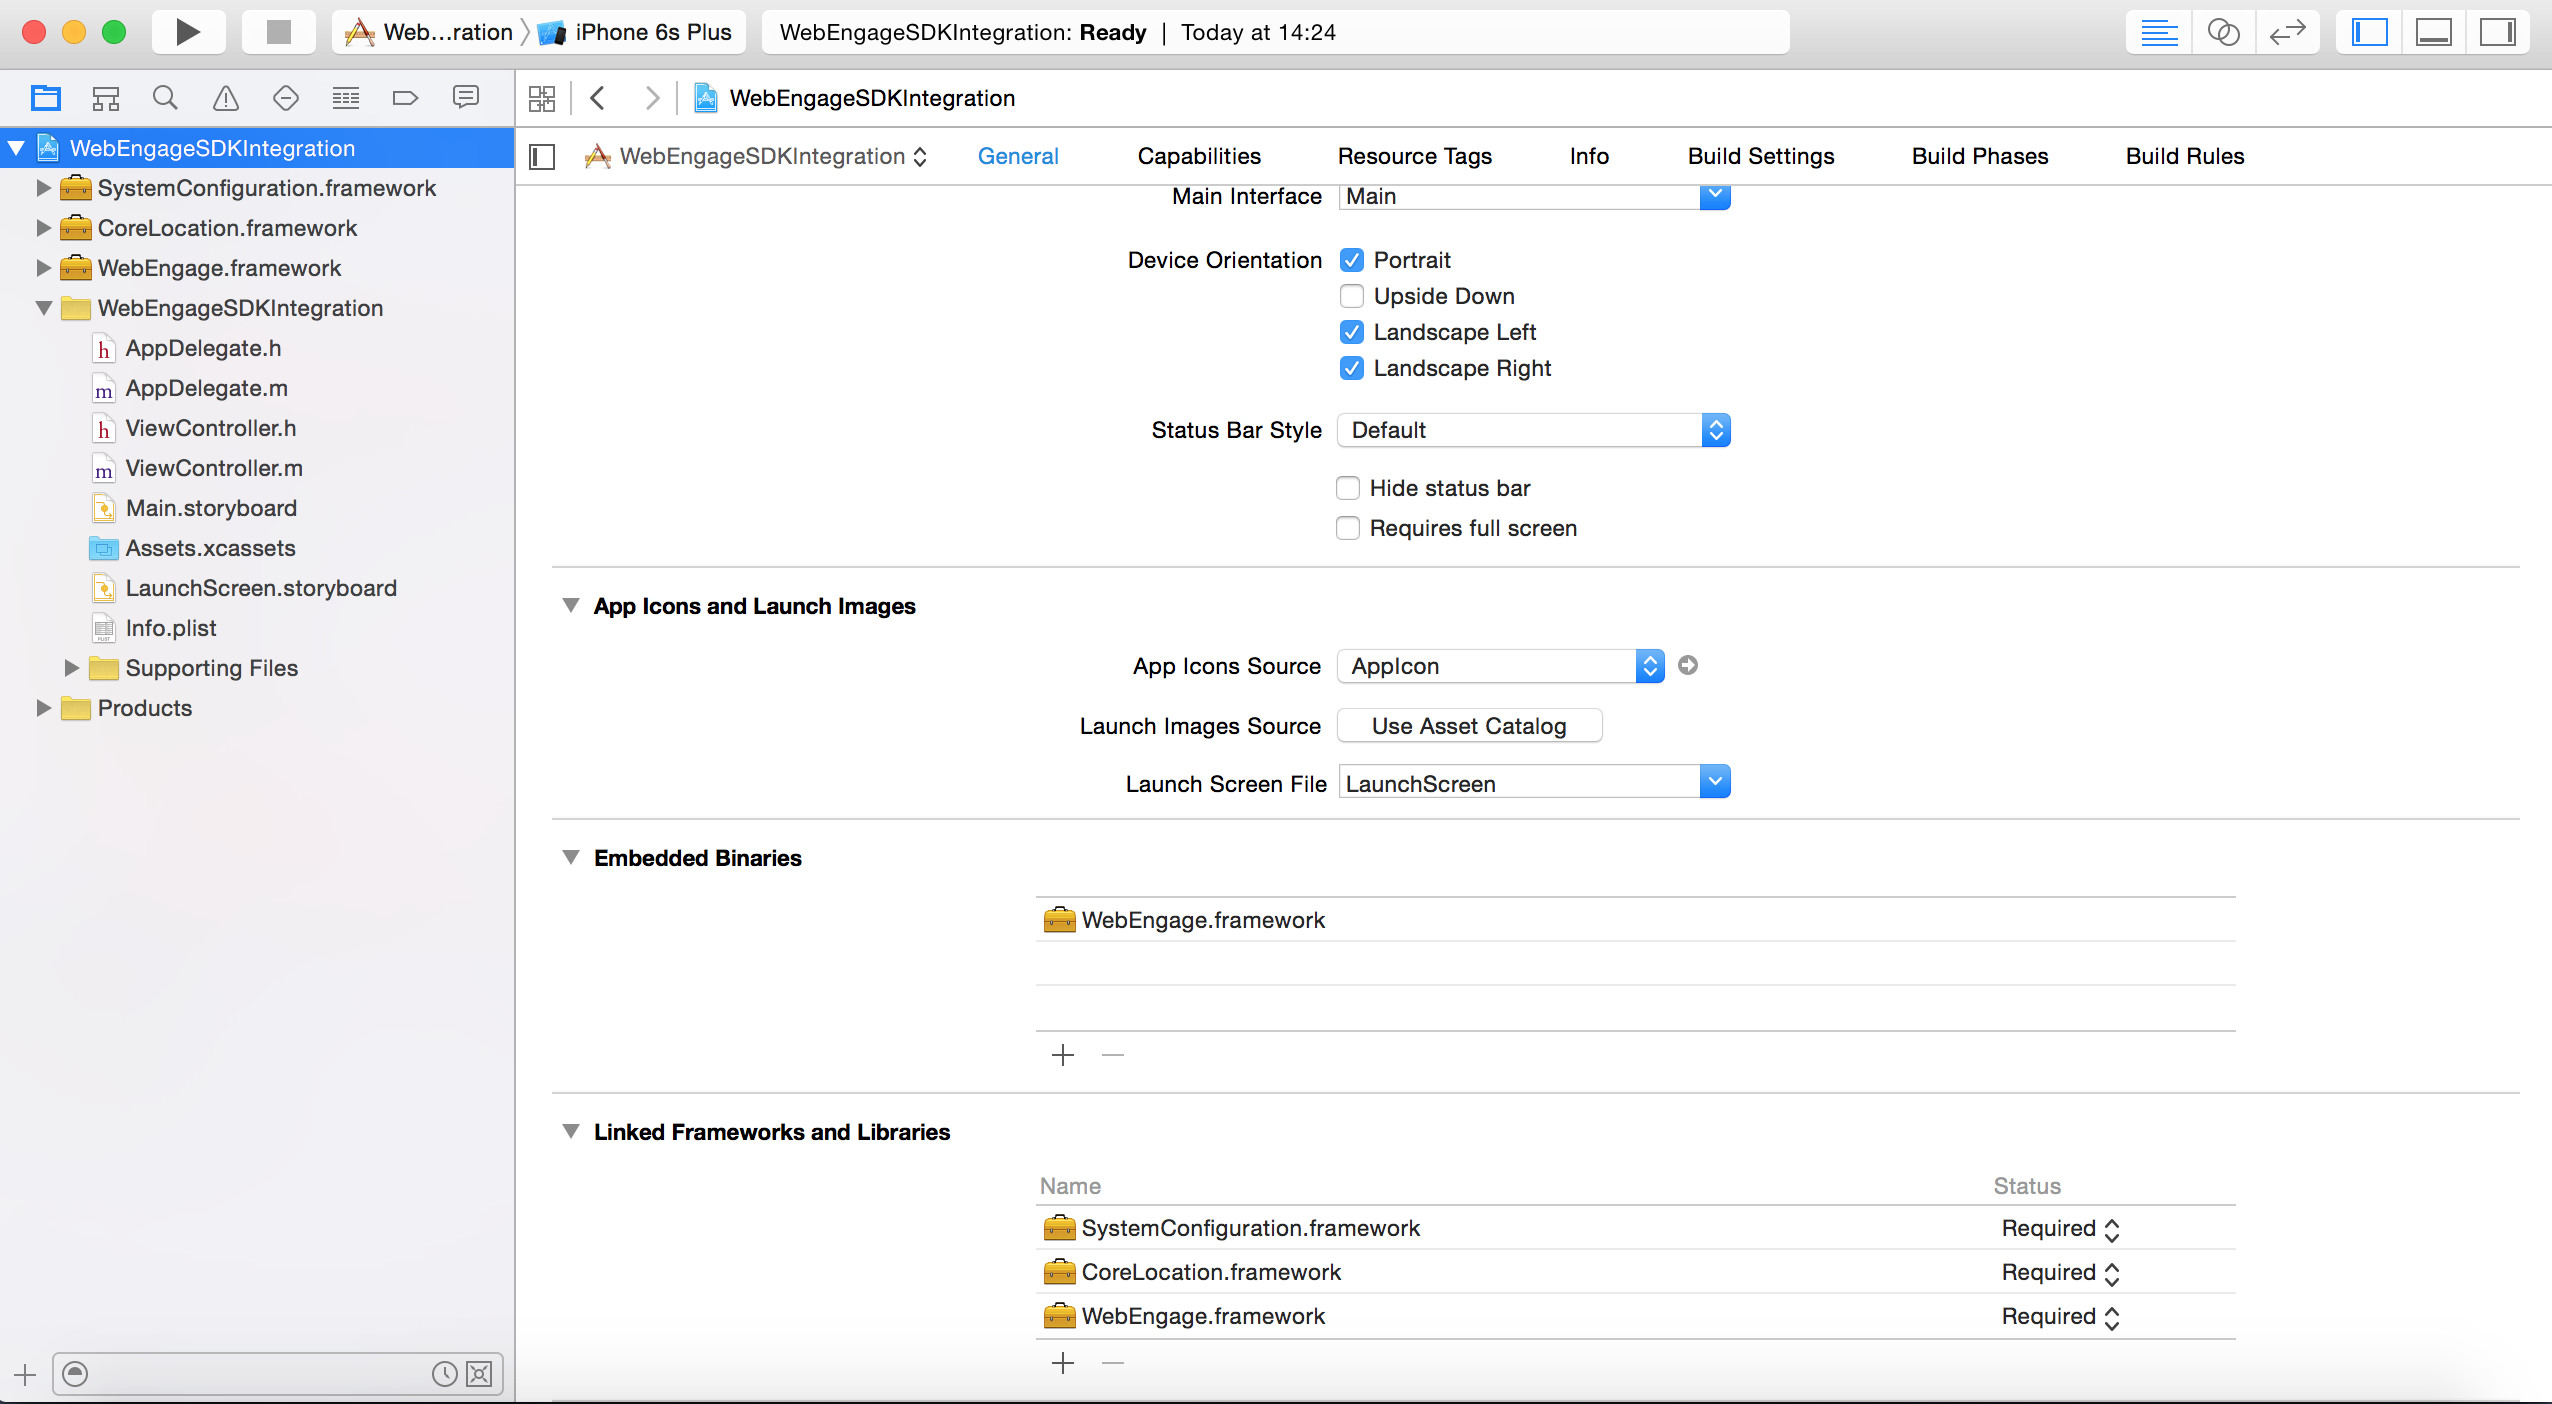
Step 2: Select the name of the project in the project navigator. The project editor appears in the Editor area of the Xcode workspace window.
Step 3: Click on the General tab at the top of project editor.
Step 4: In the section Embedded Binaries click on the "+" button to open the file chooser for your project. Open WebEngage.framework and select Copy if needed option. This will copy the framework to your project directory.
Step 5: Under Linked Frameworks and Libraries click the "+" button and add SystemConfiguration.framework and CoreLocation.framework.

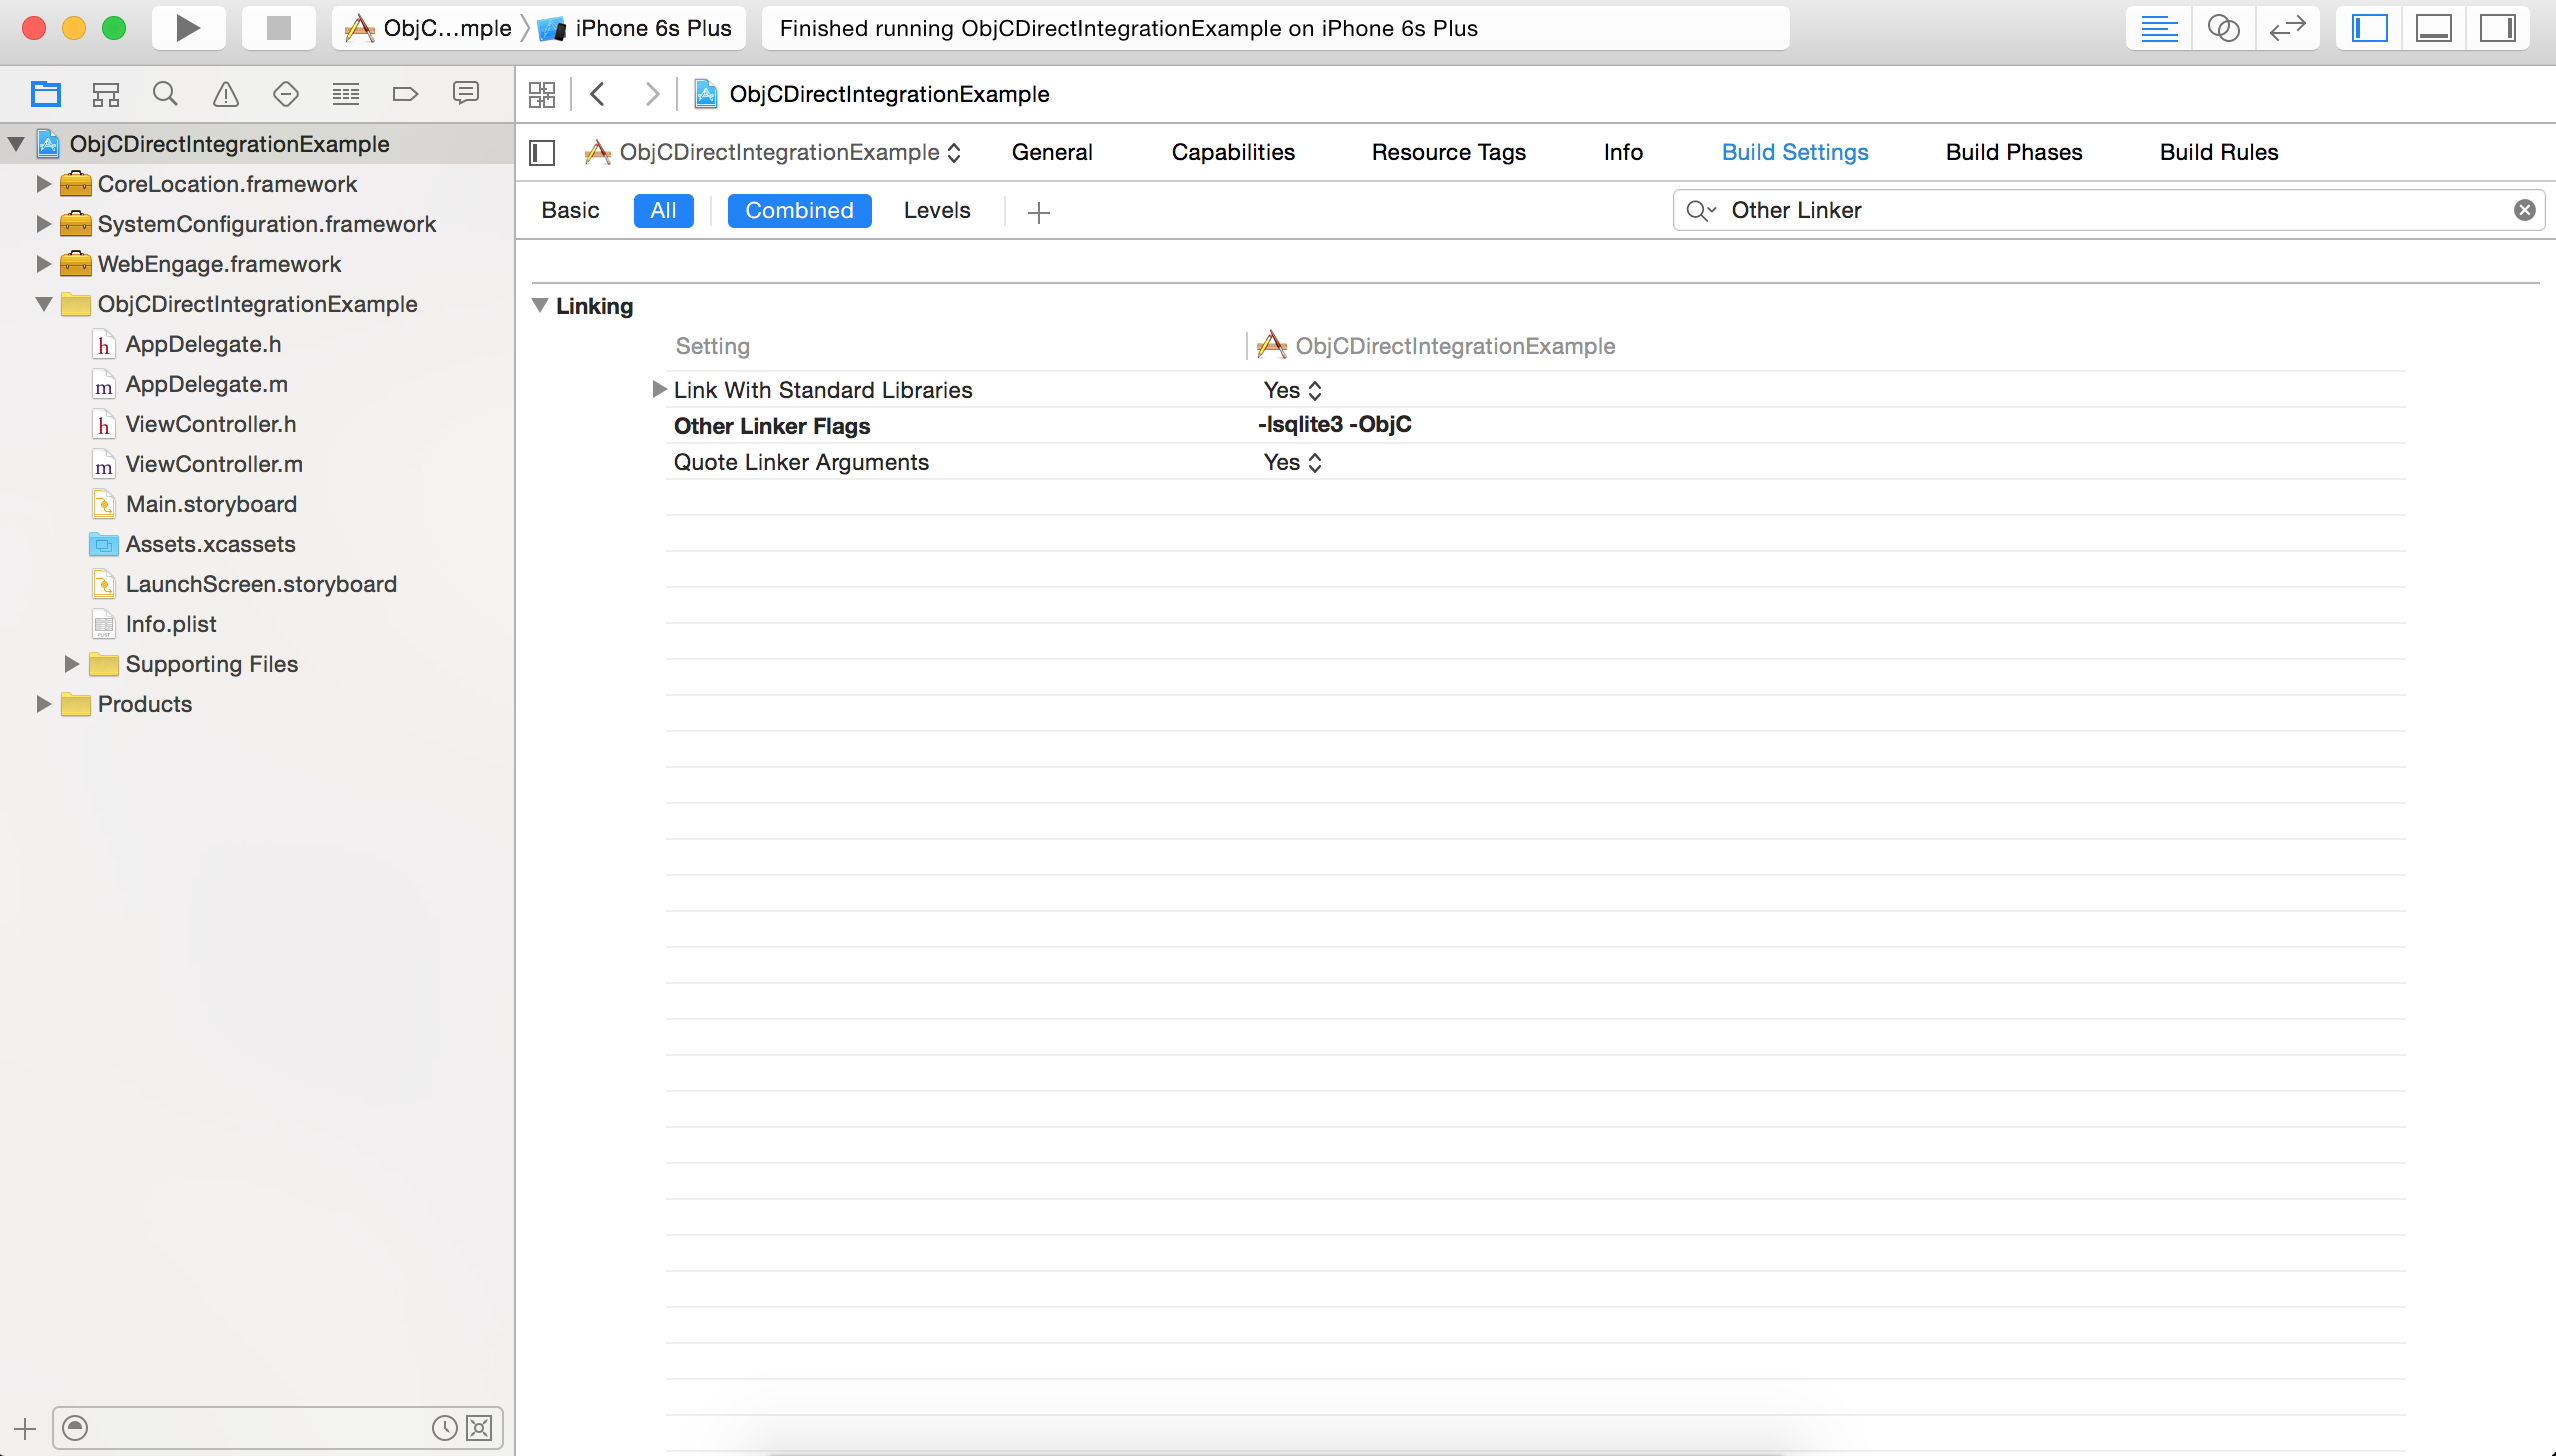
Step 6: In the 'Build Settings' tab of the project editor, search for Other Linker Flags option. Add -lsqlite3 and -ObjC under it as shown below.

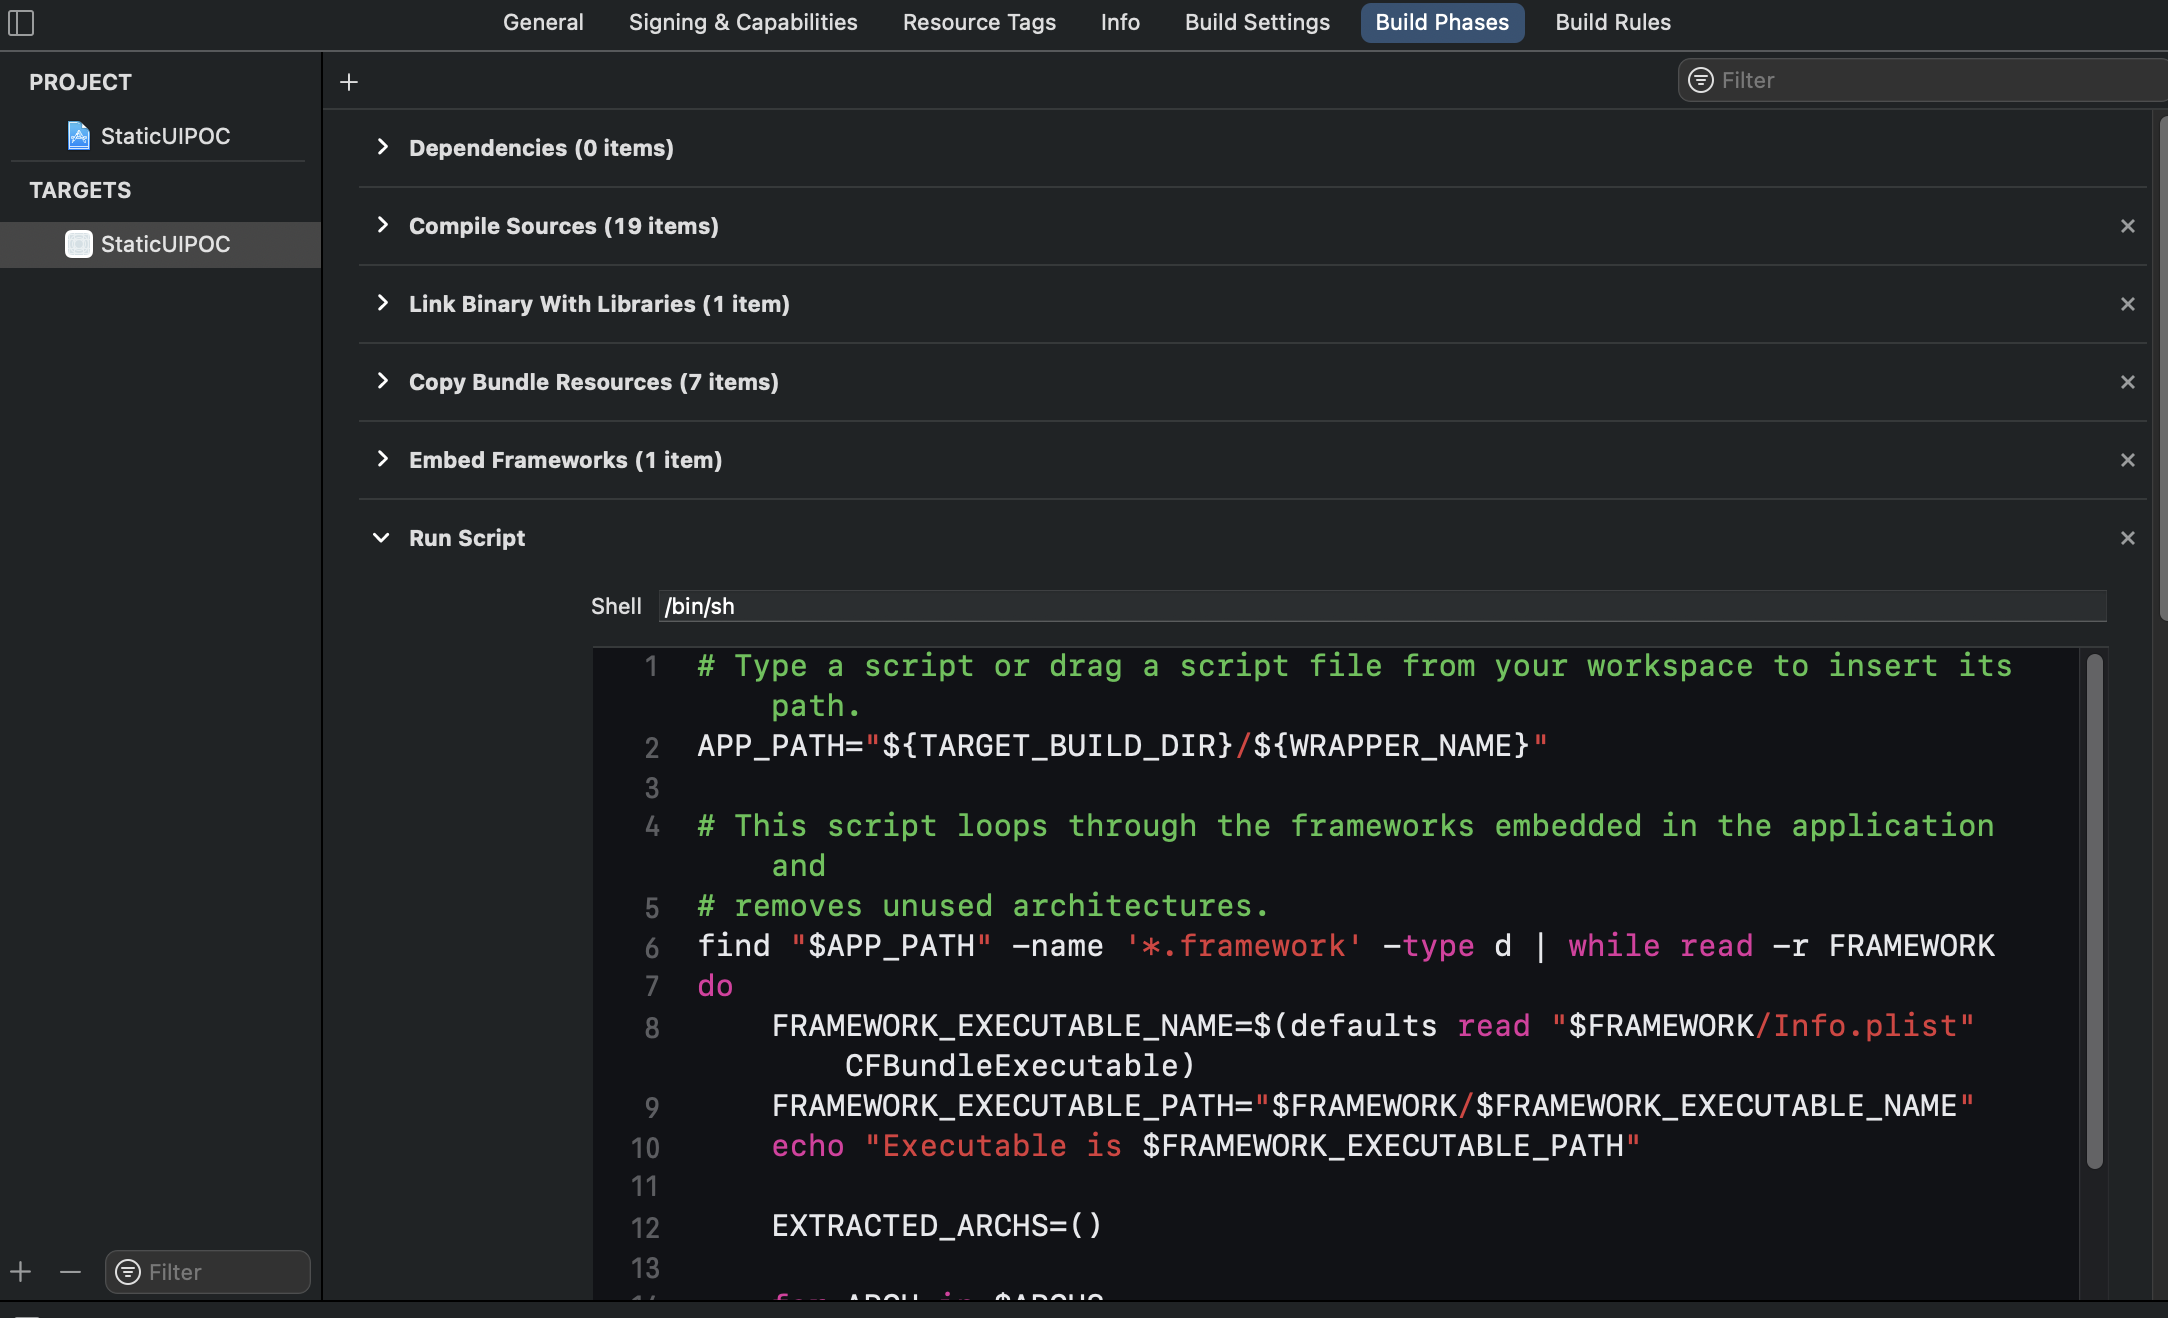
Step 7: Add script to remove Unwanted Architectures
Do this if not already done: Select App Target and go to Build Phase and add a Run Script step to your build steps, set it to use /bin/sh and enter the following script:
#!/bin/bash
APP_PATH="${TARGET_BUILD_DIR}/${WRAPPER_NAME}"

# This script loops through the frameworks embedded in the application and
# removes unused architectures.
find "$APP_PATH" -name '*.framework' -type d | while read -r FRAMEWORK
do
    FRAMEWORK_EXECUTABLE_NAME=$(defaults read "$FRAMEWORK/Info.plist" CFBundleExecutable)
    FRAMEWORK_EXECUTABLE_PATH="$FRAMEWORK/$FRAMEWORK_EXECUTABLE_NAME"
    echo "Executable is $FRAMEWORK_EXECUTABLE_PATH"

    EXTRACTED_ARCHS=()

    for ARCH in $ARCHS
    do
        echo "Extracting $ARCH from $FRAMEWORK_EXECUTABLE_NAME"
        lipo -extract "$ARCH" "$FRAMEWORK_EXECUTABLE_PATH" -o "$FRAMEWORK_EXECUTABLE_PATH-$ARCH"
        EXTRACTED_ARCHS+=("$FRAMEWORK_EXECUTABLE_PATH-$ARCH")
    done

    echo "Merging extracted architectures: ${ARCHS}"
    lipo -o "$FRAMEWORK_EXECUTABLE_PATH-merged" -create "${EXTRACTED_ARCHS[@]}"
    rm "${EXTRACTED_ARCHS[@]}"

    echo "Replacing original executable with thinned version"
    rm "$FRAMEWORK_EXECUTABLE_PATH"
    mv "$FRAMEWORK_EXECUTABLE_PATH-merged" "$FRAMEWORK_EXECUTABLE_PATH"

done
This script is for removing unsupported architectures while exporting the build OR submitting app to the app store.

Step 8: Enable Push Notifications.
a. Enter Project Navigator view.
b. Select your main app target from the expanded sidebar or from the dropdown menu, then select the Capabilities tab.
c. If Push Notifications isn't enabled, click the switch to add the "Push Notifications" entitlement to your app. If you are using Xcode 8 or above, ensure that a YOUR-APP-NAME.entitlements file has been added to your project.

2. Integrate the SDK
Step 1: Open the config.xml file from the root directory of your project and add the following code snippet.
<widget ... xmlns:android="http://schemas.android.com/apk/res/android">
    ...
    <!-- For Android -->
    <platform name="android">
        <config-file parent="/manifest/application" target="AndroidManifest.xml">
            ...
            <meta-data android:name="com.webengage.sdk.android.key" android:value="YOUR_WEBENGAGE_LICENSE_CODE" />
            <meta-data android:name="com.webengage.sdk.android.debug" android:value="false" />

        </config-file>
    </platform>
<!-- For iOS -->
<platform name="ios">
...
<config-file parent="WEGLicenseCode" target="*-Info.plist">
<string>YOUR_WEBENGAGE_LICENSE_CODE</string>
</config-file>
<config-file parent="WEGLogLevel" target="*-Info.plist">
<string>DEFAULT</string>
</config-file>
<.platform>
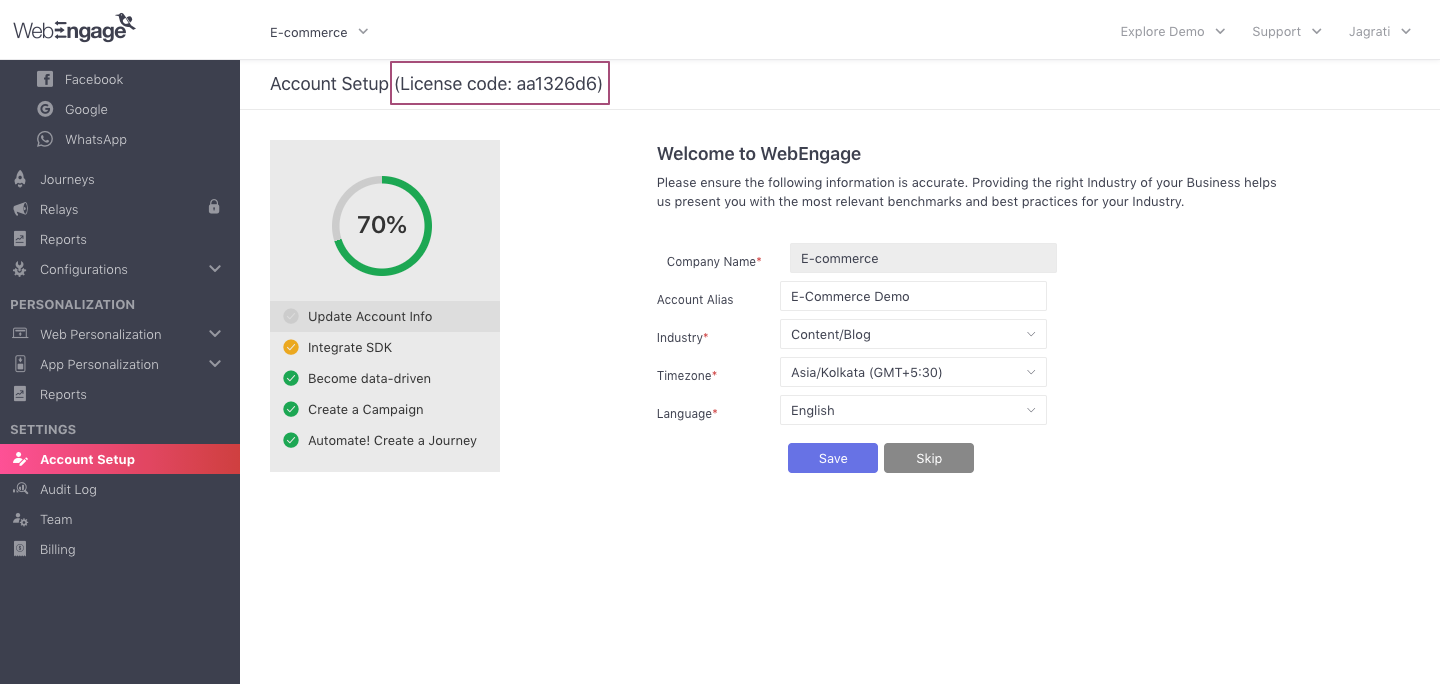
</widget>Please ensure that you replace YOUR_WEBENGAGE_LICENSE_CODE in the above code snippets (for Android & iOS) with your license code. As highlighted below, if can be found under the Account Setup section of your dashboard.

Locating your WebEngage license code
Please Note: Debug is OptionalDebug logs from WebEngage SDK are printed if:
The value of
com.webengage.sdk.android.debugtag istruefor Android.The value of the
WEGLogLeveltag isVERBOSEfor iOS.(Default value of the corresponding tags is
falsefor Android andDEFAULTfor iOS.)
Step 2: Add the meta-data tag and config-file tag under config.xml if you're using WebEngage's India Data Center.
<platform name="android">
        <config-file parent="/manifest/application" target="AndroidManifest.xml">
          ............
<meta-data android:name="com.webengage.sdk.android.environment" android:value="in" />
        .......
 </config-file>
    </platform>
<platform name="ios">
.......
<config-file parent="WEGEnvironment" target="*-Info.plist">
<string>IN</string>
</config-file>
......
</platform><platform name="android">
<config-file parent="/manifest/application" target="AndroidManifest.xml">
............
<meta-data android:name="com.webengage.sdk.android.environment" android:value="ksa" />
.......
</config-file>
</platform><platform name="ios">
.......
<config-file parent="WEGEnvironment" target="*-Info.plist">
<string>KSA</string>
</config-file>
......
</platform>
IMPORTANT: Identifying Your Data Center
If your WebEngage dashboard URL starts with
dashboard.webengage.com, then it means you're using our Global Data Center. (All data is stored here by default).If you have specifically asked for your data to be stored in our India Data Center in your contract with WebEngage, then your dashboard URL will start with
dashboard.in.webengage.com.If you have specifically asked for your data to be stored in our Saudi Arabia Data Center in your contract with WebEngage, then your dashboard URL will start with
dashboard.ksa.webengage.com.
3. Initialize the SDK
In your onDeviceReady callback, call webengage.engage.
onDeviceReady: function() {

/**
Additional WebEngage options and callbacks to be
registered here before calling webengage.engage()
**/

webengage.engage();
}
Attribution Tracking (Android only)
Add the following install-referrer library in /platforms/android/app/build.gradle file.
dependencies {
    ...
    implementation 'com.android.installreferrer:installreferrer:1.1.1'
}
Please note
App Installedevent andFirst Acquisition Detailsdata in user profile will not be tracked on your Android app unless you follow the above step.
Google Advertisement ID changes (Android 13 and above)
In late 2021, Google announced updates to Google Play service policies in relation to collecting Android Advertising ID. Read here to more about the changes.
Due to these changes, to access the device's Advertising ID, apps targeting Android 13 (API 33) and higher will need to declare a regular Google Play services permission in their manifest file.
The permission is granted at installation time because it is not a run-time authorization.
SDK changes
The AD ID permission is now declared in the SDK's AndroidManifest.xml as of WebEngage Android SDK V3.21.0. The SDK's manifest automatically combines with your app's manifest when the app is developed, adding the permission even if the app doesn't explicitly declare it. There won't be a collision if the permission is present in both the app and the SDK.
<manifest ...>
    <!-- Required only if your app targets Android 13 or higher. -->
    <uses-permission android:name="com.google.android.gms.permission.AD_ID"/>

    <application ...>
        ...
    </application>
</manifest>
Kids Apps: According to Google’s Policy, apps that target children must not transmit the Advertising ID. If you're building an app for kids and you are using SDK V3.21.0 and above, you must revoke the AD_ID permission.
<uses-permission android:name="com.google.android.gms.permission.AD_ID" tools:node="remove"/>
Please NoteAdd the above mentioned snippets inside project's config.xml according to the usage.
4. Additional steps (Optional)
For other integration such as location tracking, please refer to the Advanced section.
Congratulations!You have successfully integrated WebEngage with your Hybrid app and are sending user session data to WebEngage. Please note that it may take up to a few minutes for data to reflect in your dashboard.
Please feel free to drop in a few lines at [email protected] in case you have any further queries. We're always just an email away!
Updated 3 months ago
We recommend that you implement the following integrations with your hybrid app before releasing it with WebEngage for the first time: