Push
Step-by-step guide to configuring Push as a channel
Push Notifications are messages that pop up on mobile devices. App publishers can send them at any time, even if users are not currenly active on the app or using their device.
App integration is required before setting up this channel.Refer to the app integration guide for supported platforms and setup steps
Enable Push Messaging for your App
Once you've integrated your app with WebEngage, you will need to implement additional configurations to ensure that your users receive the Push Notifications. Depending on the OS, you may need to implement additional configurations like:
- Rich Push Notifications for iOS
- Assigning a Notification channel_ to ensure that users receive the _Push on Android v8.1+.
As shown below, navigate to the Data Platform> Integrations> Channel Integration Status> Push Setup (Configure)> Push of your dashboard to enable the channel.
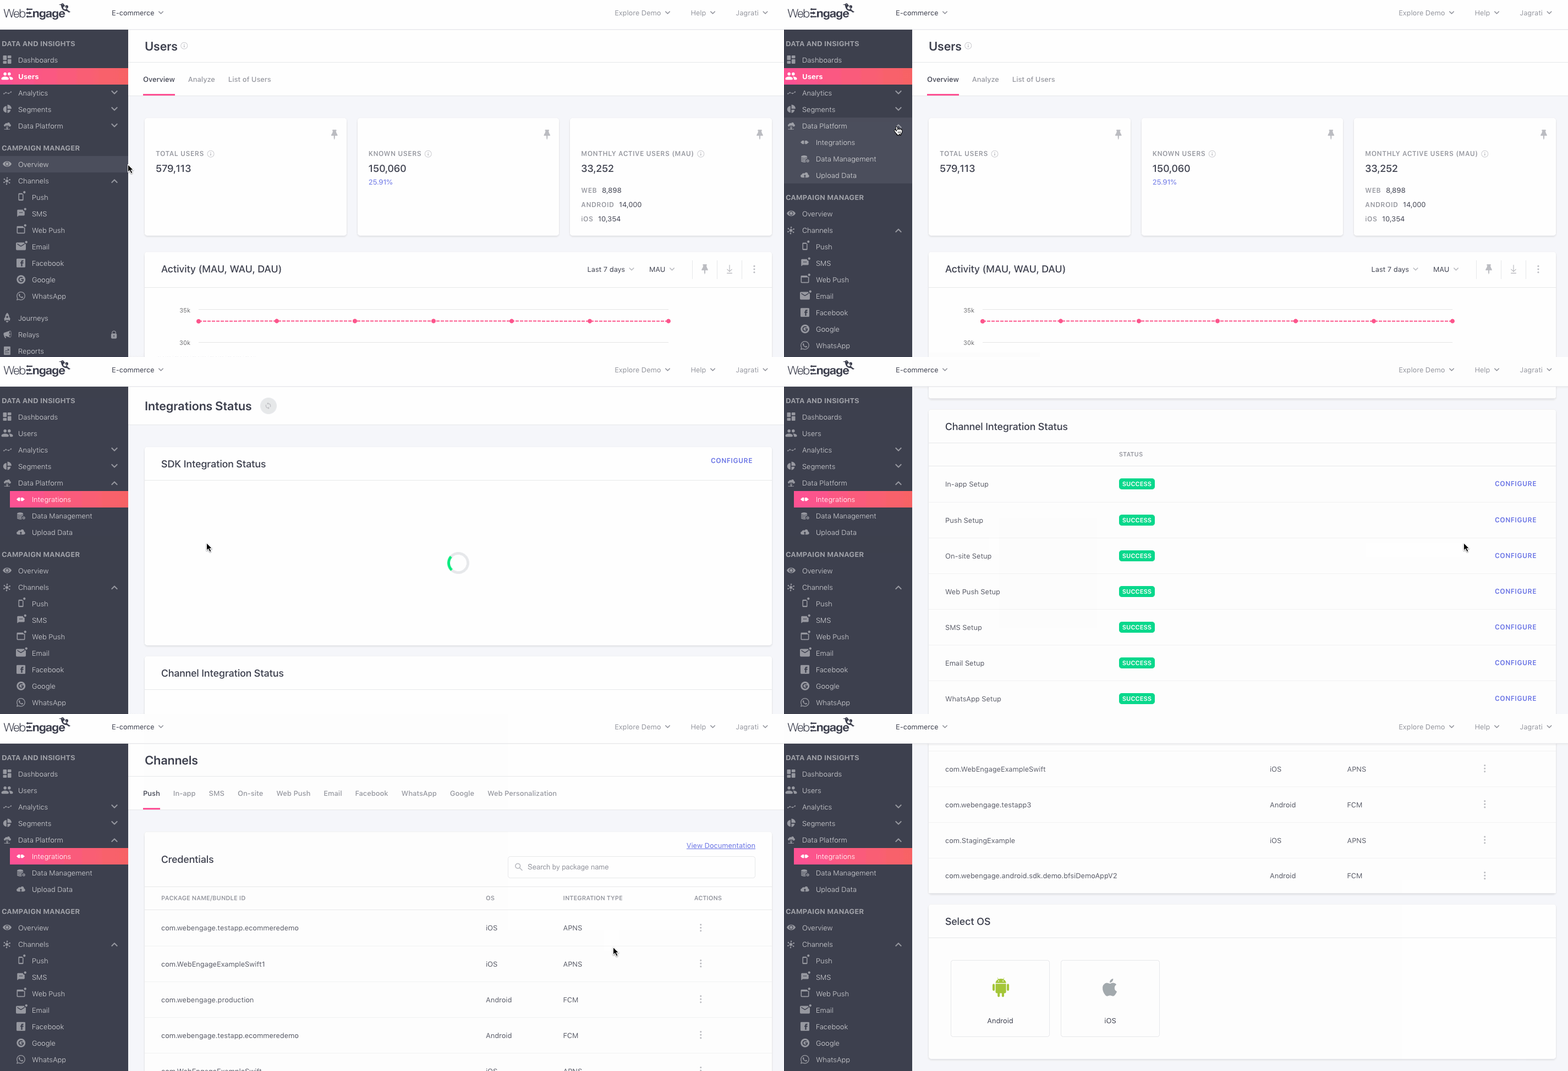
Click to enlarge
The section has been divided into two sub-sections, Credentials- which lists all the integrated Packages/ Bundle IDs and Select OS which allows you to configure Android and iOS for push notification.
Select OS
Select OS for which Push needs to be configured: Android or iOS:
Android
For Android, WebEngage offers multiple push messaging integration (listed below). But to get started adding FCM push service is mandatory.
Adding FCM keys
To get started, you are required to add FCM Push service keys.
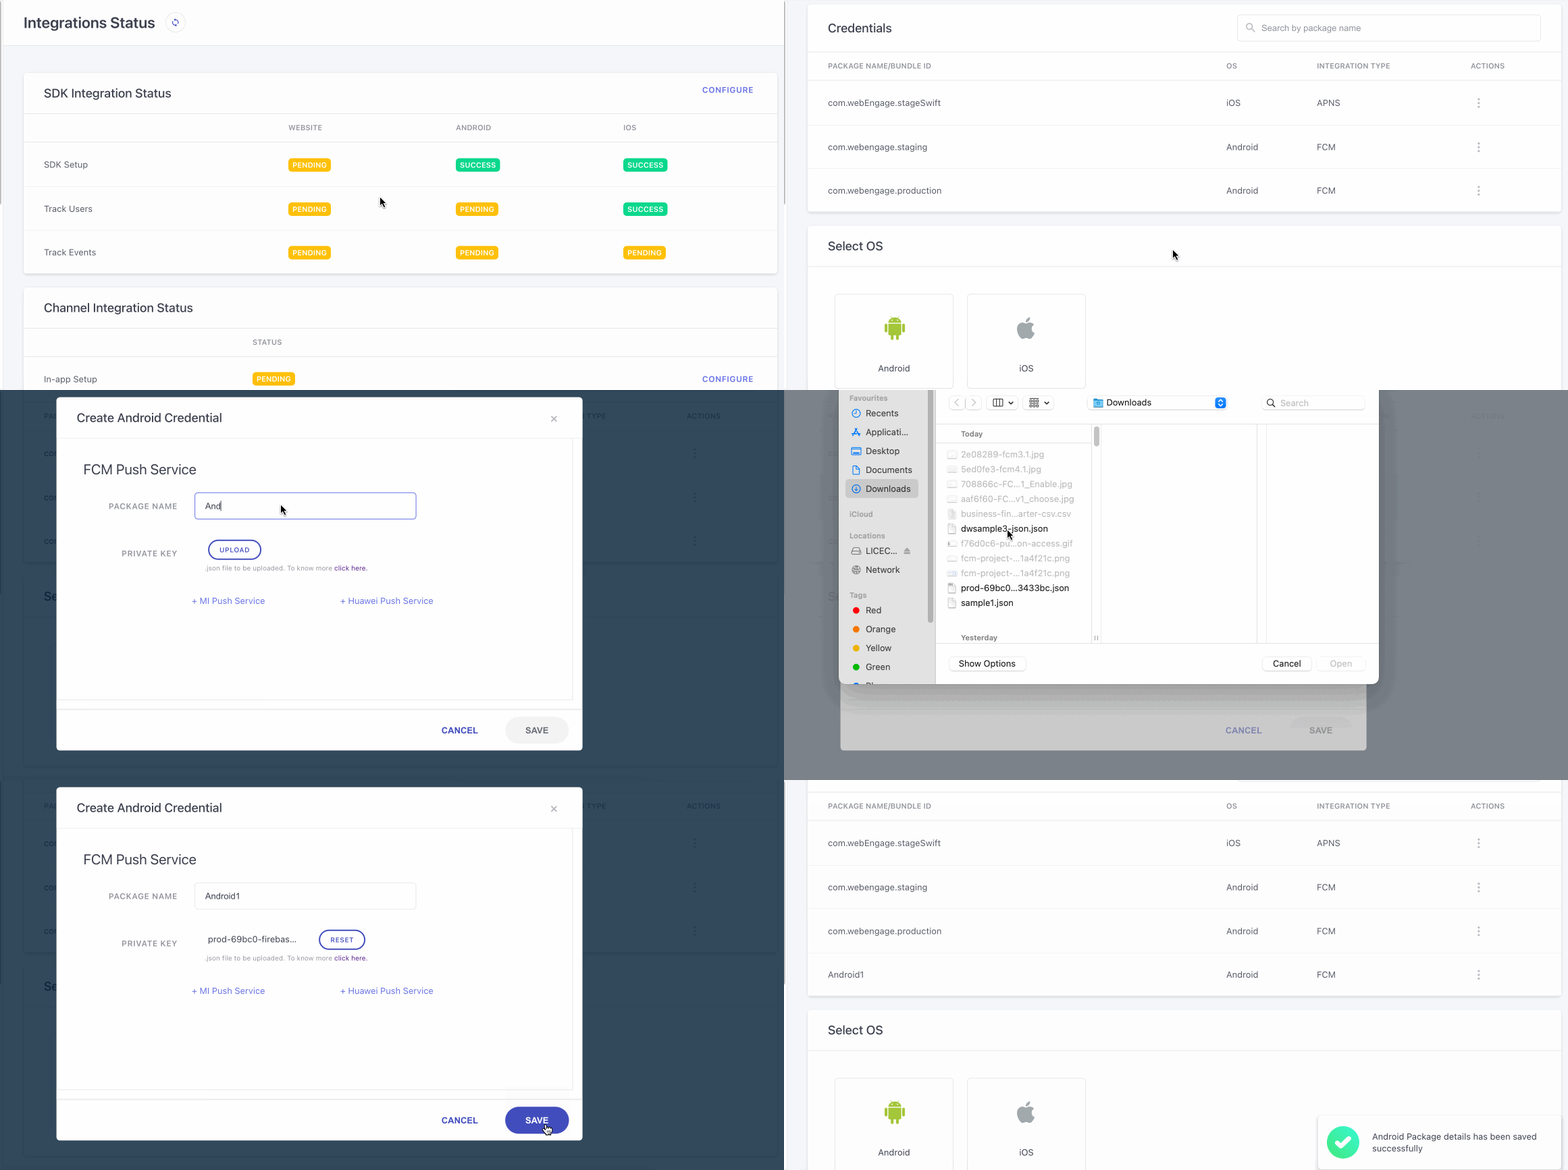
As shown above:
Step 1: Add Package Name
The Android app's application ID is also referred to as the Package Name. You can find it in your module (app-level) Gradle file, usually app/build.gradle (example package name: com.yourcompany.yourproject).
Step 2: Add FCM Creds
Upload the private key which you have downloaded from firebase cloud messaging (FCM) and click on Save.
-
On the Project Settings page of your Firebase Developers Console., navigate to the Service Accounts tab. Under Firebase Admin SDK, ensure that Node.js is selected, then click Generate New Private Key.
-
On doing so, you will be presented with a warning message, proceed to clicking on Generate Key, to download your private key JSON file.
Click here to know more about how to generate Private Key on Firebase.
Enhanced Delivery Options
For better delivery and impression rates on Chinese OEM devices like Huawei, WebEngage allows clients to add and enable the push notification services offered by these OEMs.
Please NoteHaving an FCM integration is mandatory to enable these service for your app.
Add Huawei Push Service Creds (Optional)
PrerequisiteTo enable this service, you are required to register their app on Huawei developer portal.
To get started with enabling Huawei Push services for your app refer to this doc.
Once enabled, we will attempt notification via FCM and Huawei push services on these devices.
To enable Enhanced Push messaging via Huawei Push Services, you are required to add 'Client ID' and 'Client Secret'. This will be available on your Huawei Messaging Service (HMS) dashboard.
Image for reference:
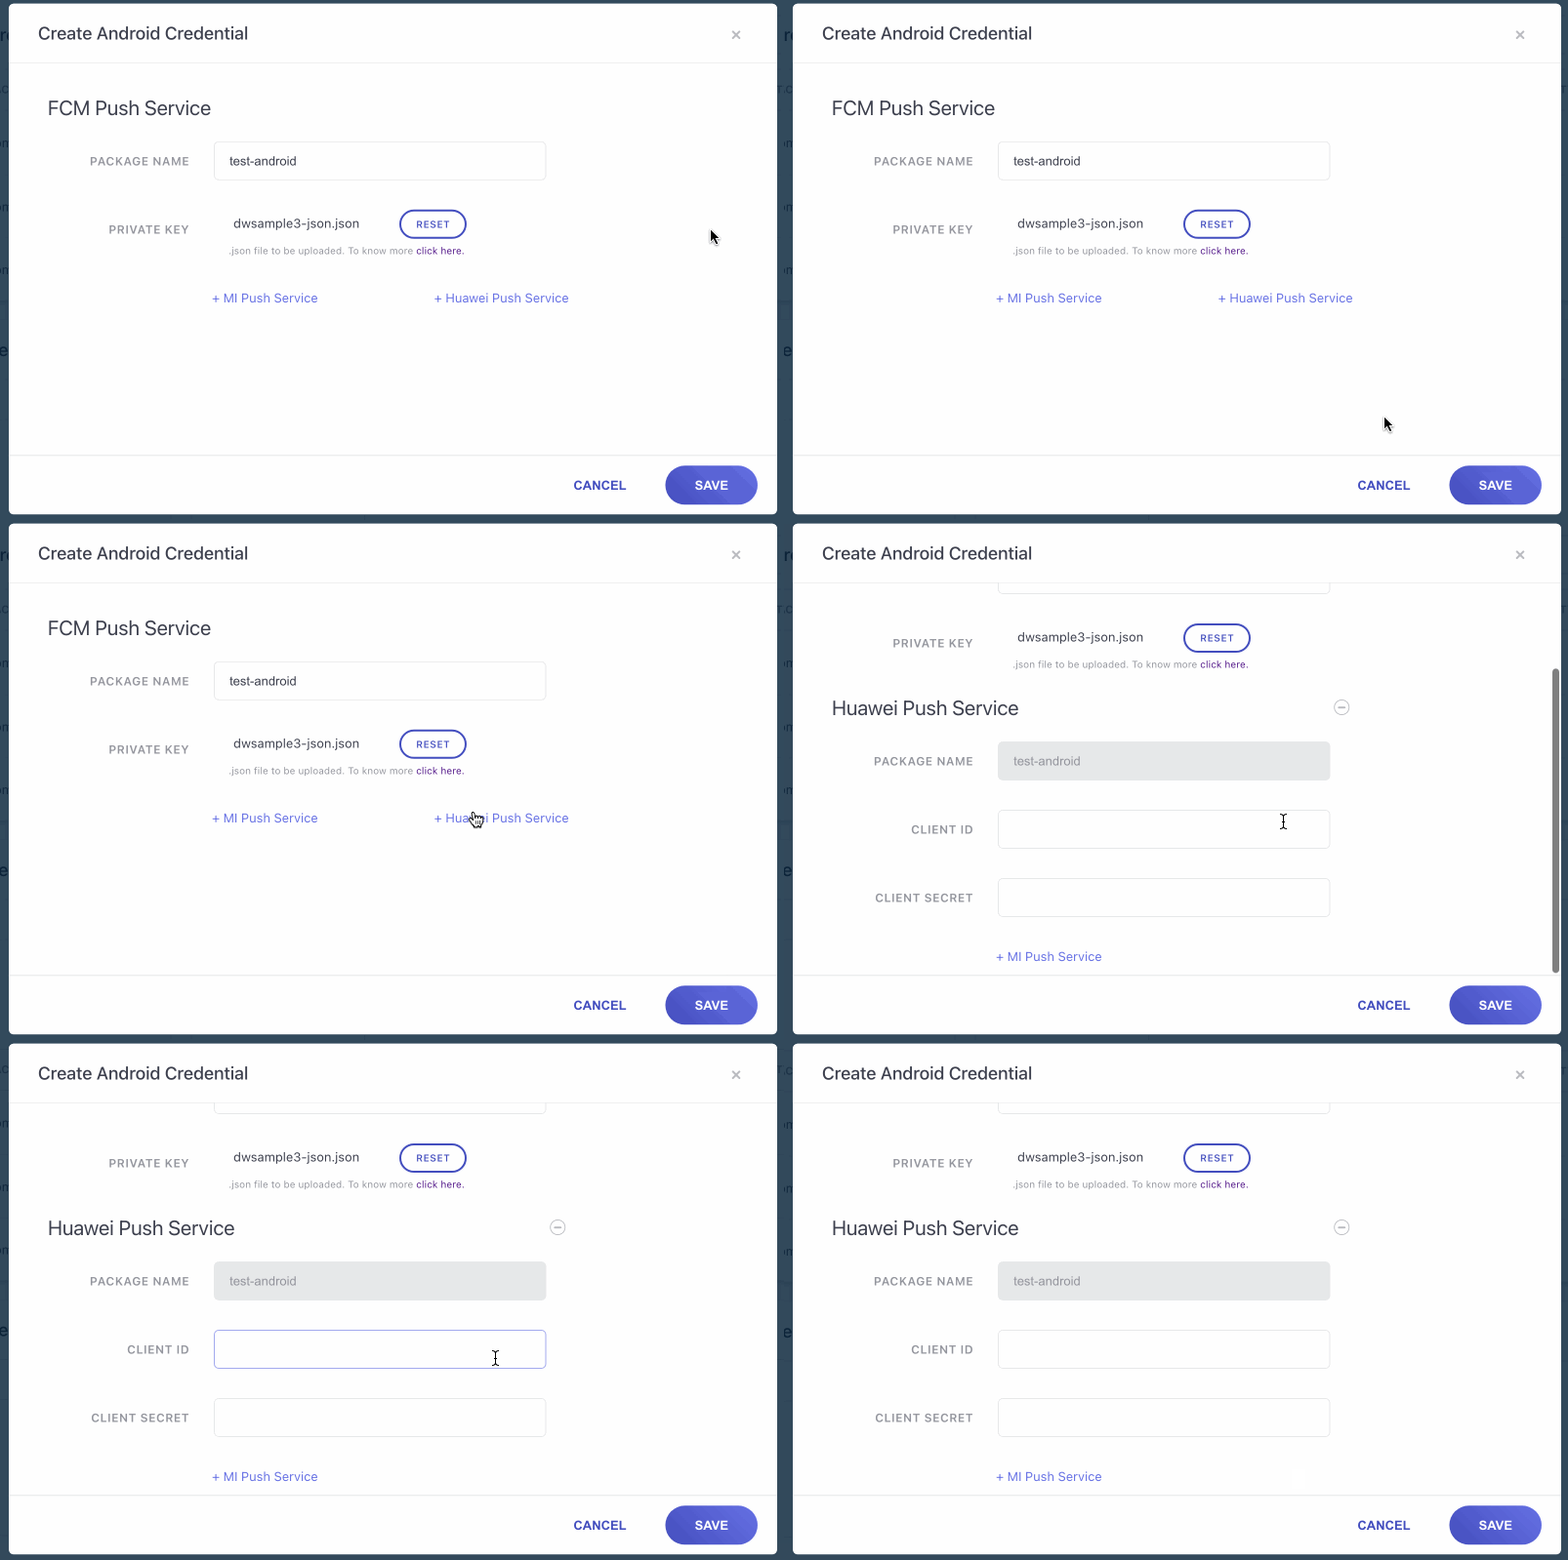
Once all the required integrations are added, Click Save.
Enable more Android apps
WebEngage allows you to add more than one Android app in a single project. To add simple click on Android icon and follow the steps mentioned above.
iOS
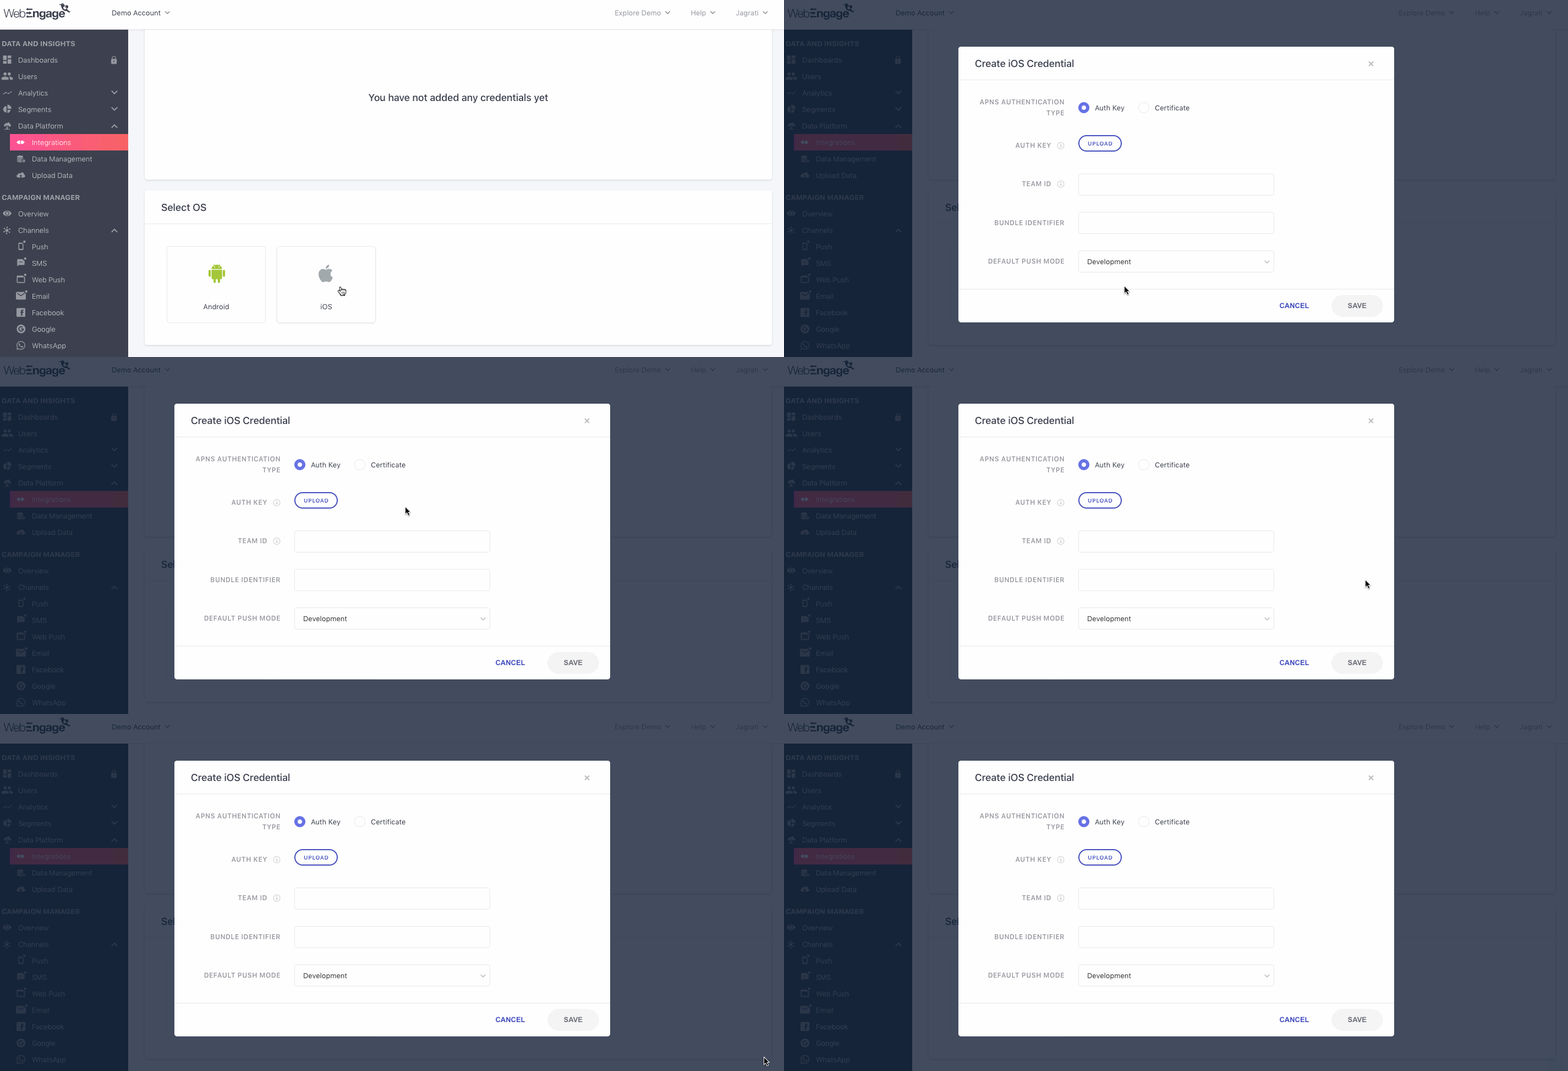
Click to enlarge
As shown above:
Step 1: Select APNs Authentication Type
-
Select Auth Key to connect your app by uploading the Auth Key file created by your tech team.
- This method allows you to connect multiple app with your WebEngage account as a common Auth Key can be shared by multiple apps, registered to the same Apple Developer Console. (Setting up multi-app support)
- Select Certificate to connect your app by uploading the APNs Push Certificate.
- This method allows you to connect only one iOS app with your WebEngage account.
- You will need to re-generate the Push Certificate every year.
If Auth Key selected at Step 1
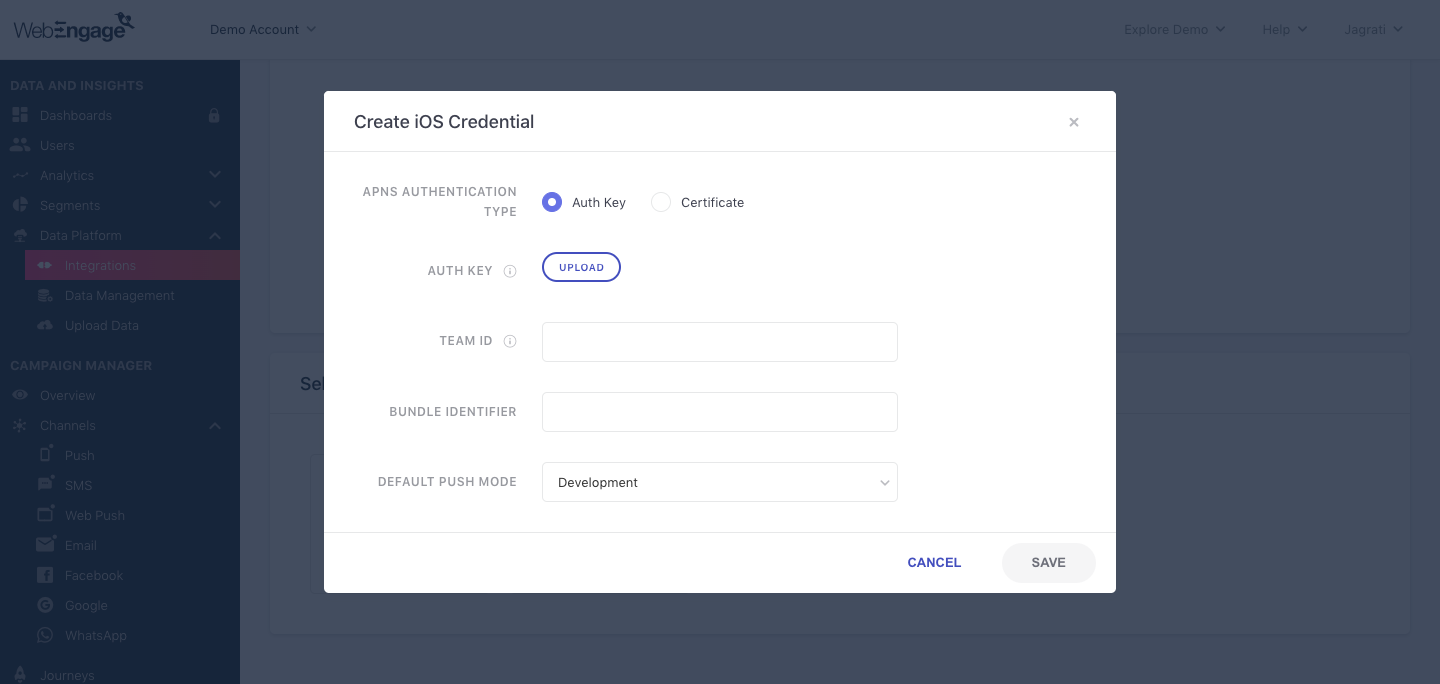
Click to enlarge
Step 2: Upload Auth Key file
As shown above, click the Upload button to add the Auth Key file.
- You can download the Auth Key file from the Certificates, Identifiers & Profiles > Keys section in the Apple Developer Console. (Please don't rename the file).
Step 3: Add Team ID
The Team ID is located under Membership > Team ID in the Apple Developer Console.
Step 4: Add Bundle Identifier
The Bundle Identifier can be found in Xcode.
Step 5: Select Default Push Mode
As shown in the above visual:
-
Select Development to test Push integration for an iOS app that's currently under development (not available for download at the app store).
-
Select Production to start sending Push Notifications to all users who have downloaded your iOS app.
Step 6: Click Save
If Certificate selected at Step 1
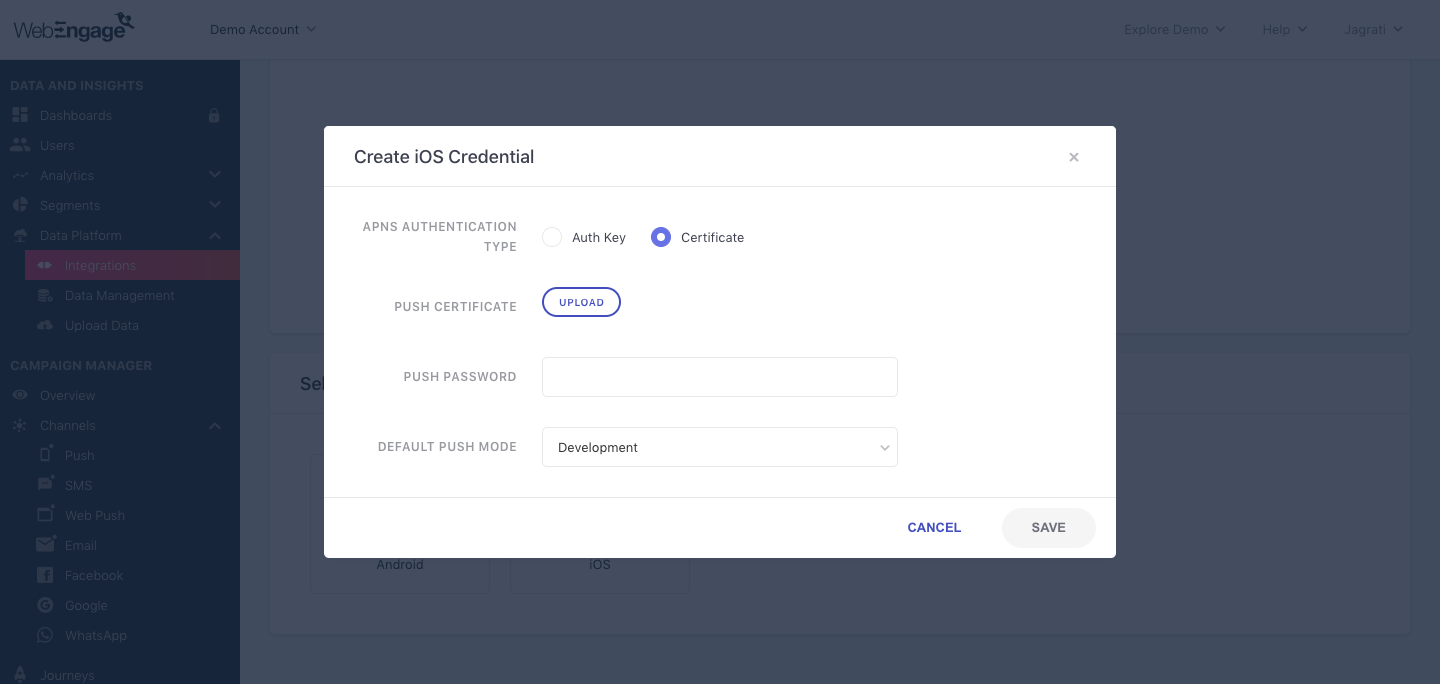
Click to enlarge
Step 2: Upload Push Certificate
As shown above, click the Upload button to add the Push Certificate.
Please get in touch with your tech team to upload the Certificate and complete configuration. APNs Push Certificate can be created through the Certificates, Identifiers & Profile > Identifiers > App ID section in the Apple Developer Console. (Step-by-step guide)
Step 3: Enter Push Password
Enter your certificate Push Password.
Step 4: Select Default Push Mode
As shown in the above visual:
-
Select Development to test Push integration for an iOS app that's currently under development (not available for download at the app store).
-
Select Production to start sending Push Notifications to all users who have downloaded your iOS app.
Step 5: Click Save
Enable more iOS apps
WebEngage allows you to add more than one iOS app in a single project. To add simple click on iOS icon and follow the steps mentioned above.
Test Push Integration
Test your integration by sending a Push Campaign to an internal segment (including only yourself and your teammates). (Step-by-step Guide to Creating Segments)
Congratulations!You're now ready to engage users through Push Notifications.
Manage Credentials
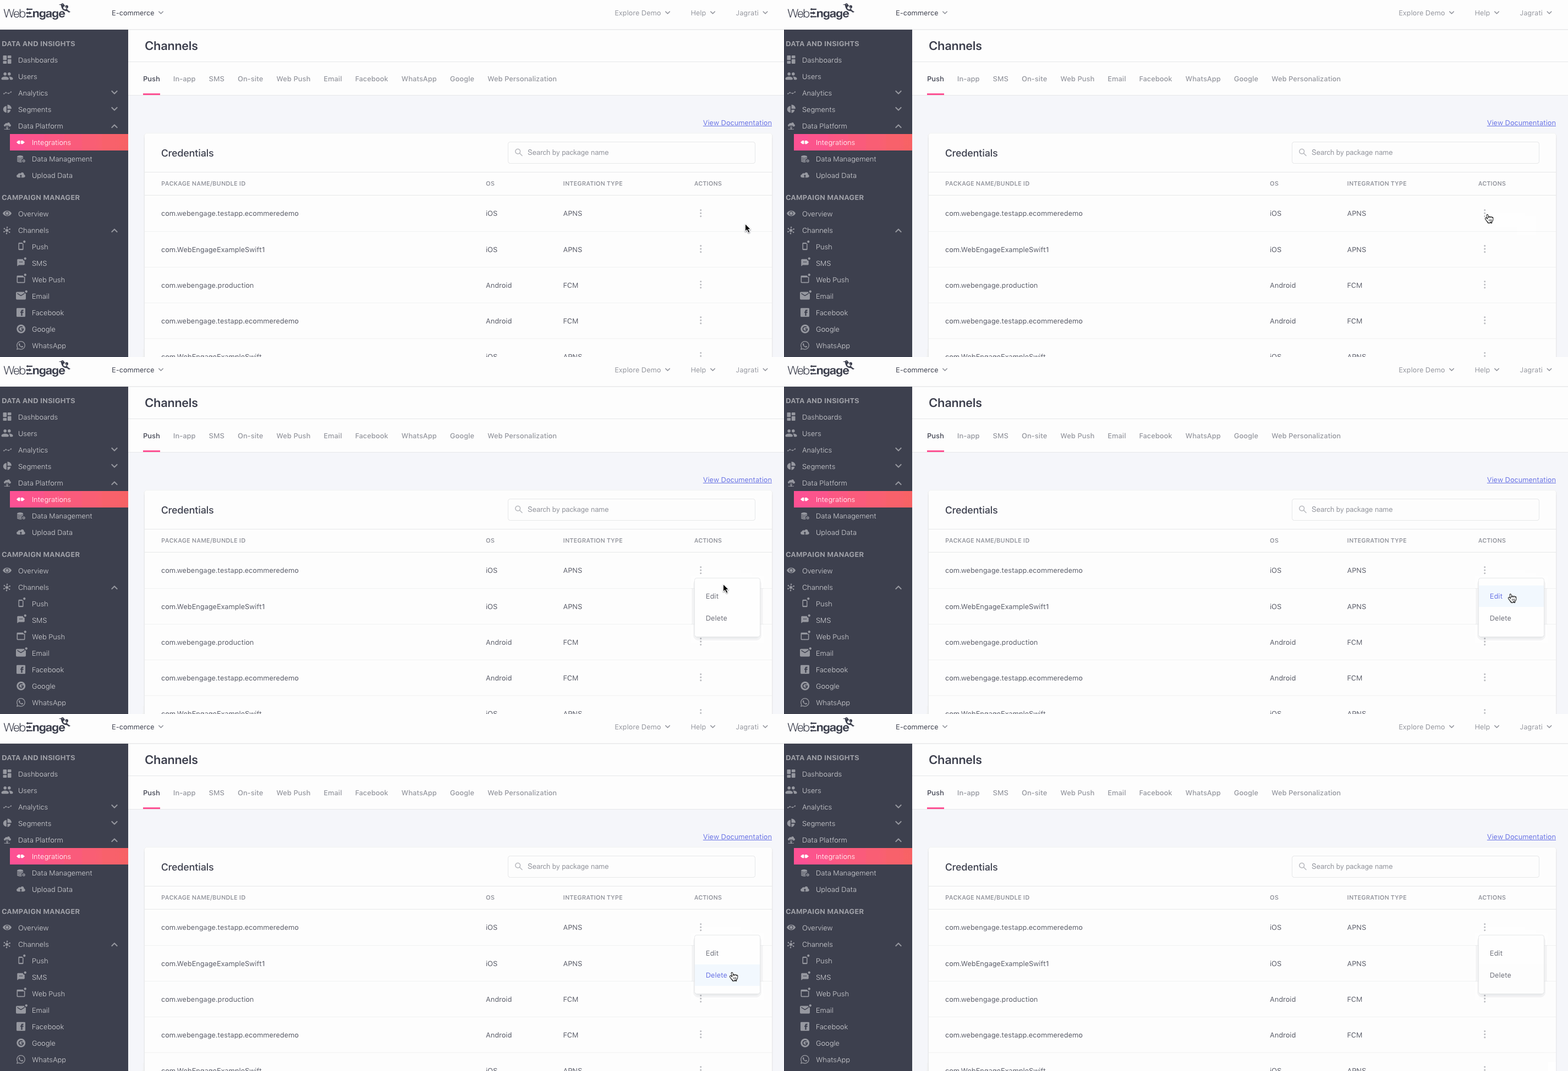
Click to enlarge
As shown above, integrated channels are listed under the Credentials section. Here you can manage your configurations i.e., Edit or Delete the integration anytime you like by accessing the Actions menu placed on the extreme right.
Editing a Channel
You can choose to edit configuration details in cases where incorrect details were entered during configuration or update some details post-integration.
As shown below, select Edit from the Actions menu, make your changes.
For Android
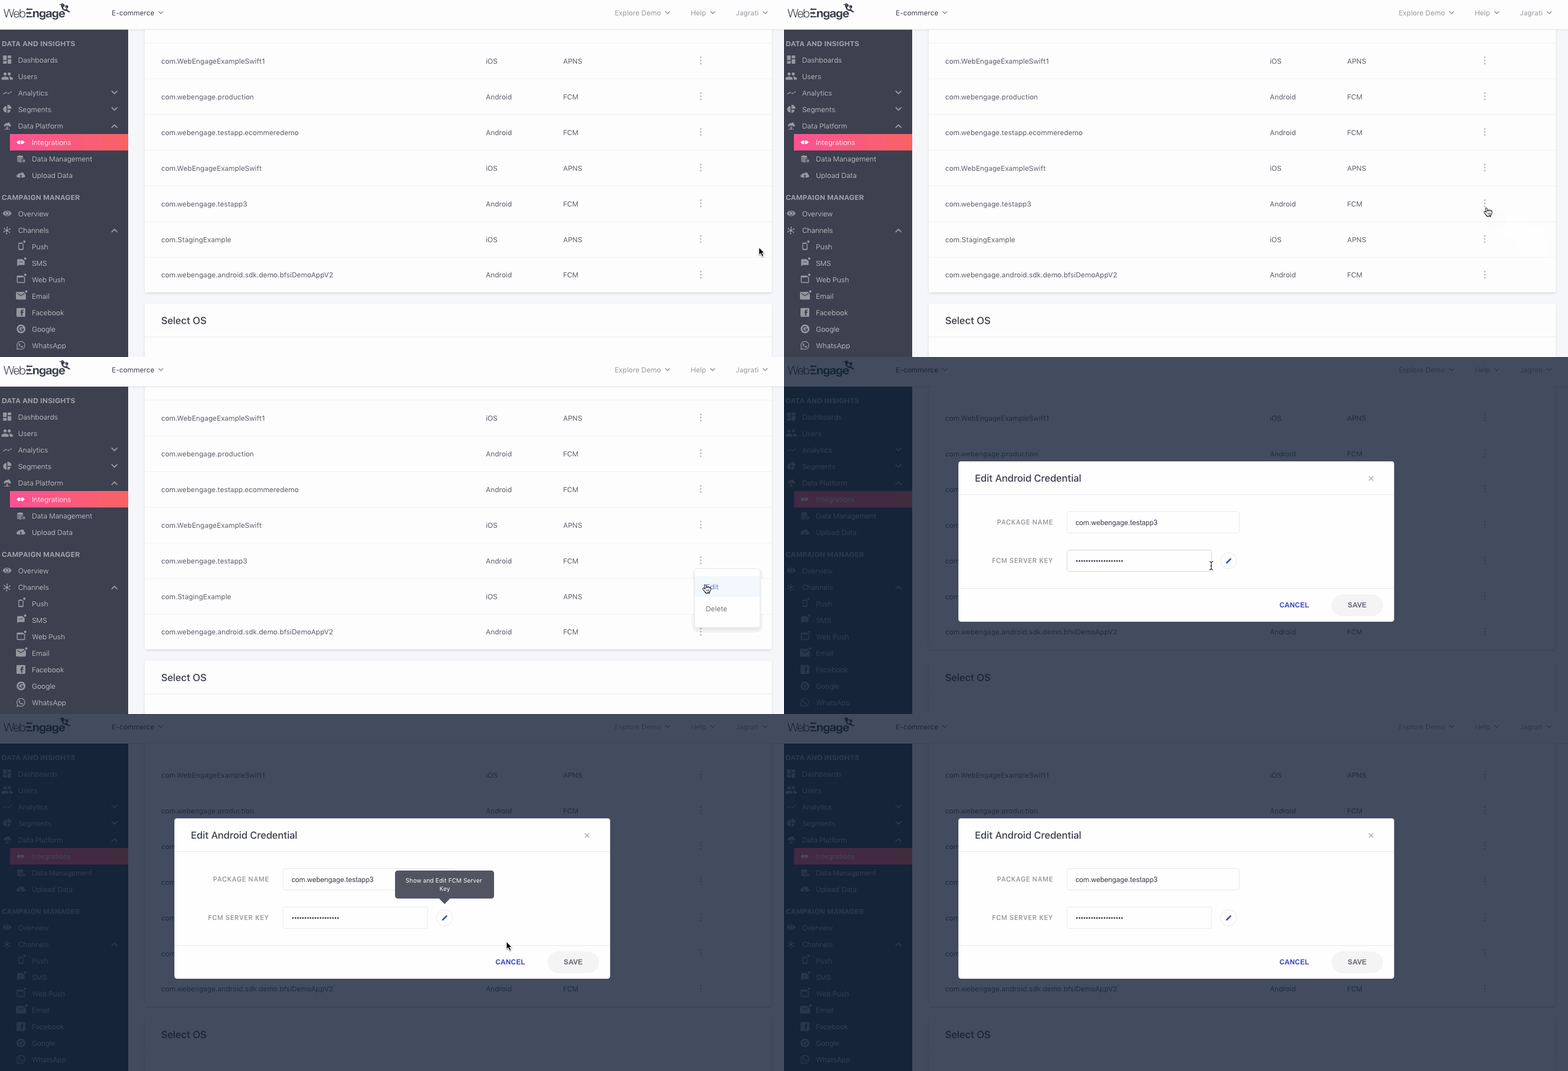
Click to enlarge
As shown above, for Android devices, you can edit the Package Name and/ or FCM Server Key by clicking on the Pencil icon next to it. Click Save to save the changes.
For iOS
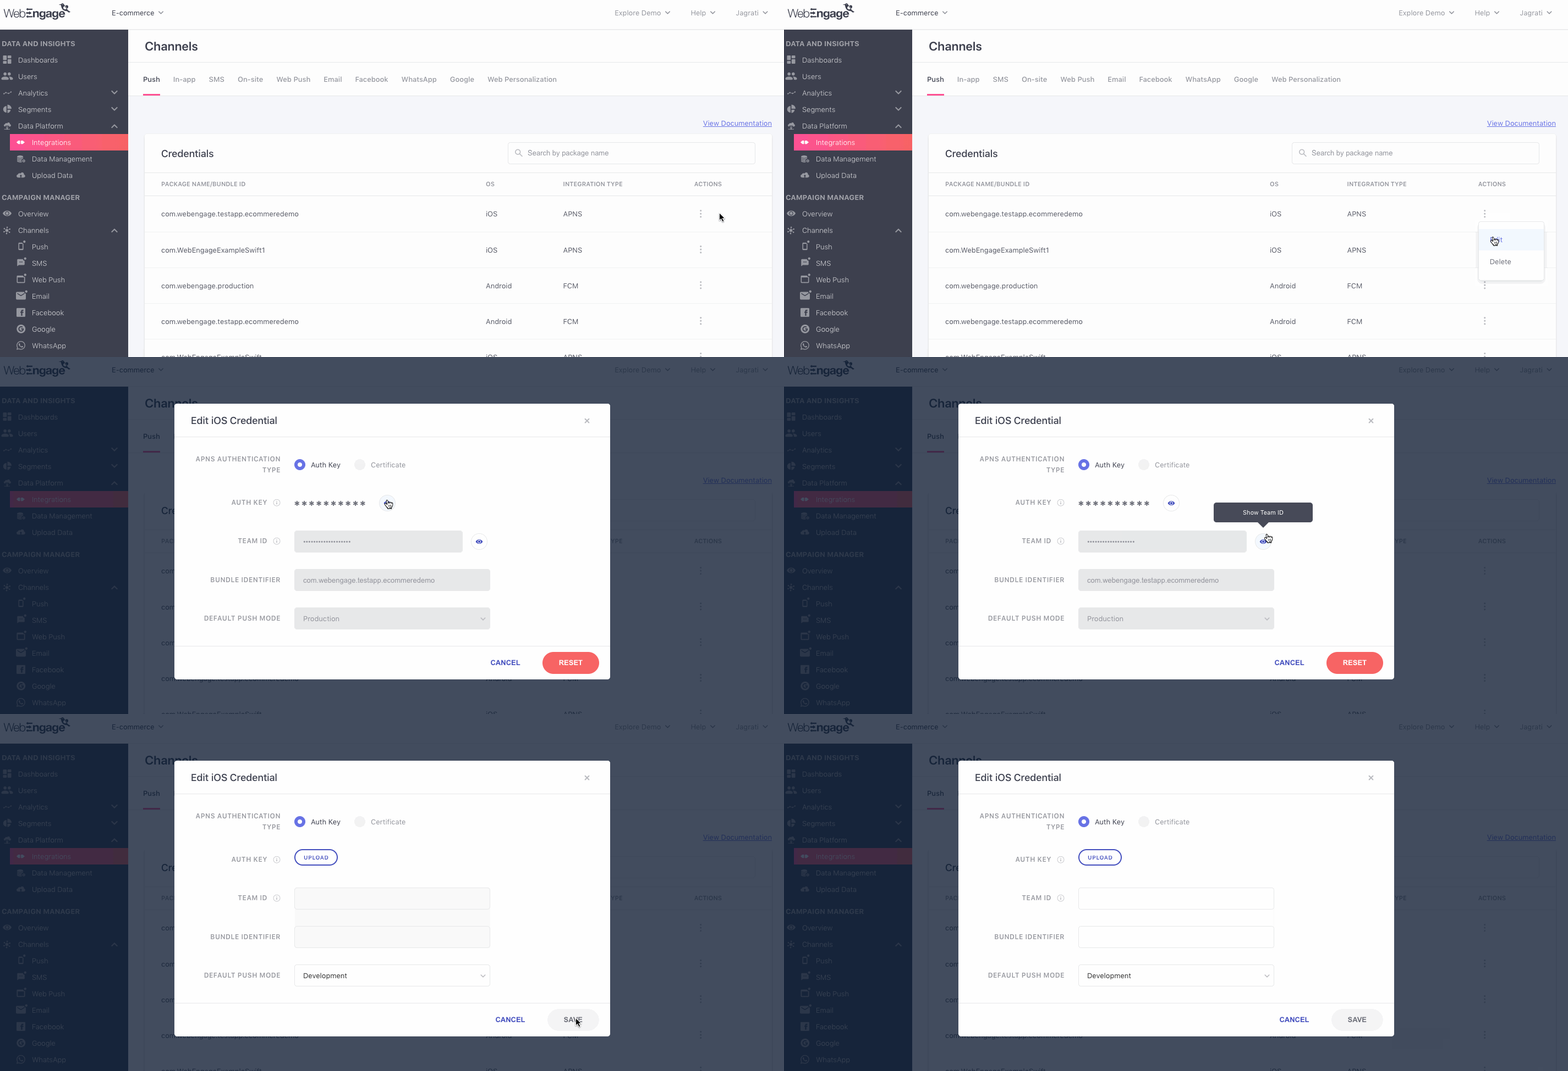
Click to enlarge
Click Reset to reset the configurations and click Save to save the changes after editing.
Deleting a Configuration
Deleting a configuration will cease campaign delivery for all Running and Upcoming campaigns where the respective configuration was selected for sending it. In such cases, you will be prompted by the message informing you that campaign(s) is running and hence the configuration cannot be deleted.
Thus, please ensure that no existing campaigns are dependant on the configuration (you intend to delete) for sending Push Campaigns to your users.
As shown below, select Delete from the Actions menu, and click the Delete button in the pop-up to confirm your decision.
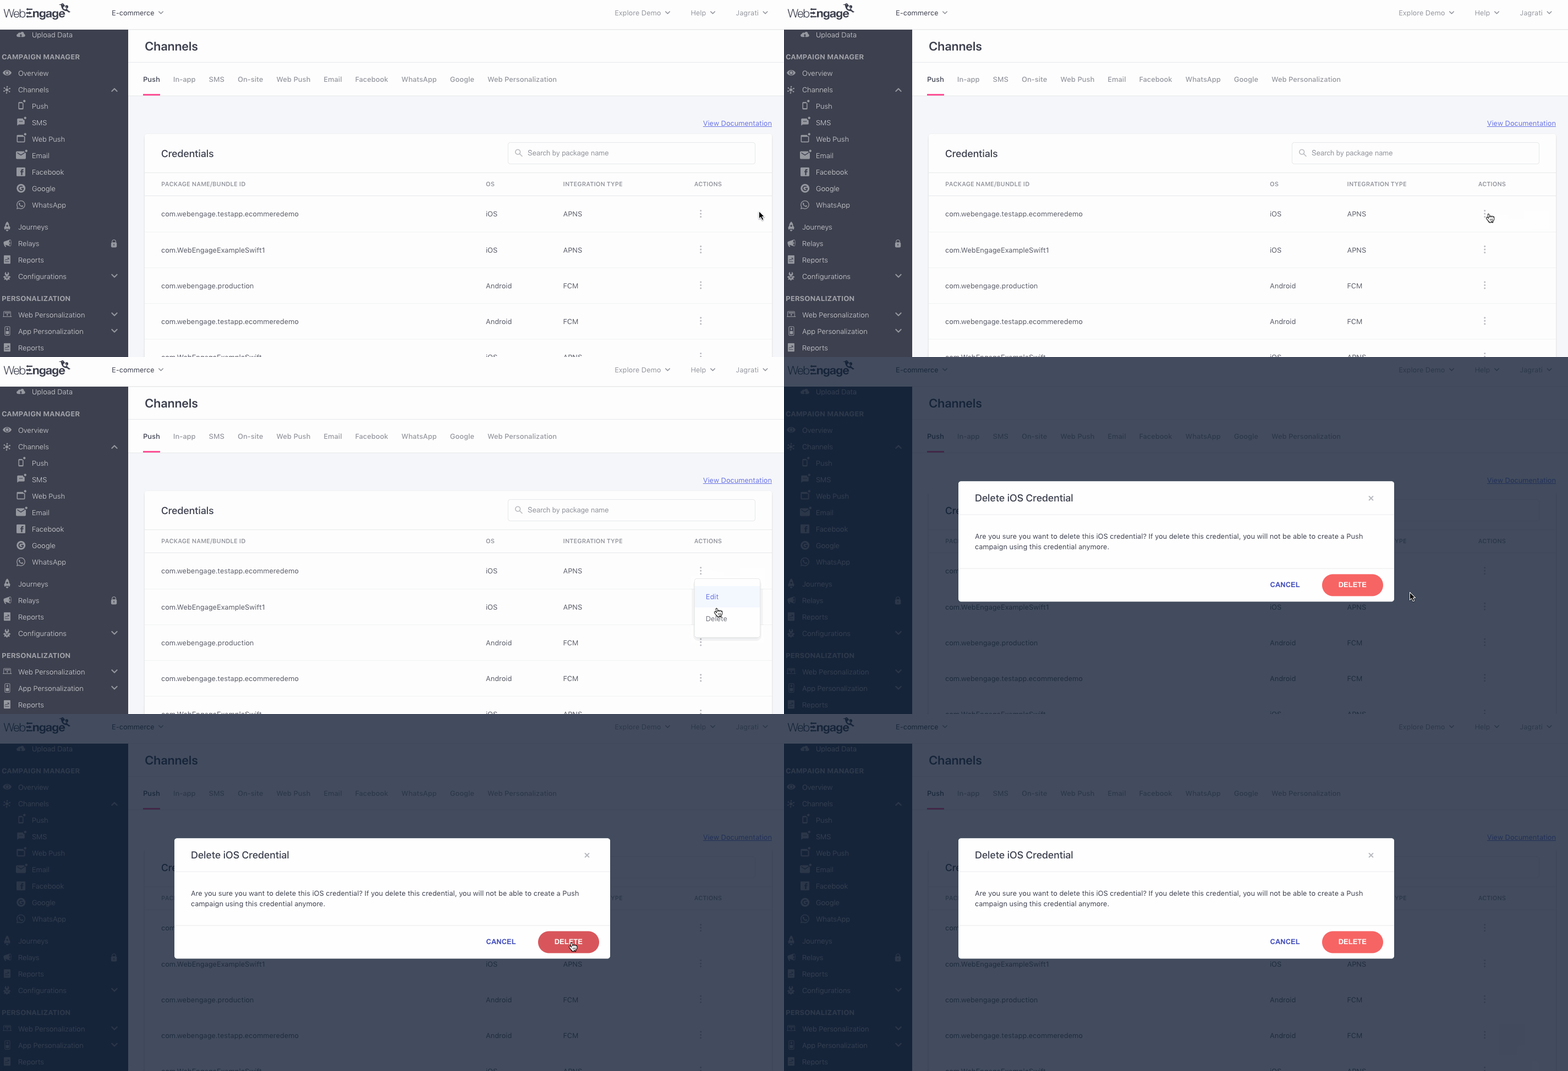
Click to enlarge
Please feel free to drop in a few lines at [email protected] in case you have any queries or feedback. We're always just an email away!
Updated about 1 month ago
Let's help you launch your first Push campaign!