Android
Pre-requisites to getting started:Step 1: Integrate WebEngage Android SDK.
Step 2: Configure Google Tag Manager and Firebase.
1. Install WebEngage GTM Dependency
Since you've integrated the WebEngage Android SDK as per the steps above, there is one change you need to make in the integration to setup the GTM dependency. Update your project's build.gradle script to remove existing WebEngage SDK and include WebEngage's GTM library.
dependencies {
  //implementation 'com.webengage:android-sdk:3.+'
  implementation 'com.webengage:android-gtm:3.+'
}
2. User Login and Attributes Setup
Must ReadWe recommend that you get yourself acquainted with all the concepts related to Users and User Attributes before proceeding. Doing so will help you understand the workings of this section, better.
Here's how you can go about it:
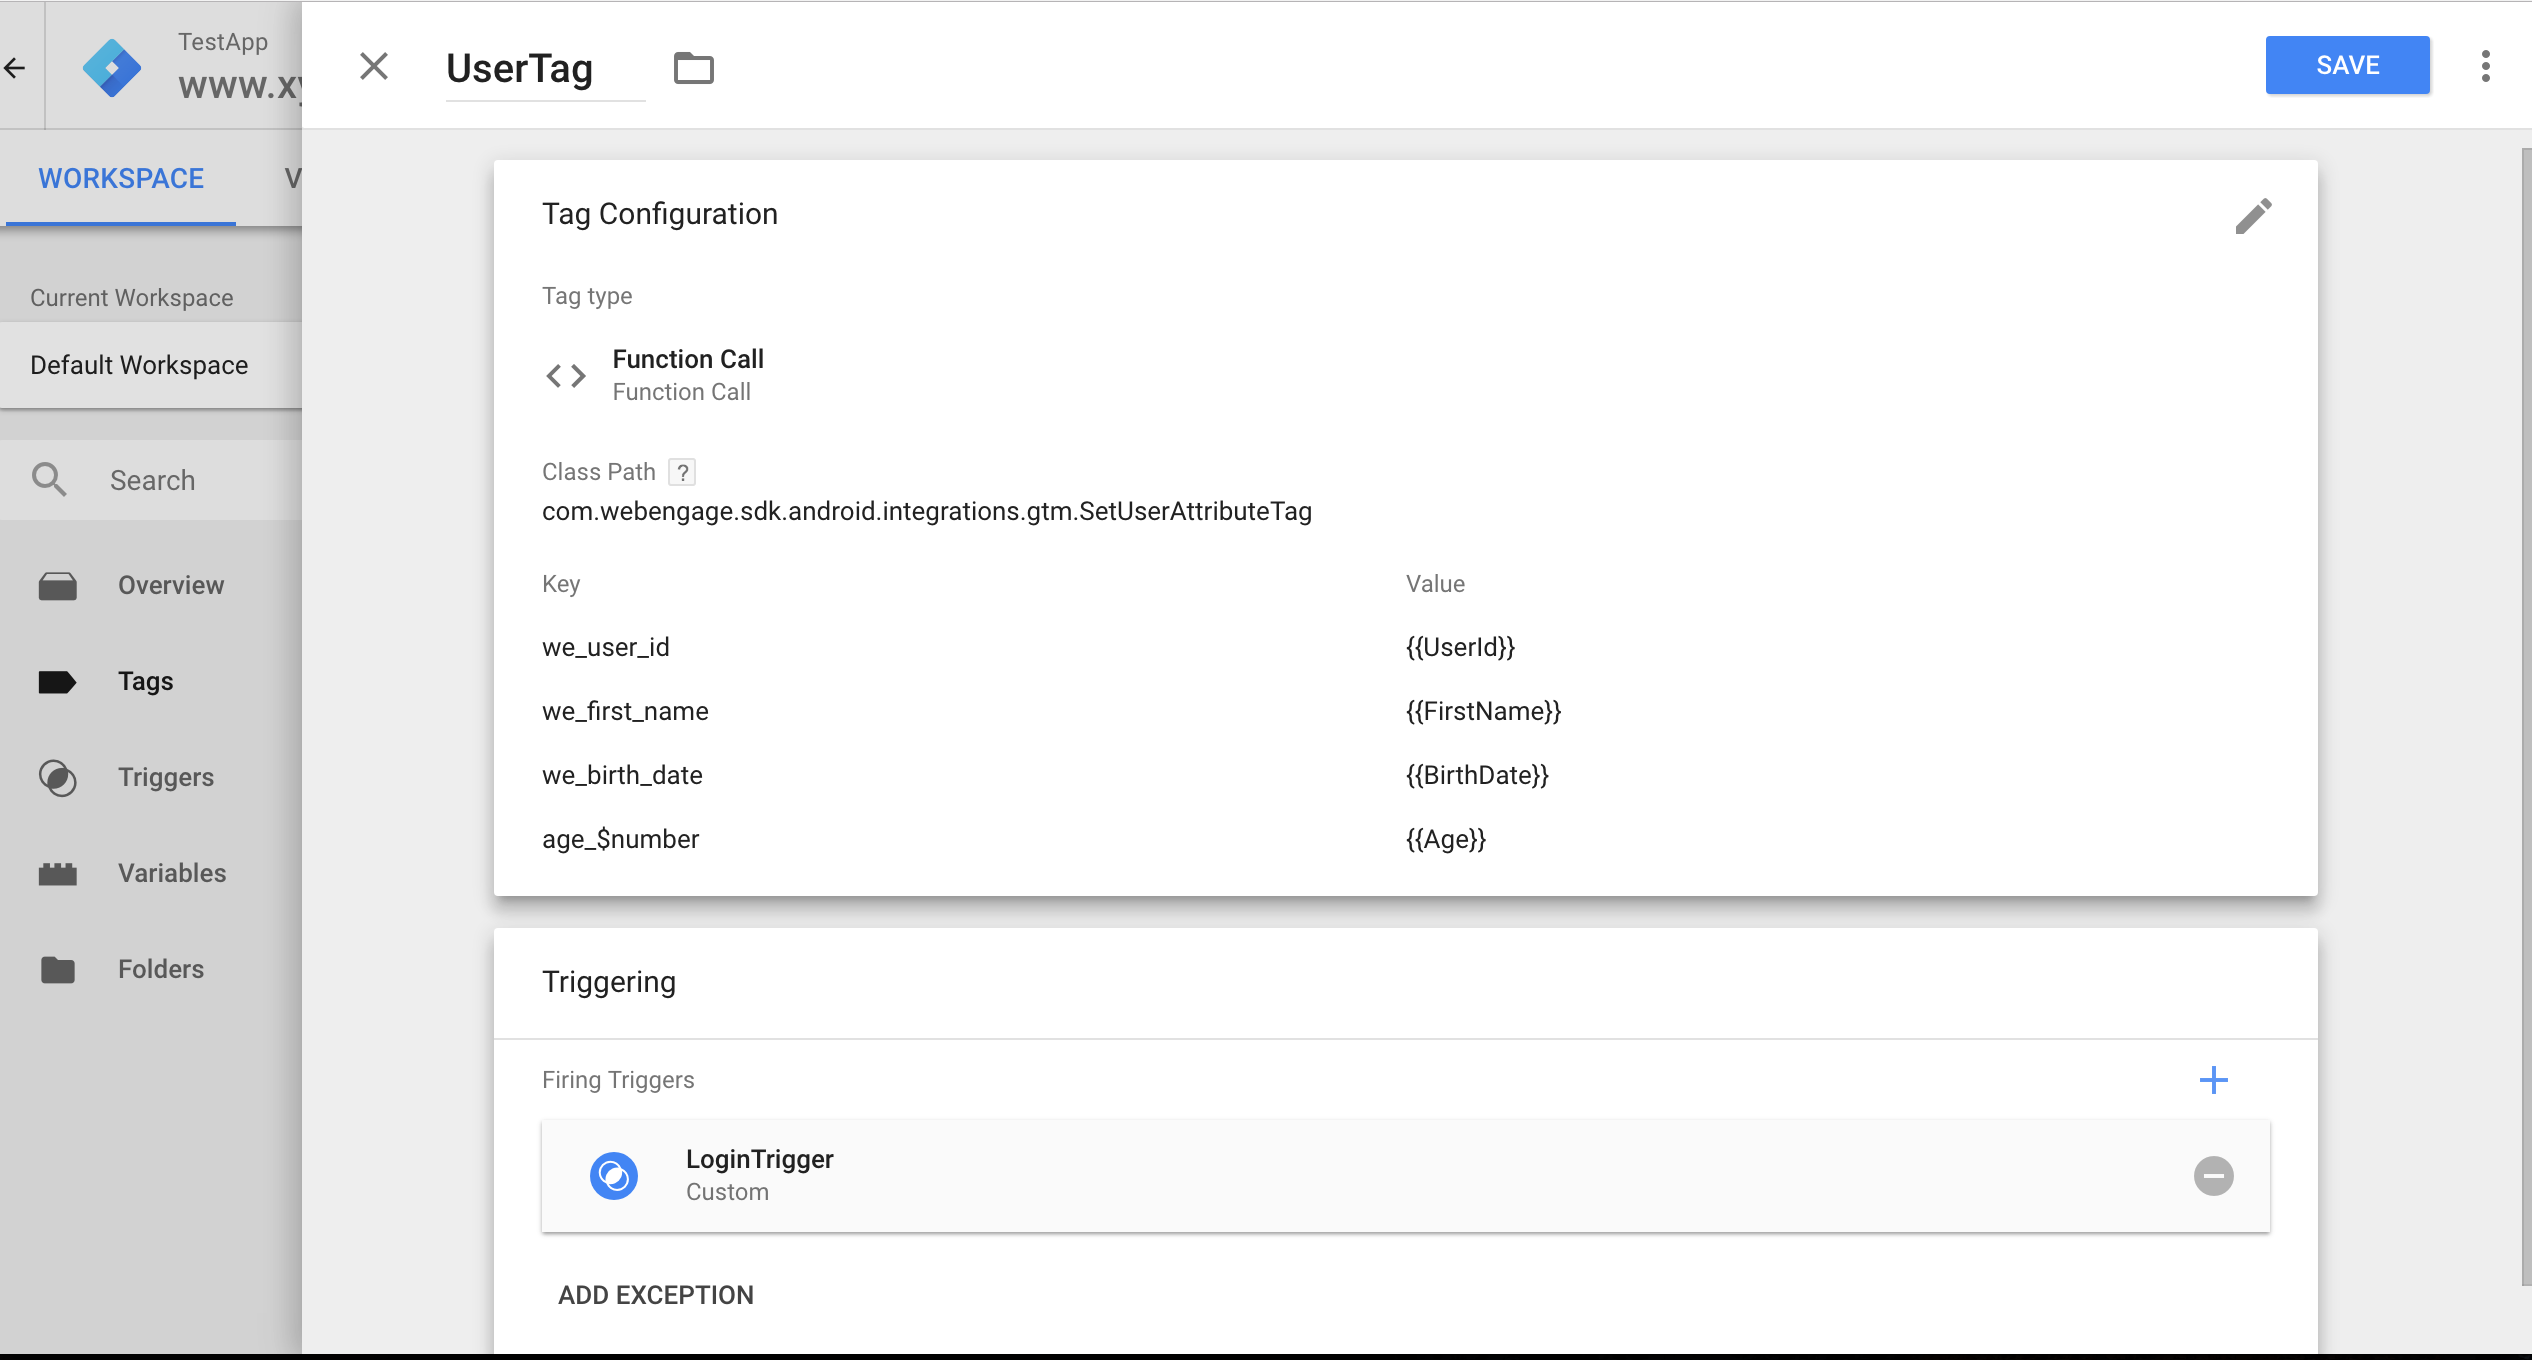
Step 1: Create a new Tag under Tags section and provide a name.
Step 2: Click on Tag Configuration and under Tag type select Function Call.
Step 3: Provide com.webengage.sdk.android.integrations.gtm.SetUserAttributeTag under Class Path section.
Step 4: Expand ADD ARGUMENT section and provide user's system or custom attributes. Below is the list of user's system attributes which are pre-defined.
List of System User Attributes Defined by WebEngage
Name | Type | Description |
|---|---|---|
we_user_id | String | Unique user identifier |
we_first_name | String | User's first name |
we_last_name | String | User's last name |
we_email | String | User's email address |
we_birth_date | String | User’s birth date in |
we_phone | String | User’s phone number in E.164 format |
we_gender | String | User’s gender (values can only be |
we_company | String | User’s company |
we_hashed_email | String | Encrypted email address |
we_hashed_phone | String | Encrypted phone number |
we_push_opt_in | Boolean | if set to |
we_sms_opt_in | Boolean | If set to |
we_email_opt_in | Boolean | If set to |
Step 5: Click on Triggering section and choose your appropriate trigger on which this Tag should fire.

Click to enlarge
Guidelines for Tracking Custom User Attributes
Here are a few things to keep in mind:
-
User Attribute names are case sensitive and must be less than 50 characters long.
Stringattribute values must be less than 1000 characters long. Additional characters will be truncated. -
You can create a maximum of 25 Custom User Attributes of each data type.
-
userAttributeNamemust not start withwe_. Names starting withwe_are reserved exclusively for internal use at WebEngage. Thus, to avoid data contamination for your account, such data will be ignored if used for your Custom User Attributes. -
The first datapoint synced to WebEngage defines the data type for that user attribute. Thus, data types must be consistent with the value that you want to store against the attribute. If the data type is changed at a later date, then Custom Users Attribute data will stop flowing to your WebEngage dashboard.
3. Event Tracking Setup
Must ReadWe recommend that you get yourself acquainted with the concept of System Events, Custom Events and their attributes before proceeding. Doing so will help you better understand the workings of this section.
Here are a few Custom Event Templates to help you get started.
Here's how you can go about it:
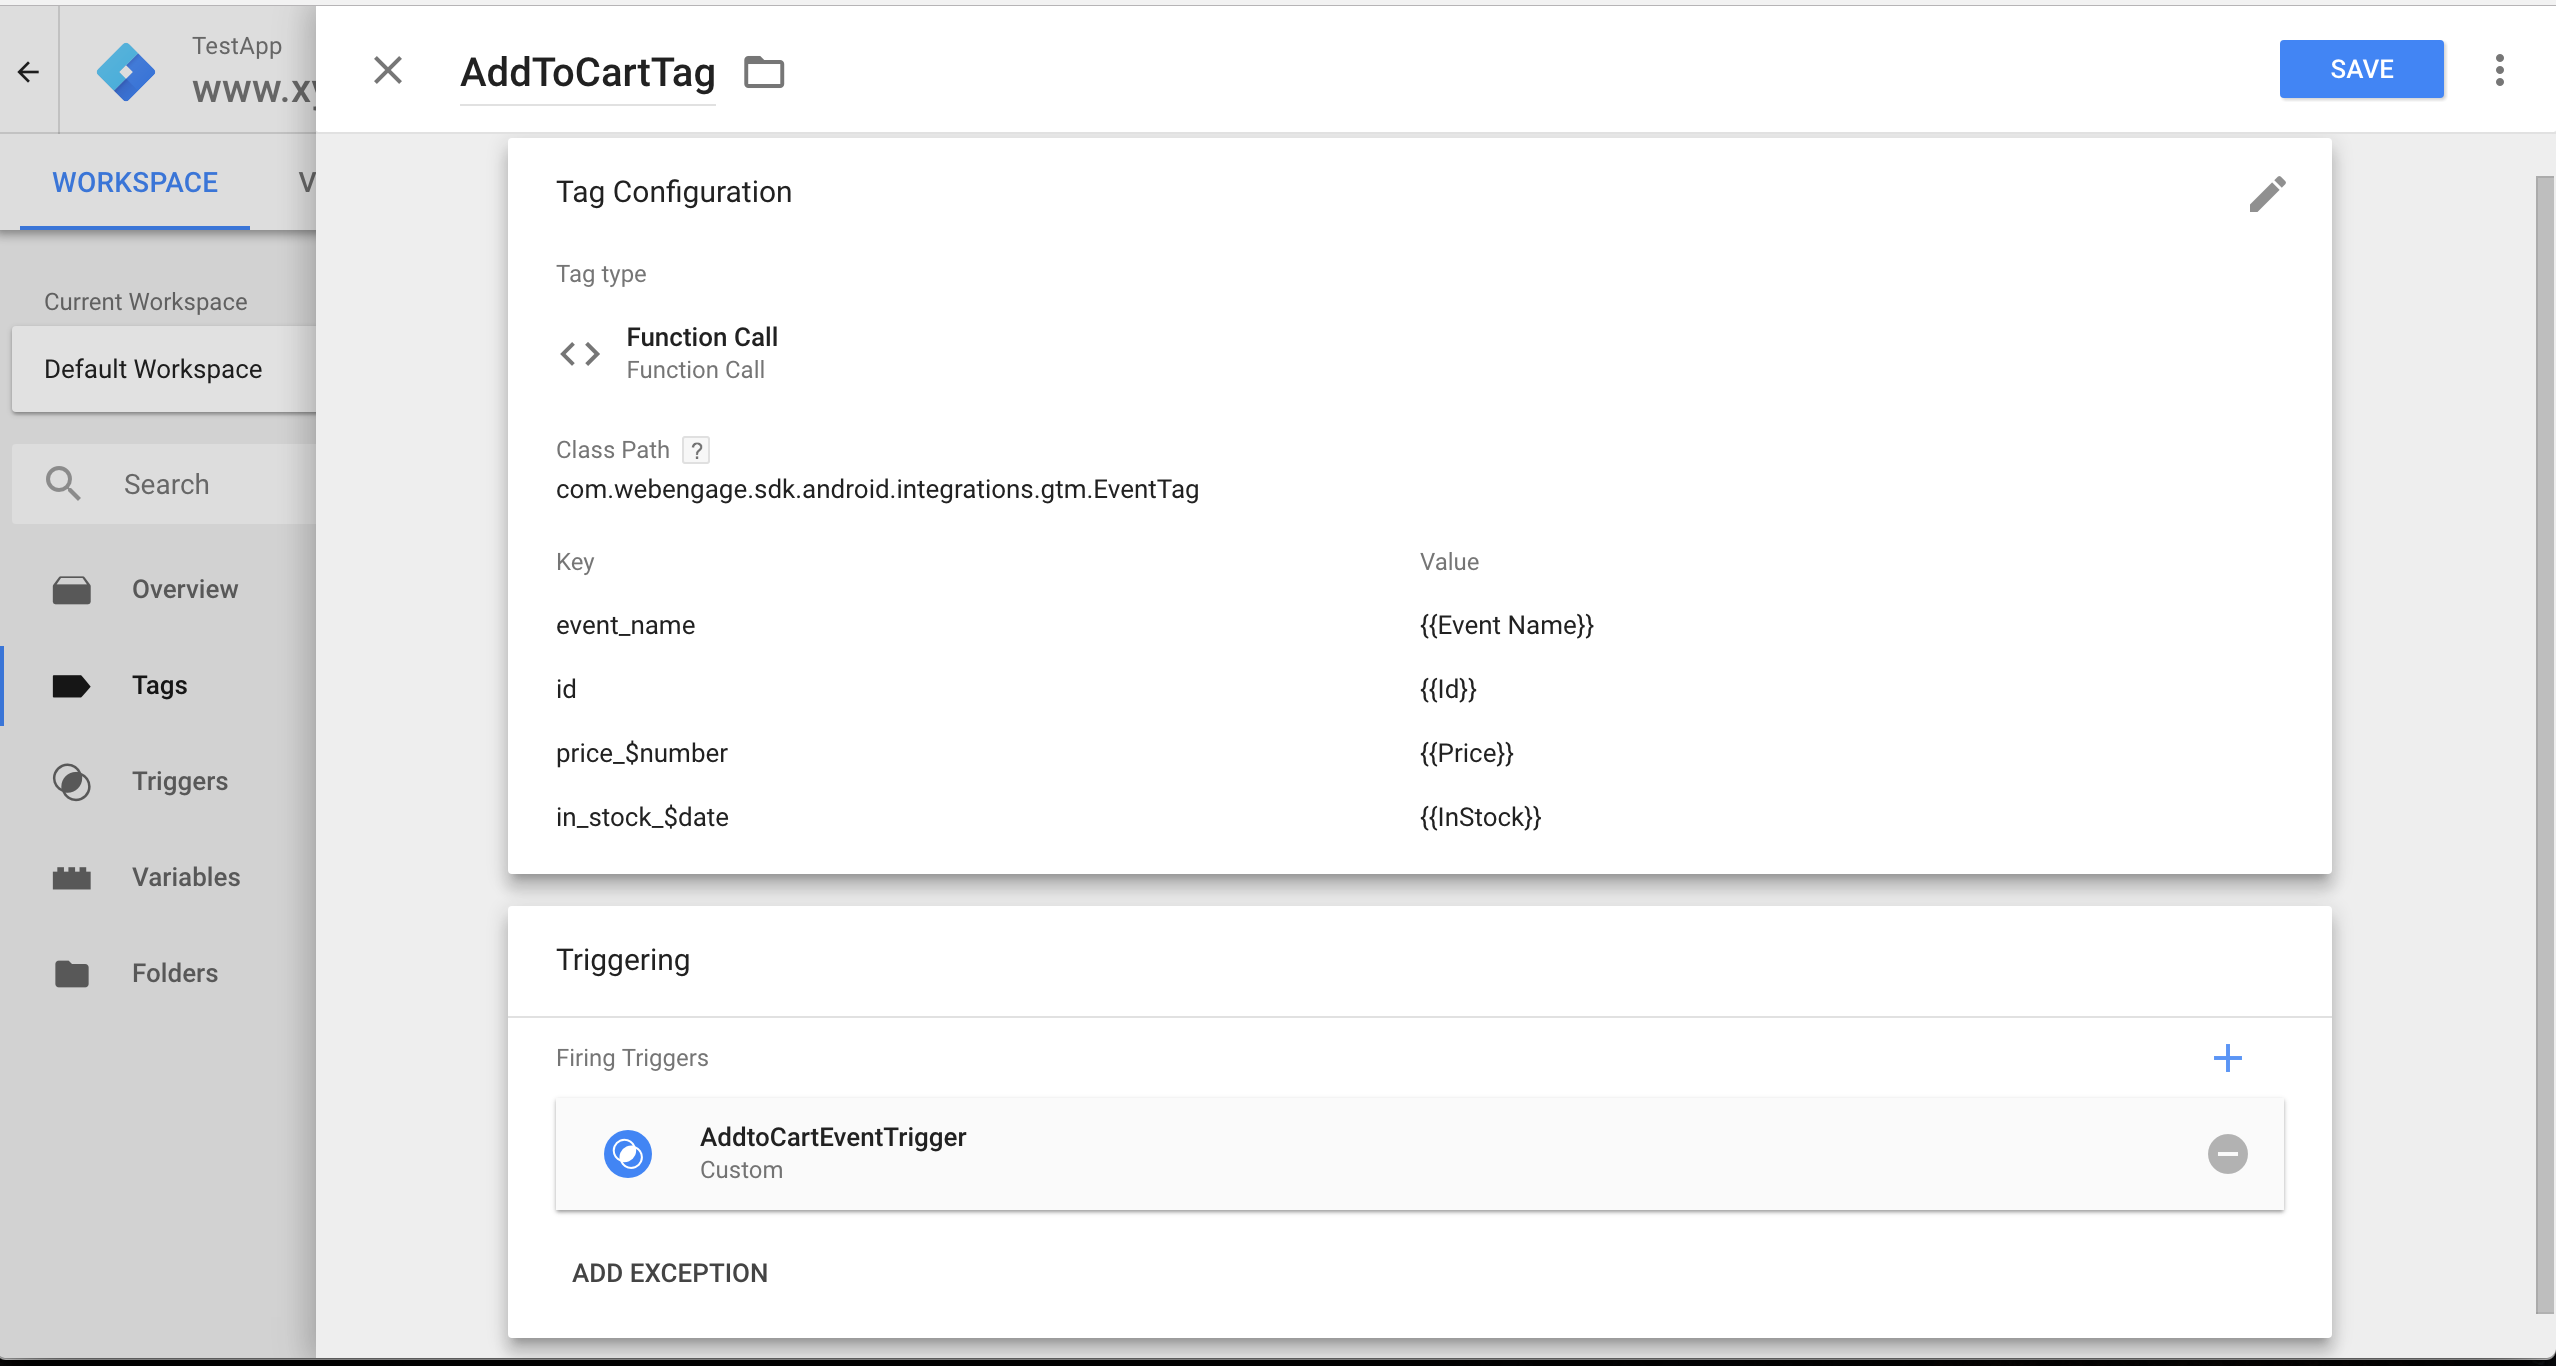
Step 1: Create a new Tag under Tags section of your GTM account and provide a name.
Step 2: Click on Tag Configuration and under Tag type select Function Call.
Step 3: Provide com.webengage.sdk.android.integrations.gtm.EventTag under Class Path section.
Step 4: Expand ADD ARGUMENT section and provide key as event_name with value being the default built in Event Name variable.
Step 5: Provide rest of the event attributes as arguments to function calls with appropriate data types.
Step 6: Click on Triggering section and choose your appropriate trigger on which this Tag should fire.

Click to enlarge
Guidelines for Tracking Custom Events & Custom Event Attributes
-
Custom Event and Custom Event Attribute names are case sensitive and must be less than 50 characters long.
Stringattribute values must be less than 1000 characters long. -
eventNameoreventAttributeNamemust not start withwe_. Names starting withwe_are reserved exclusively for internal use at WebEngage. Thus, to avoid data contamination for your account, such data will be ignored if used for your Custom Events. -
Custom Event Attributes can be of these data types:
String, all subclasses ofNumber,Boolean,Date,List,Map. -
You can create a maximum of 25 Event Attributes of each data type for a Custom Event.
-
If an Event Attribute value is
ListorMap, then it cannot be used to create segments. It can only be used to personalize campaigns. -
The first datapoint synced to WebEngage defines the data type for that event attribute. Thus, data types must be consistent with the value that you want to store against the attribute. If the data type is changed at a later date, then Custom Event Attribute data will stop flowing to your WebEngage dashboard.
4. Screen Tracking Setup
Screens are the mobile equivalent of webpages. We highly recommend that you track all the sections of your app as screens to enable contextual In-app Message targeting. Further, you can also choose to track specific app-user interactions as Screen Data to engage users with an In-app Message whenever they perform a specific action on any app screen. (Detailed read)
Here's how you can go about it:
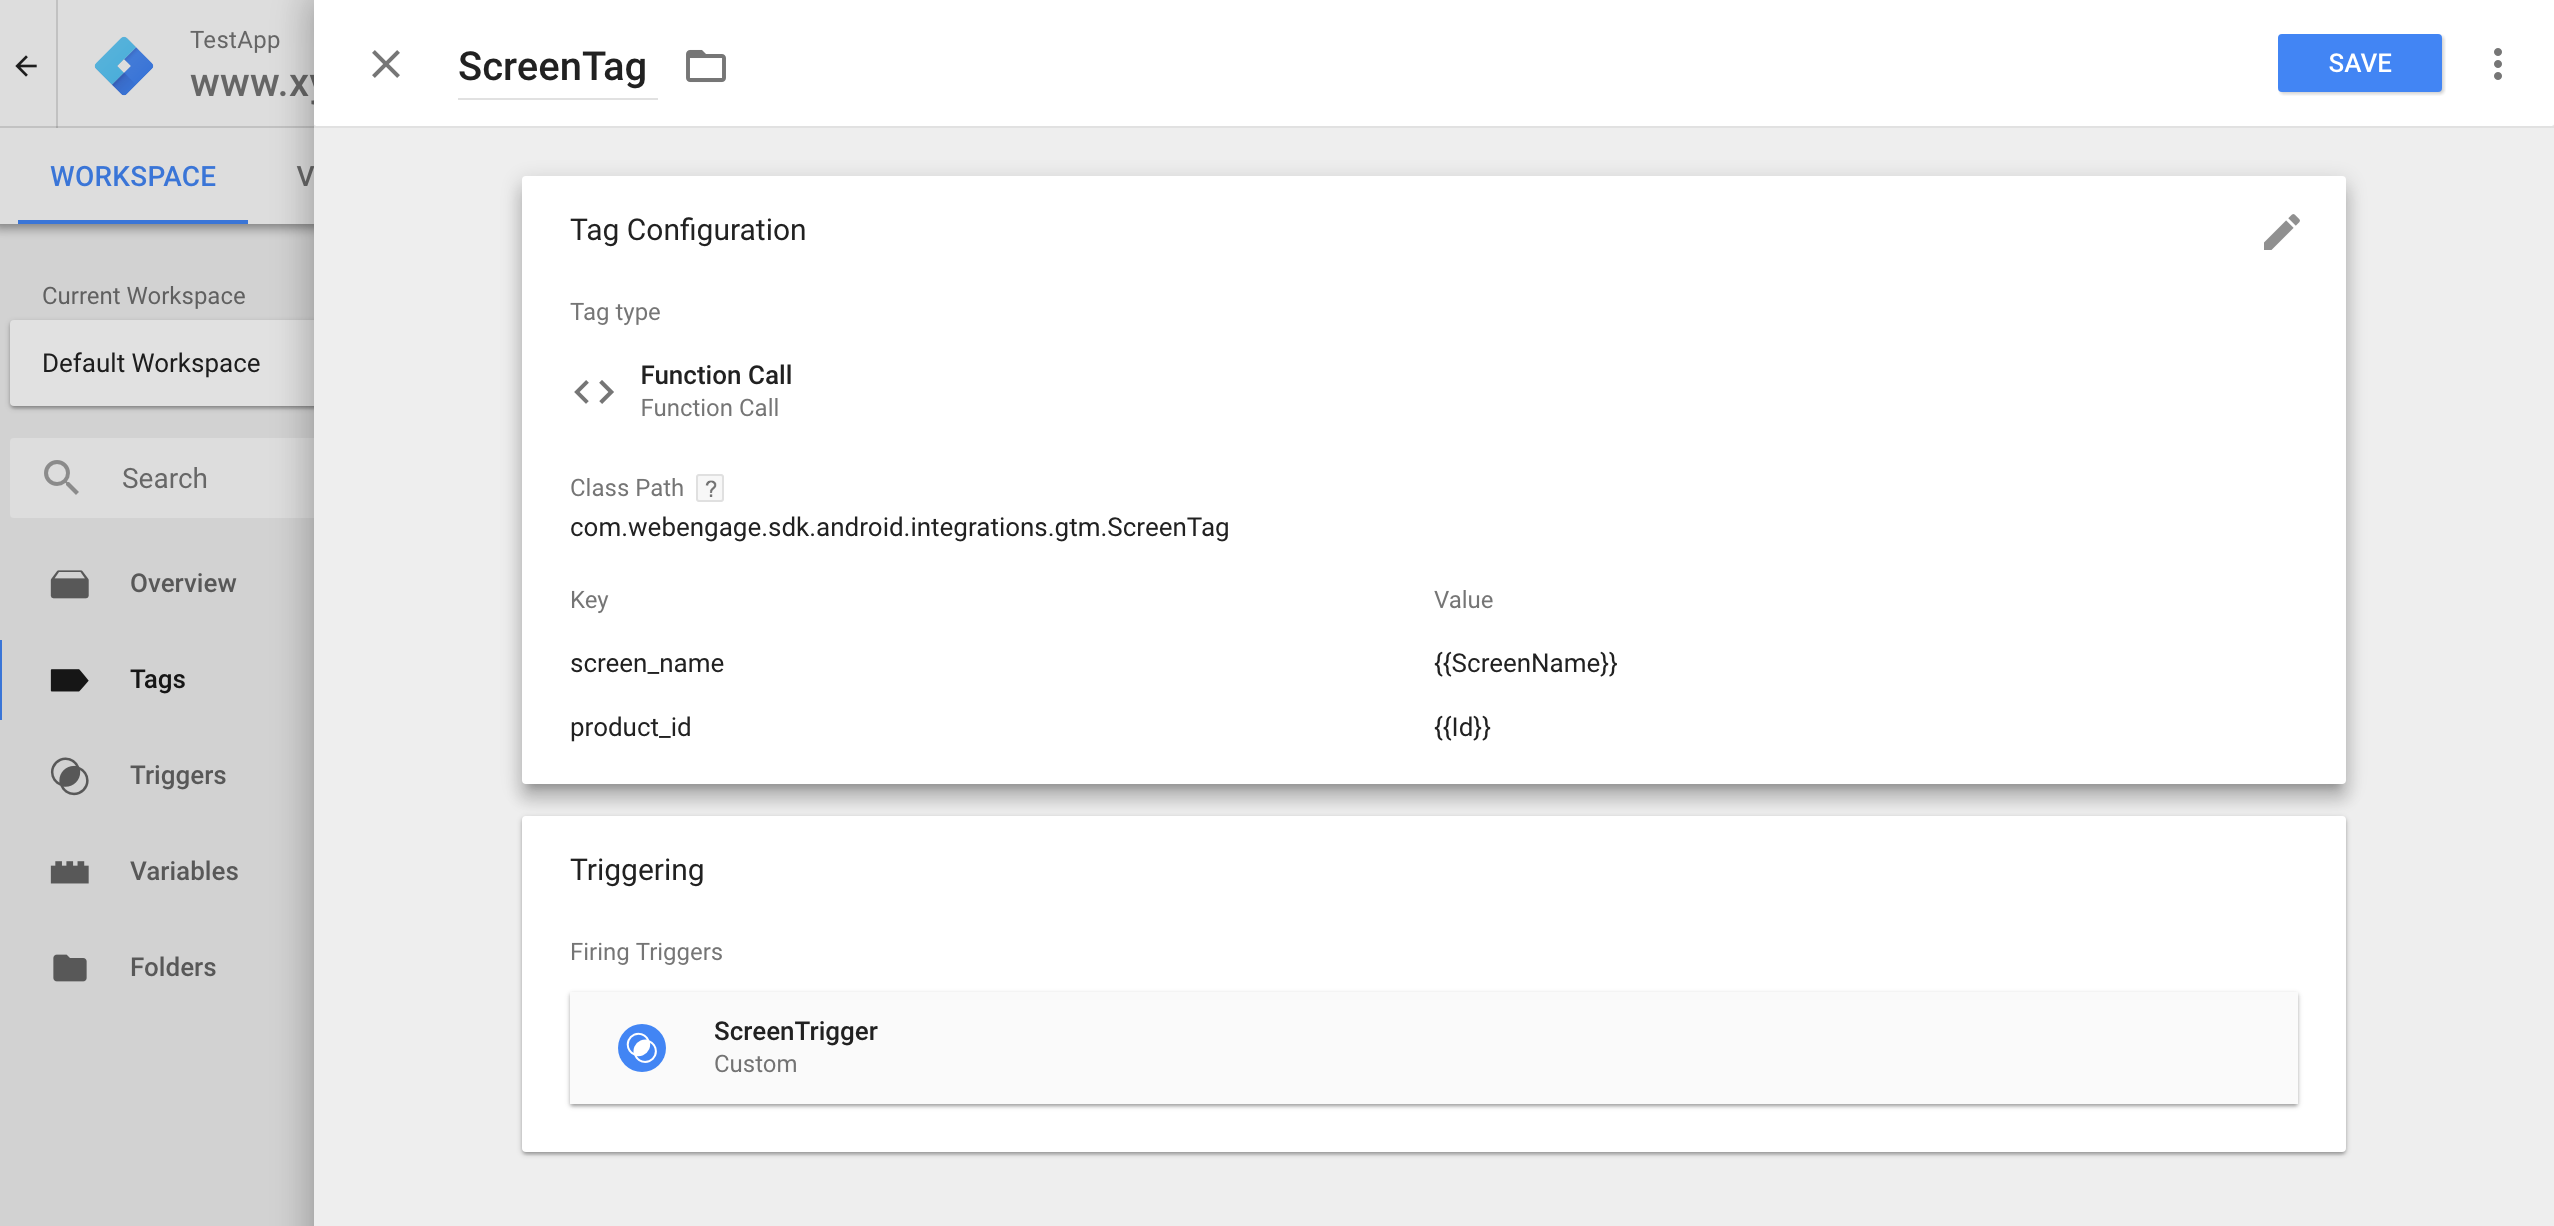
Step 1: Create a new Tag under Tags section and provide a name.
Step 2: Click on Tag Configuration and under Tag type select Function Call.
Step 3: Provide com.webengage.sdk.android.integrations.gtm.ScreenTag under Class Path section.
Step 4: Expand ADD ARGUMENT section and provide key as screen_name with value being your custom screen variable.
Step 5: Provide rest of the key value pairs (if any) which will used as screen data.

Click to enlarge
Related ReadFollow this guide to configure advanced options like attribution and location tracking for your Android app.
5. Data Types
WebEngage allows you to track event and user attribute values with different data types. This is similar to Firebase but with a few differences like:
- Firebase event parameters don't have a Date data type.
- Firebase user properties are always Strings.
To overcome the limitations of Firebase types, WebEngage allows you to change the data type of the argument value before it is tracked to WebEngage. There are no code changes required and your can achieve this by just appending one of the below suffixes in your argument key.
- WebEngage first tries to convert the value associated with the key to its proper data type (depending on the suffix of the key on the Tag configuration).
- Then we remove the suffix before it is tracked.
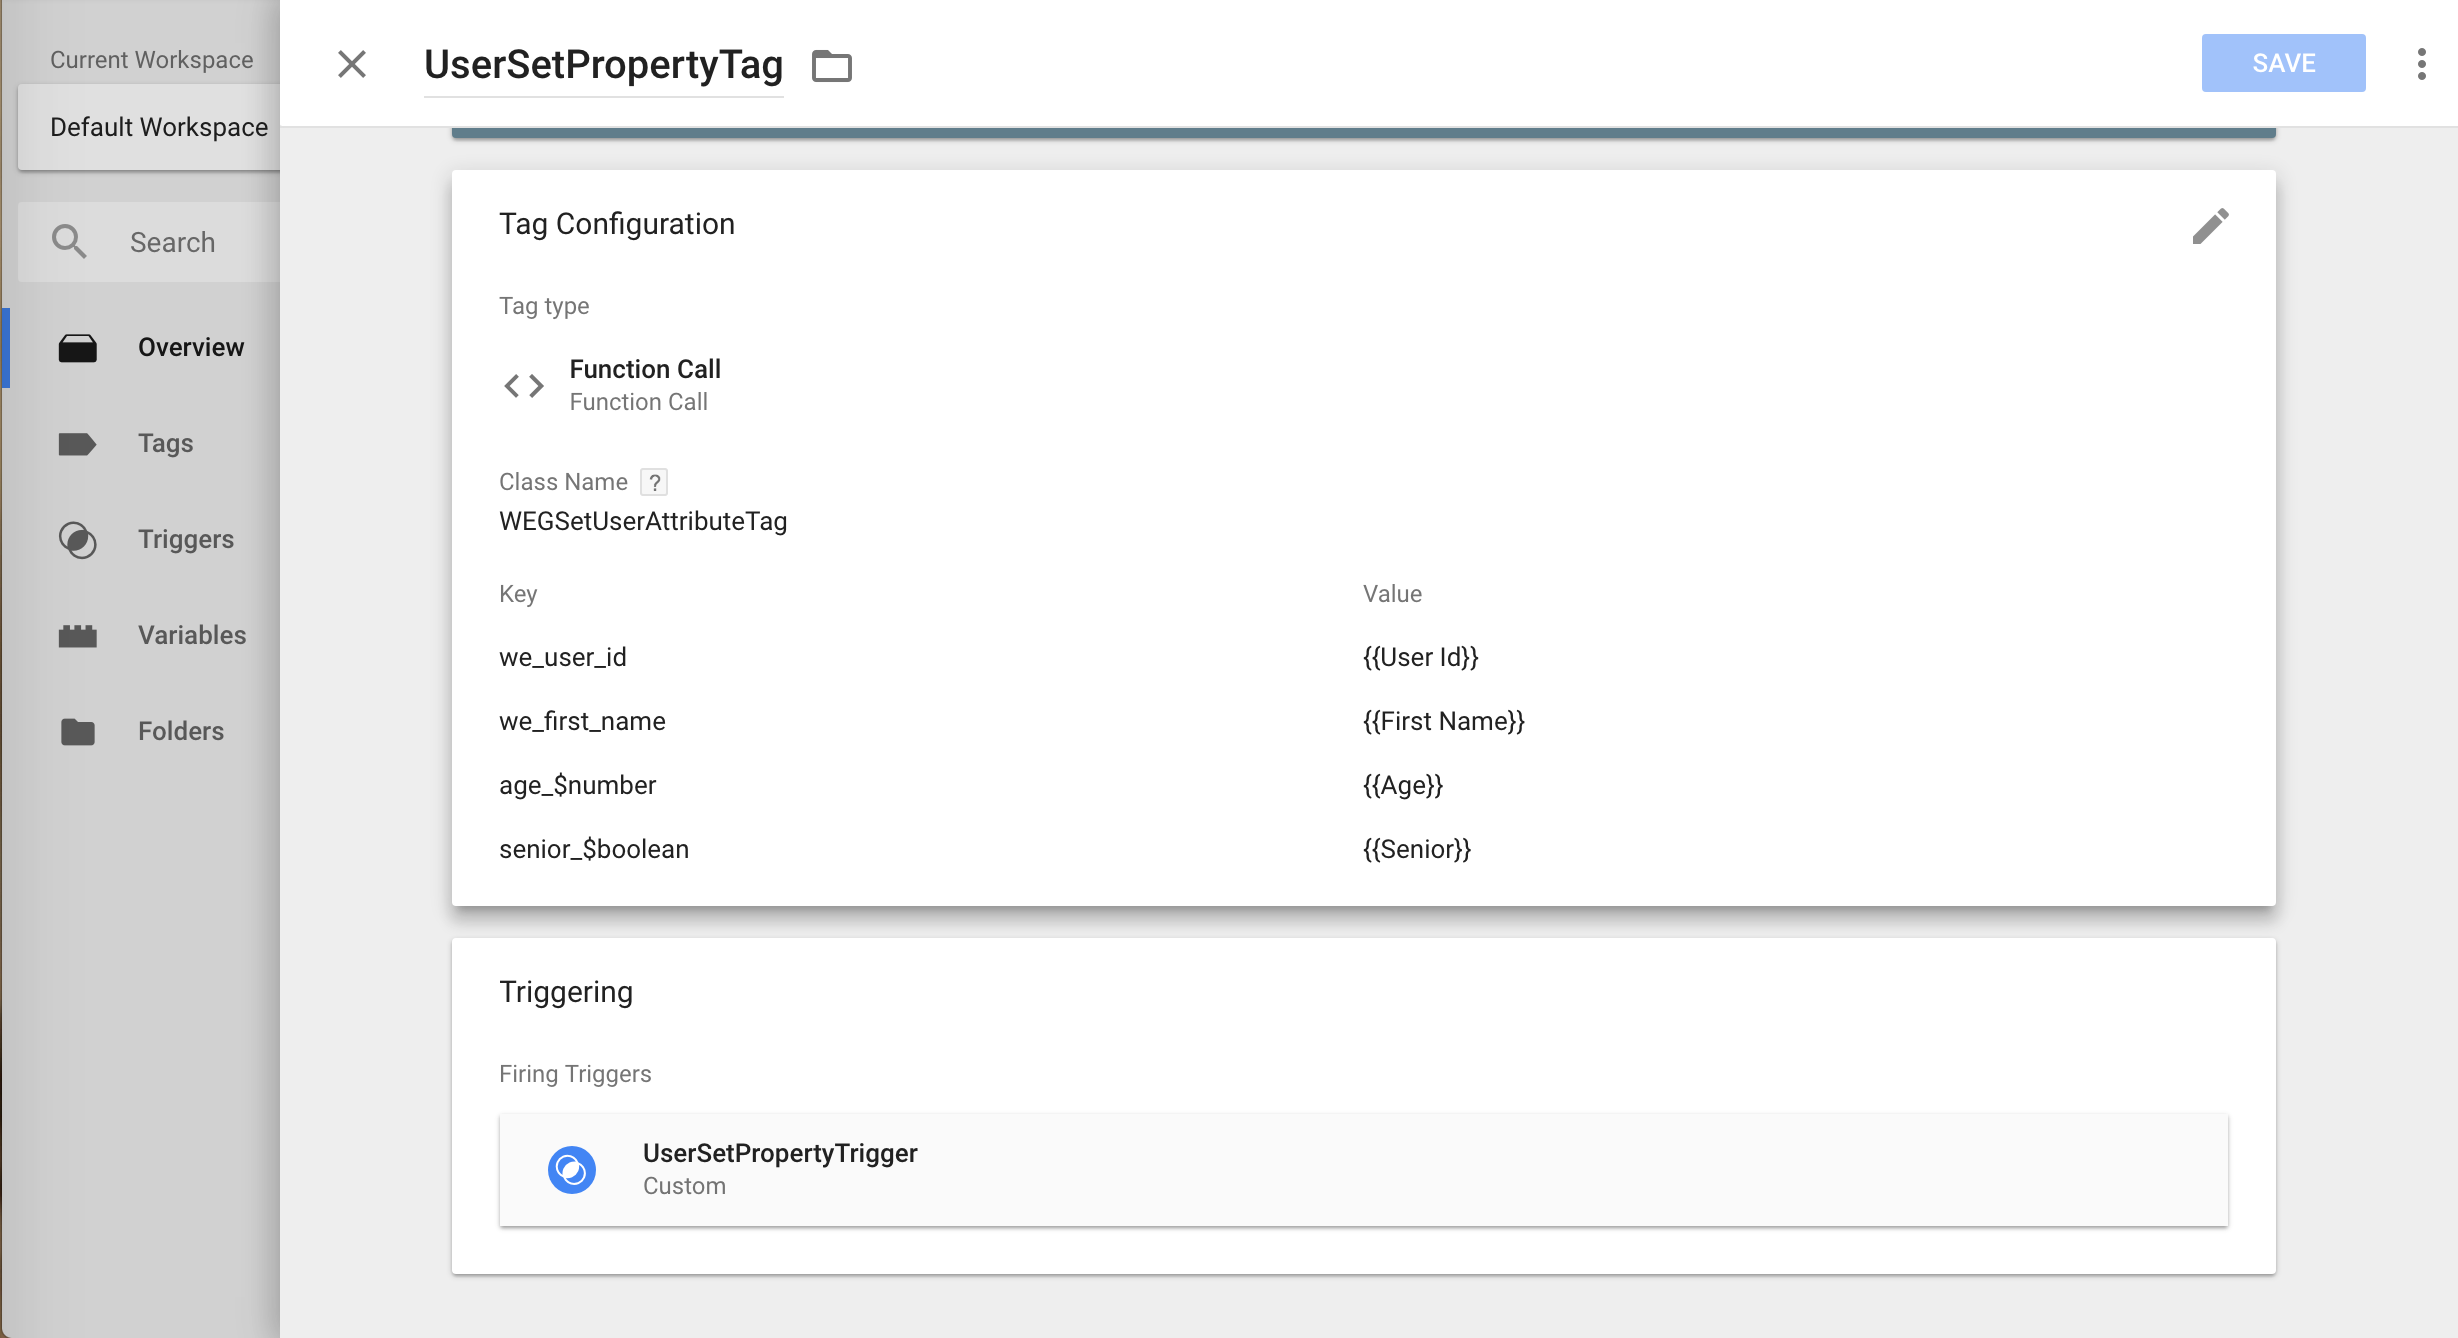
For ExampleSuppose you have defined a GTM variable
UserAgeof type Event Parameter (or Firebase user property).Now to track an attribute
ageto WebEngage with data type of Number you need to provide argument key asage_$number(see image below) and the value being theUserAgeGTM variable.

Click to enlarge
Suffix | Description |
|---|---|
| Converts the data type of the value to its appropriate String representation. For example: |
| Converts the data type of the value to Number. |
| Converts "true" string to true Boolean. Any other string will be converted to false. For example: "false" -> false |
|
|
Please feel free to drop in a few lines at [email protected] in case you have any queries or feedback. We're always just an email away!
Updated 3 months ago