In-app
Step-by-step guide to configuring In-app as a channel
In-app Notifications are sent by your app to engage active users with contextual messages. At WebEngage, as soon as you integrate your apps with your dashboard, you can start sending In-app Messages.
Please Ensure That Your Apps are Integrated with WebEngage Before Proceeding
Step 1: Enable Channel in Dashboard
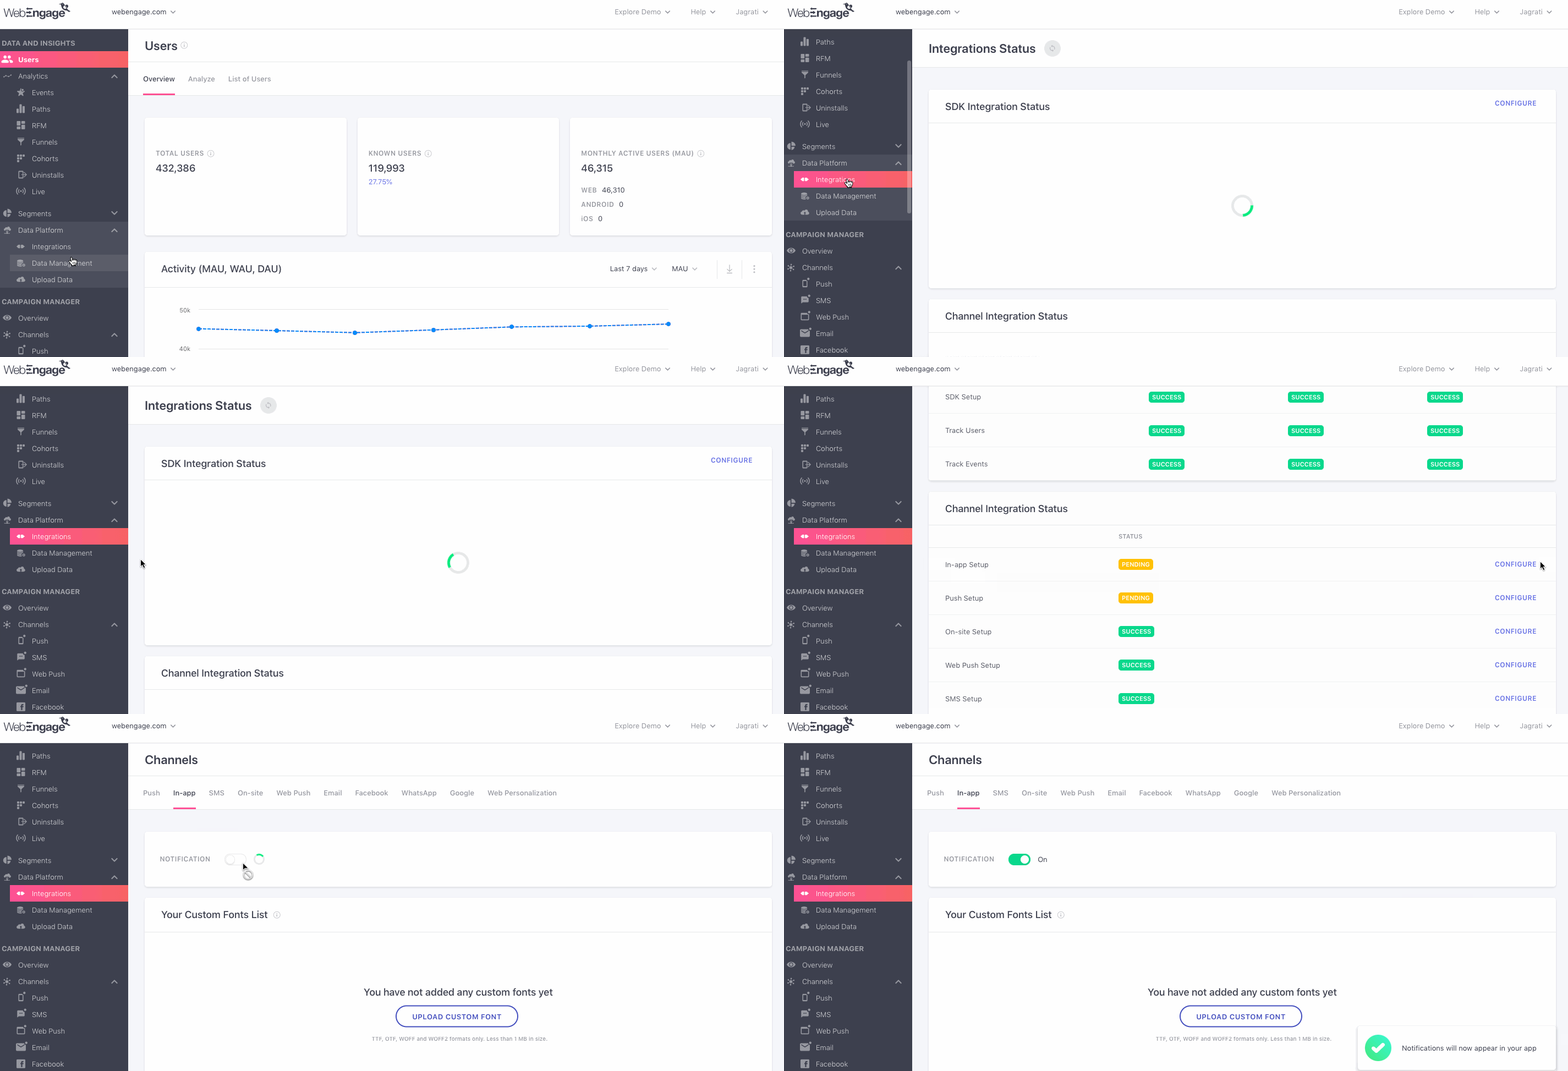
As shown below, head over to Data Platform> Integrations > In-app Setup (Configure) in your dashboard and click the toggle button to start sending In-app Campaigns.

Click to enlarge
You can also choose to implement a few additional configurations to:
- Show the In-app Notifications in specific sections of your app. (How it works)
- Customize the font style of your message and CTAs as per your brand guidelines. (How it works)
Step 2: Set up In-app Message Targeting
By default, all In-app Notifications are shown as soon as a user launches their app or performs a specific Event while interacting with your app. You can choose to specify exactly where the In-app message must be shown by:
- Tagging app screens with a Screen Name
- Tracking app-user interactions through Screen Data Attributes to display the message in the context of their actions.

How In-app Message Targeting Works
Tagging App Screens with Screen Name
Just like a website has several web pages associated with it, an app can lead users to several sections or ‘screens’ that facilitate varied user-app interactions.
For example, users of an e-commerce app will see the homepage or home screen on launching the app. The home screen enables them to search and navigate to various sections like a curated collection, product category, personal Wishlist/ Cart, profile, order tracking section and so on.
Thus, using the WebEngage SDK, you can tag each screen with a Screen Name. Doing so enables you to pinpoint Screens in your app where you can render In-app messages.
For example, marketers of the e-commerce app can engage users with contextual In-app Notifications whenever they view their Shopping Cart, extending personalized offers on purchase. This can easily be done by adding the Screen Name, cart under the field, Where to Show at Step 2: When while creating the campaign.
Pro TipTag all app screens with a Screen Name to ensure that we are abe to track the exact screen a user is viewing, in real-time. Doing so helps ensure that the In-app Notification is shown on the correct screens (as specified while creating the campaign).
Here’s a sample to help you get started:
App Section | Screen Name |
|---|---|
Home Screen |
|
Order History Screen |
|
Live Delivery Tracking Screen |
|
Wishlist |
|
Shopping Cart |
|
Checkout Payment Screen |
|
Checkout Confirmation Screen |
|
User’s Profile |
|
Loyalty Reward Points Screen |
|
Collection Listing Screen (Spring/Summer Collection, Festive Collection, Formal Wear Collection etc.) |
|
How to Tag App Screen with a ‘Screens Name’
Tracking Screen Data
Each Screen in your app can be associated with contextual Screen Data which could be anything like, the product category a user is viewing, the number of products a user sees in a session, the search filters added by a user, the sort applied while browsing through an app screen and so on.
Thus, tracking app-user interactions as Screen Data Attributes enables you to engage only those users who interact with your app in a specific manner, no matter which Screen they're on.
For example, marketers of an e-commerce app can specifically engage users who view more than 50 products in any section of their app, highlighting the most popular styles of the season. This can be done by adding the Screen Data Attribute, prod-count greater than 50
under the field, Where to Show at Step 2: When.
Here’s a sample to help you get started:
App Screens | Screen Data Attribute | What it Tracks |
|---|---|---|
Product Category Listing, Collection Listing, Brand Listing, Sale Listing |
| No. of products that a user has viewed on the screen or scrolled through |
Home screen, Collection Listing, Brand Listing, Sale Listing |
| Name of the product category selected/ searched by a user |
Product Category Listing, |
| The option selected to sort the products listed in any section of your app like Price (descending/ ascending), Gender (Female/ Male/ Unisex), Color (Black/ Blue/ Orange) and so on. |
How to Track 'Screen Data' for your App
Step 3: Upload Brand Fonts
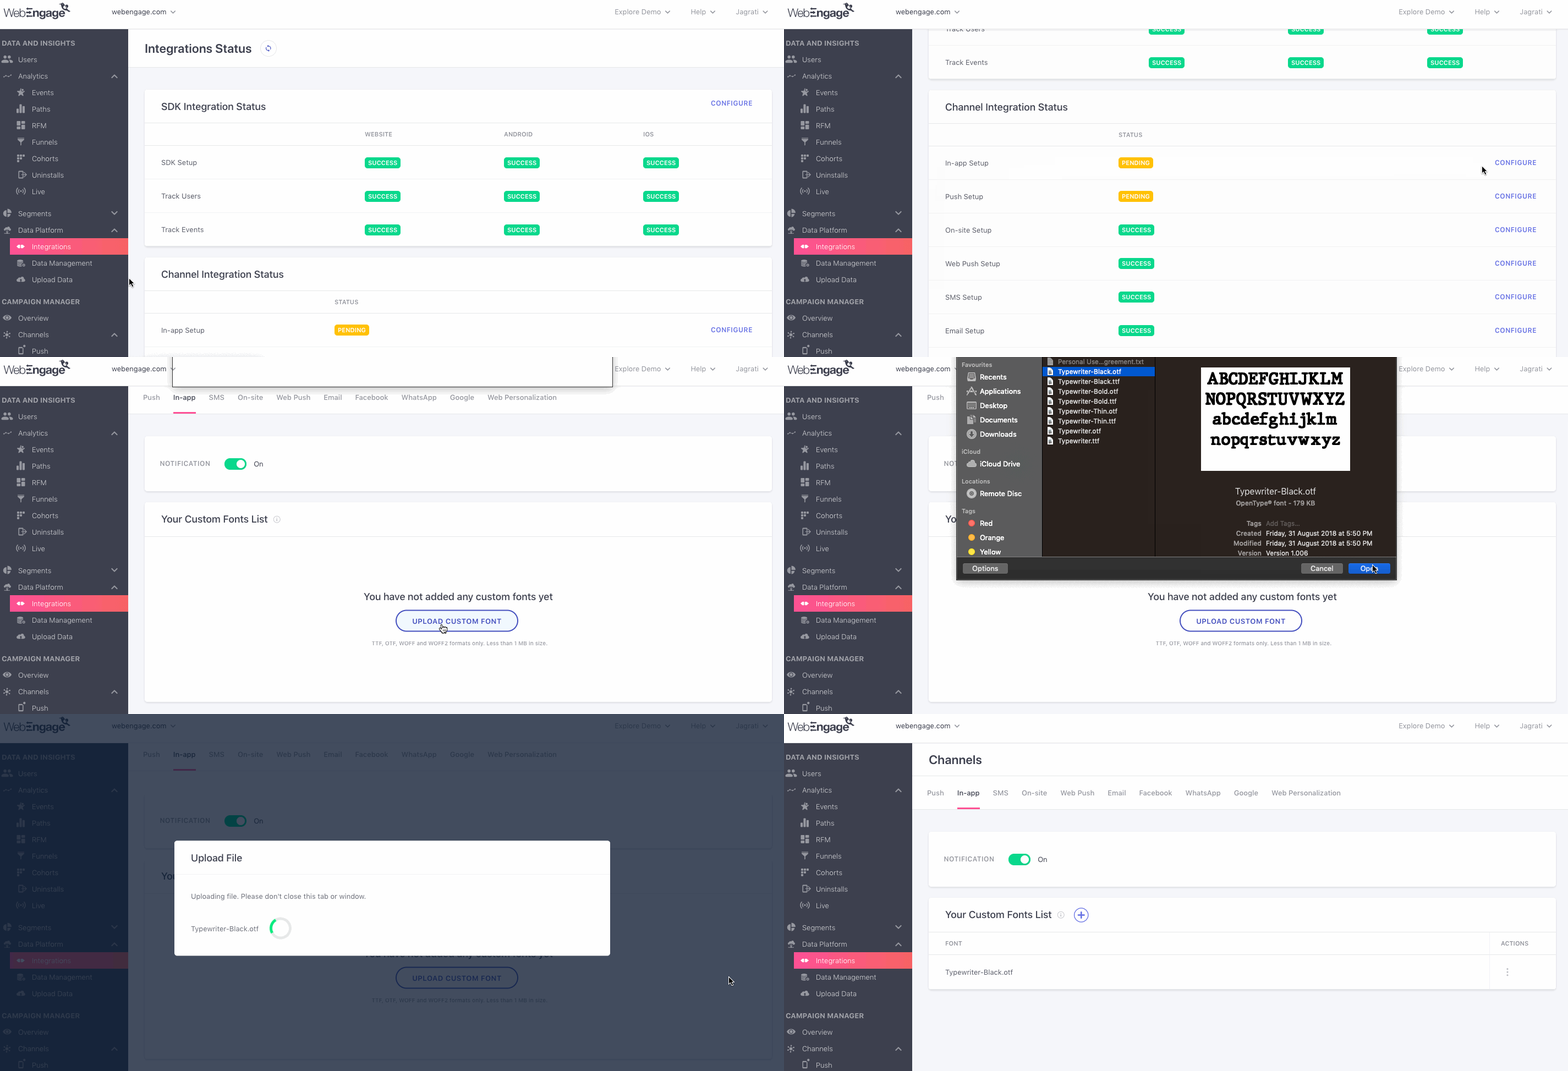
You can easily upload all your brand fonts to your dashboard to ensure that your In-app Messages convey the same look and feel as your app. Here’s how you can go about it:

Click to enlarge
Step 1: As shown above, go to the Data Platform> Integrations > In-app Setup (Configure) in your dashboard.
Step 2: Click on the Upload Custom Font button / Plus Icon (placed on top left) to add a font file. Please ensure that:
- The file size does not exceed 1MB.
- The file is in .ttf / .otf / .woff / .woff2 format.
Once added, you will be able to select separate fonts for the In-app Notification’s Message and Button Label (CTA) through the Themes section nested under Step 2: Message while creating the campaign.
Creating Custom HTML Templates
(Applicable only to Classic Modal andFull Screen Modal* Layouts)
Please Note
This is an access controlled feature. Kindly contact your CSM or reach out to [email protected] to get this feature enabled.
Recommended Android core SDK v3.20.5 and iOS core SDK v5.2.11

To create a campaign with custom template:
- Create a in-app notification campaign
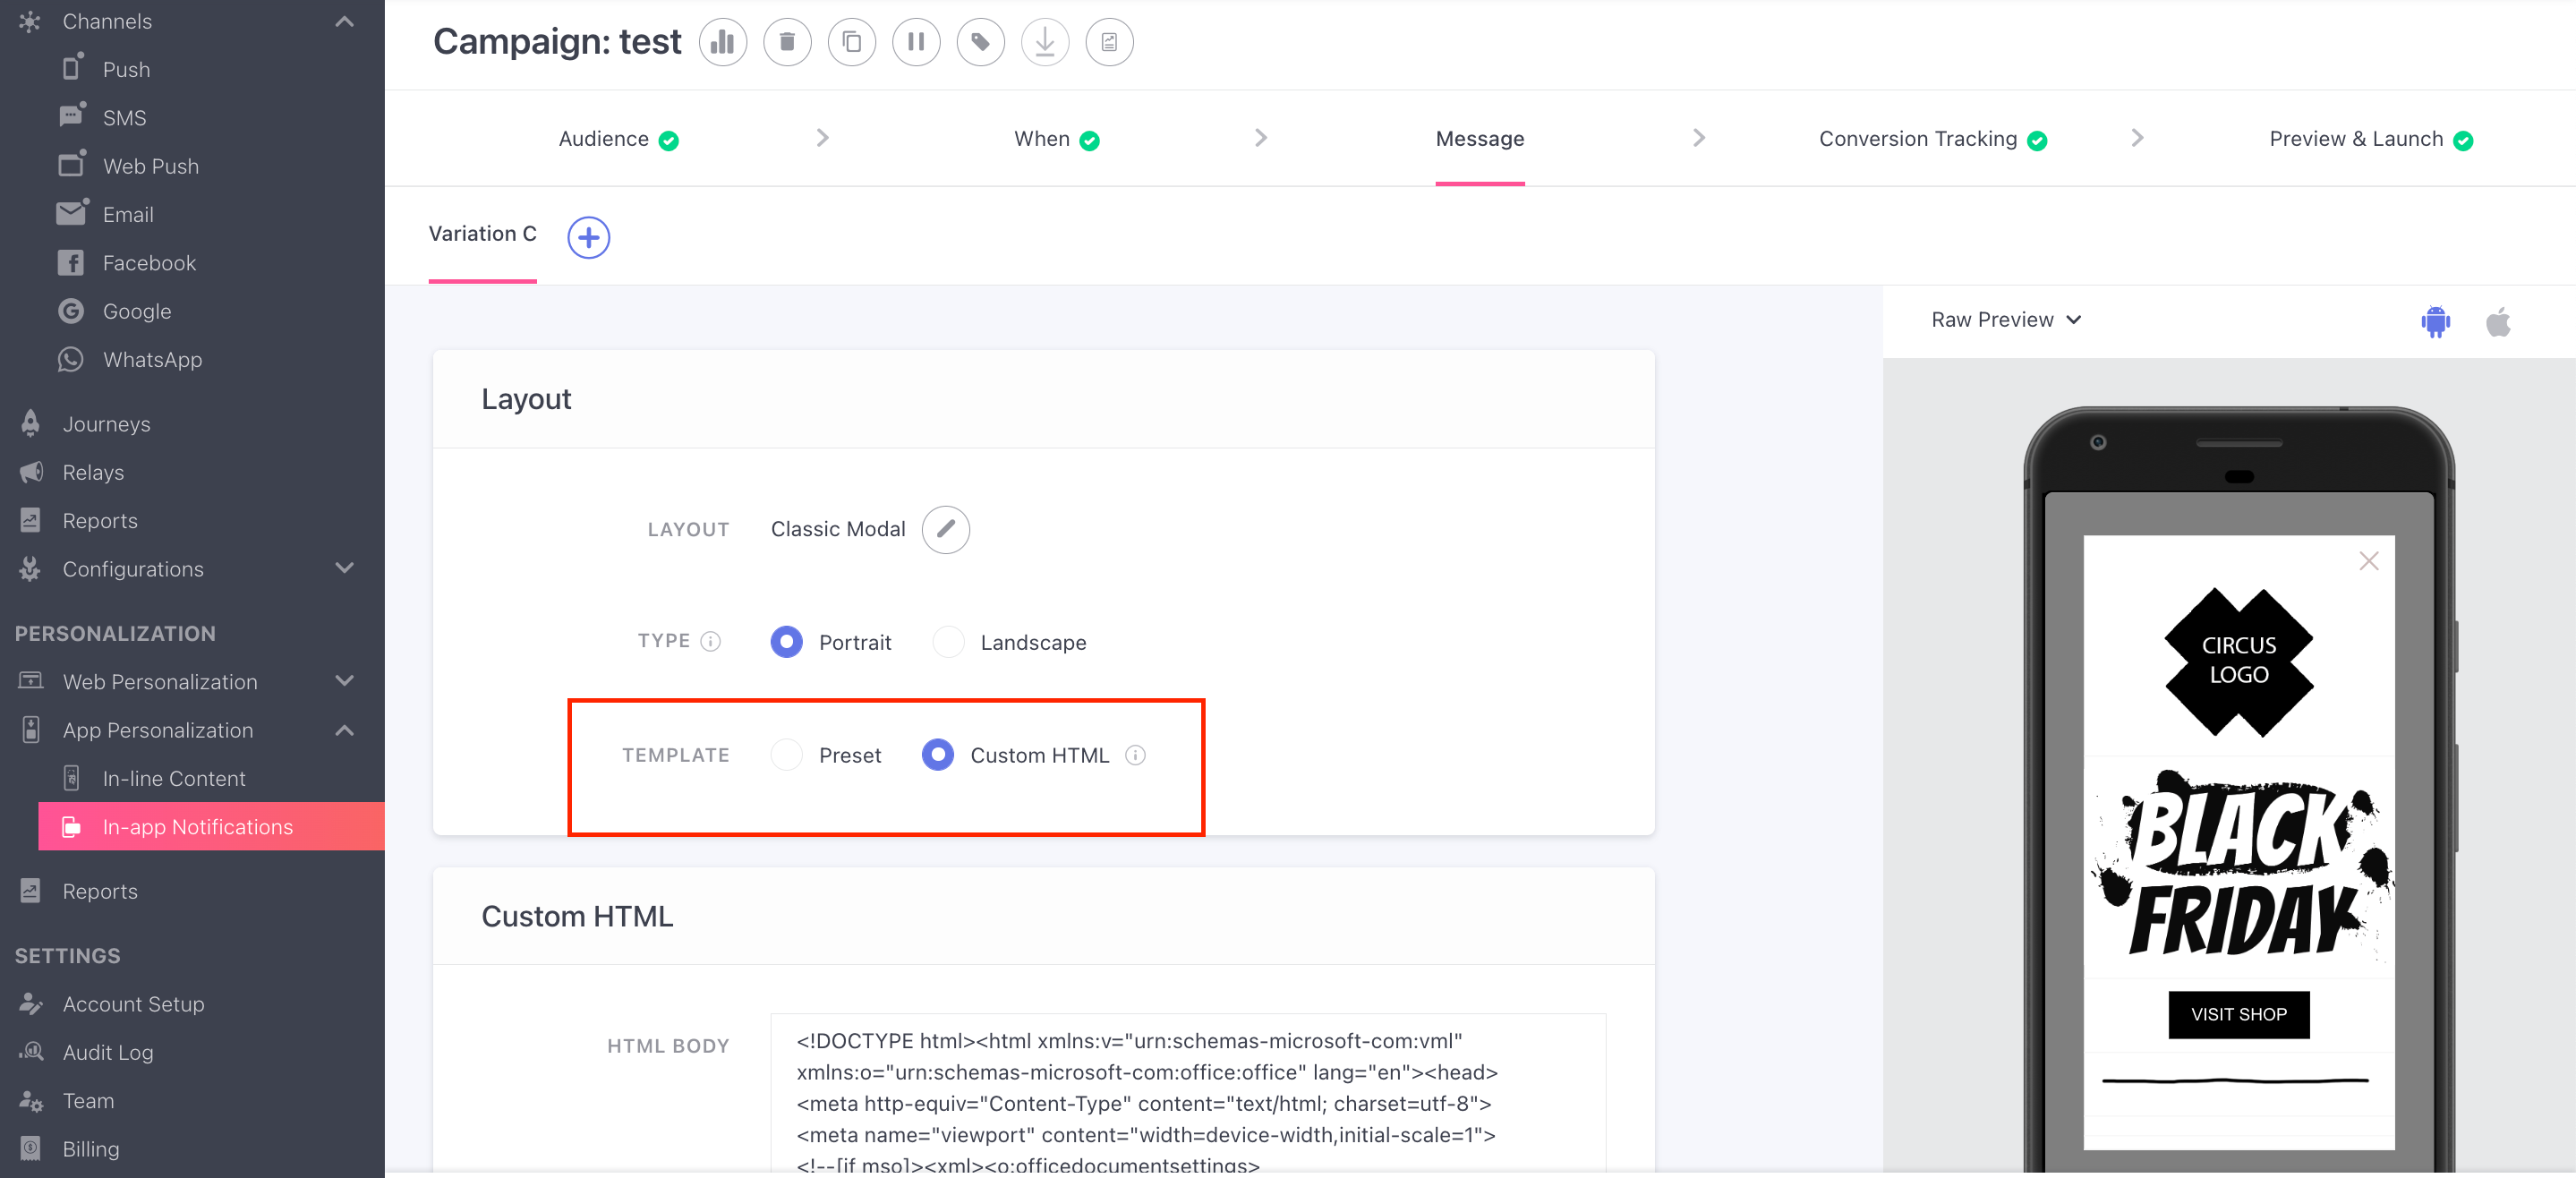
- On Message tab, Select the layout type as Classic or Full screen
- Select the Template as 'Custom HTML' and add the content body in Raw HTML format.
Congratulations!You're now ready to engage users with In-app Notifications.
Please feel free to drop in a few lines at [email protected] in case you have any queries or feedback. We're always just an email away!
Updated 3 months ago
Let's help you launch your first In-app campaign!