Google Cloud Messaging integration
As of April 10, 2018, Google has deprecated Google Cloud Messaging. The GCM server and client APIs are deprecated and will be removed as soon as April 11, 2019.
We strongly suggest that you use Firebase Cloud Messaging for push messaging in your application by following WebEngage FCM integration steps.
If you are already using GCM to send push messages, follow Google's FCM upgrade instructions. You can also check out this video, which walks through the migration process.
Create a Google API project and enable GCM.
- Visit Google services page.
- Create or choose your app and package name and click Choose and configure services.
- Click the Cloud Messaging button and click on Enable Cloud Messaging.
- Note the Server API Key and Sender ID.
Automatic GCM Configuration
If you want GCM token registration and message handling to be done by WebEngage SDK, follow this approach, otherwise follow the custom GCM configuration.
1. Add Google Cloud Messaging dependency
Add the dependency for Google Cloud Messaging in your module’s build.gradle.
dependencies {
  implementation 'com.google.android.gms:play-services-gcm:15.0.1'
}
2. Turn on WebEngage automatic GCM registration
To be able to receive push messages, the device must register with the Google GCM server. WebEngage SDK can handle this registration process for you. Turn on automatic GCM registration and provide GCM project number during SDK initialization as shown below.
import com.webengage.sdk.android.WebEngageConfig;
import com.webengage.sdk.android.WebEngageActivityLifeCycleCallbacks;

...
...

WebEngageConfig webEngageConfig = new WebEngageConfig.Builder()
		.setAutoGCMRegistrationFlag(true)
		.setGCMProjectNumber(YOUR_GCM_PROJECT_NUMBER)
		.build();
registerActivityLifecycleCallbacks(new WebEngageActivityLifeCycleCallbacks(this, webEngageConfig));
3. Add permissions in AndroidManifest.xml
Add the below permissions inside manifest element of your AndroidManifest.xml. This ensures that push messages are being sent to your app and that no other app can receive your push messages.
<uses-permission android:name="com.google.android.c2dm.permission.RECEIVE" />
<permission
  android:name="${applicationId}.permission.C2D_MESSAGE"
  android:protectionLevel="signature" />
<uses-permission android:name="${applicationId}.permission.C2D_MESSAGE" />
4. Add WebEngage push receiver in AndroidManifest.xml
Add WebEngage push receiver inside application element of your AndroidManifest.xml.
<receiver
    android:name="com.webengage.sdk.android.WebEngagePushReceiver"
    android:permission="com.google.android.c2dm.permission.SEND">
    <intent-filter>
      <action android:name="com.google.android.c2dm.intent.RECEIVE" />
      <category android:name="${applicationId}" />
    </intent-filter>
</receiver>
5. Add your Google Cloud Messaging credentials to WebEngage
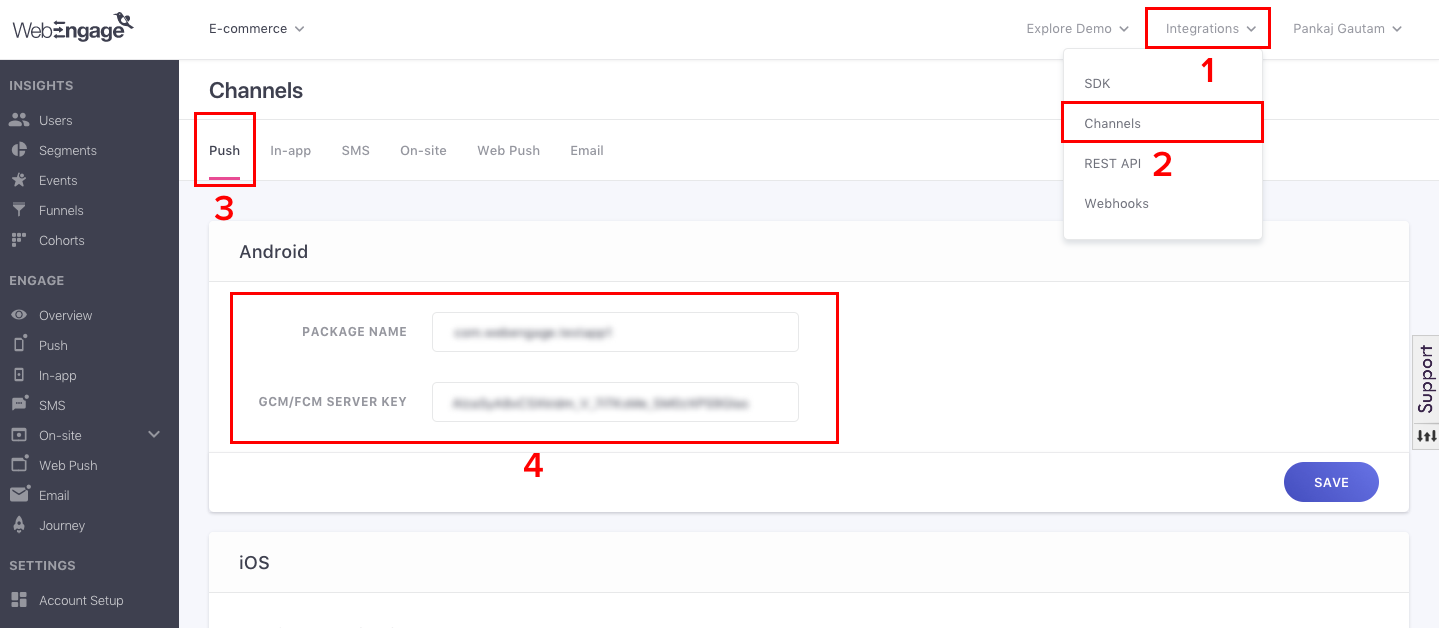
Log in to your WebEngage dashboard and navigate to Integrations > Channels. Select Push tab and paste the noted Server API Key from Google services page for your project under the field labeled “GCM/FCM Server Key” under Android section. Enter your application package name under the field labeled “Package Name” and click Save.

Next steps
1. Customizing icon and accent colors
By default, WebEngage Android SDK uses your application's icon to set the small and large icons of your push notifications. You can provide custom icons during SDK initialization as shown below.
import com.webengage.sdk.android.WebEngageConfig;
import com.webengage.sdk.android.WebEngageActivityLifeCycleCallbacks;

...
...

WebEngageConfig webEngageConfig = new WebEngageConfig.Builder()
		.setPushSmallIcon(R.drawable.YOUR_SMALL_ICON)
		.setPushLargeIcon(R.drawable.YOUR_LARGE_ICON)
		.setPushAccentColor(Color.parseColor("#ff0000"))
		.build();
registerActivityLifecycleCallbacks(new WebEngageActivityLifeCycleCallbacks(this, webEngageConfig));
This will work only for SDK version 1.14.0 and above.
2. Notification icon fix for Android Lollipop and above
Since the release of Lollipop (API 21), the material design style dictates that all non-alpha channels in notification icons be ignored. Therefore, the small notification icon will be rendered solid white if it is not transparent.
Hence, if you have provided a custom small icon during SDK initialisation as shown above, then you need to make sure that it is transparent.
Custom GCM configuration
Using WebEngage’s automatic GCM configuration is recommended for most GCM integrations. However, if you need to manage GCM registration and message handling manually or are using a separate service to register in a parallel integration with WebEngage, you will need to follow the below approach.
1. Turn off WebEngage automatic GCM registration
Turn off automatic GCM registration during SDK initialisation.
import com.webengage.sdk.android.WebEngageConfig;
import com.webengage.sdk.android.WebEngageActivityLifeCycleCallbacks;

...
...


WebEngageConfig webEngageConfig = new WebEngageConfig.Builder()
		.setAutoGCMRegistrationFlag(false)
		.build();
registerActivityLifecycleCallbacks(new WebEngageActivityLifeCycleCallbacks(this, webEngageConfig));
2. Pass GCM token to WebEngage
Since you are already registering with GCM you need to send that registration token to WebEngage. If this is the first version of your app to include the WebEngage SDK, call this method on the first app launch (and not just on a token refresh) for this version to ensure WebEngage receives the current token for users updating from the previous app version.
import com.google.android.gms.gcm.GoogleCloudMessaging;
import com.webengage.sdk.android.WebEngage;

...
...

GoogleCloudMessaging gcm = GoogleCloudMessaging.getInstance(context);
String registrationId = gcm.register(SENDER_ID);
WebEngage.get().setRegistrationID(registrationId);
3. Pass messages to WebEngage SDK
All incoming messages from WebEngage backend will contain key source with the value as webengage. Pass them to WebEngage Android SDK as shown below. bundle is a message here.
import com.webengage.sdk.android.WebEngage;

...
...

if(bundle!= null && bundle.containsKey("source") && "webengage".equals(bundle.getString("source"))) {
  WebEngage.get().receive(bundle);
}
Next steps
1. Customizing icon and accent colors
By default, WebEngage Android SDK uses your application's icon to set the small and large icons of your push notifications. You can provide custom icons during SDK initialization as shown below.
import com.webengage.sdk.android.WebEngageConfig;
import com.webengage.sdk.android.WebEngageActivityLifeCycleCallbacks;

...
...

WebEngageConfig webEngageConfig = new WebEngageConfig.Builder()
		.setPushSmallIcon(R.drawable.YOUR_SMALL_ICON)
		.setPushLargeIcon(R.drawable.YOUR_LARGE_ICON)
		.setPushAccentColor(Color.parseColor("#ff0000"))
		.build();
registerActivityLifecycleCallbacks(new WebEngageActivityLifeCycleCallbacks(this, webEngageConfig));
This will work only for SDK version 1.14.0 and above.
2. Notification icon fix for Android Lollipop and above
Since the release of Lollipop (API 21), the material design style dictates that all non-alpha channels in notification icons be ignored. Therefore, the small notification icon will be rendered solid white if it is not transparent.
Hence, if you have provided a custom small icon during SDK initialisation as shown above, then you need to make sure that it is transparent.
Updated about 1 month ago