Getting Started
1. Installation
- Download WebEngage Xamarin.Android Library.
- To consume this downloaded .DLL in your Xamarin.Android app, you must add a reference to the Bindings Library. To do this, right-click on the References node of your project and select Add Reference.
2. Initialization
Initialize WebEngage SDK with your license code from onCreate callback of your Application class as shown below.
using Com.Webengage.Sdk.Android;
...

	[Application]
    public class YourApplication : Application
    {
    	...

    	public override void OnCreate()
        {
            base.OnCreate();

            WebEngageConfig config = new WebEngageConfig.Builder()
                                                        .SetWebEngageKey(YOUR_WEBENGAGE_LICENSE_CODE)
                                                        .SetDebugMode(true)
                                                        .Build();
            RegisterActivityLifecycleCallbacks(new WebEngageActivityLifeCycleCallbacks(this, config));

            ...
        }
    }
Make sure you replaceYOUR_WEBENGAGE_LICENSE_CODE with your WebEngage license code

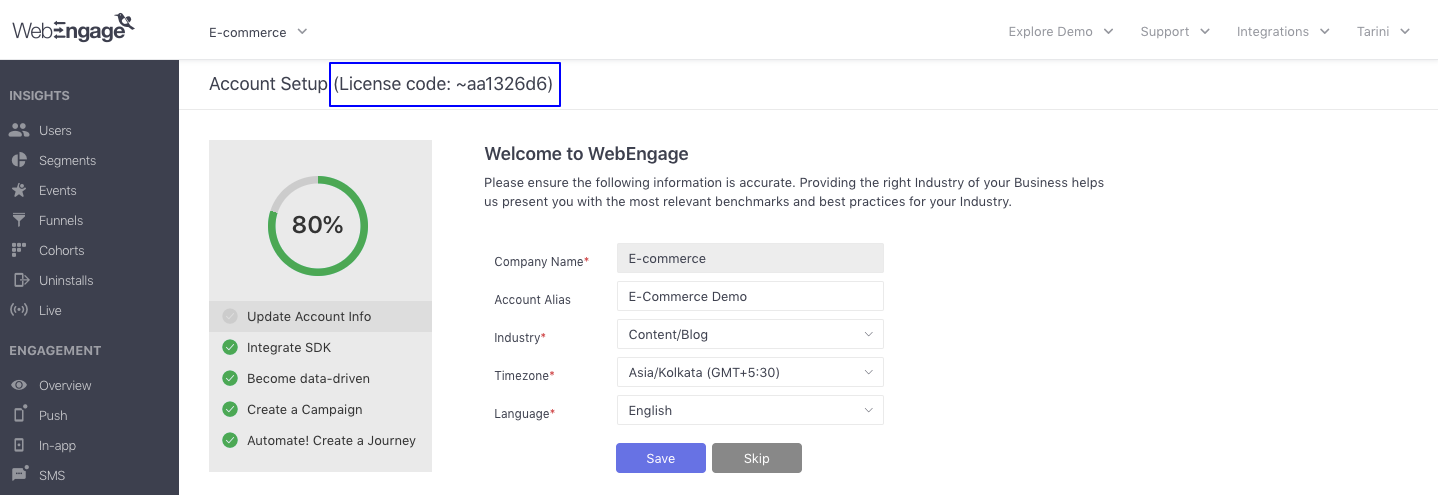
Finding your WebEngage License Code
As shown above, navigate to the Account Setup section to find your license code. Your License Code might start with tilde (~).
3. Attribution tracking
Android only supports one BroadcastReceiver for the INSTALL_REFERRER IntentFilter. If your app or another SDK in your app is already listening for the INSTALL_REFERRER IntentFilter to track user acquisition source on Android, follow the below instructions for using WebEngage in addition to other attribution providers.
Pass the Intent broadcast received in the BroadcastReceiver of your primary InstallReferrer to onReceive() of WebEngage's InstallReferrer. This is illustrated below.
using Com.Webengage.Sdk.Android;

namespace YourNamespace
{
    [BroadcastReceiver]
    public class PrimaryInstallTracker : BroadcastReceiver
    {
        public override void OnReceive(Context context, Intent intent)
        {
            WebEngage.Get().Analytics().Installed(intent);
        }
    }
}Doing this is straightforward:
- Set up a new
InstallReferrer.- Declare it in
AndroidManifest.xml.- Call the immutable
InstallReferrerand WebEngage'sInstallReferrerfrom theonReceive()of this new primaryInstallReferrer.- Call other
InstallReferrers if you are using more attribution trackers.
Alternatively, if you don't have any other primary install referrer tracker and want to make WebEngage as the primary one, add the below receiver tag inside the application tag of your AndroidManifest.xml file.
<receiver
  android:name="com.webengage.sdk.android.InstallTracker"
  android:exported="true">
  <intent-filter>
     <action android:name="com.android.vending.INSTALL_REFERRER" />
  </intent-filter>
</receiver>
4. Additional steps (Optional)
For other integration options such as location tracking, refer the Advanced section.
Next steps
Congratulations! You have now successfully integrated WebEngage with your Hybrid app and are now sending user session data to WebEngage.
Note that it may take a few minutes for your data to show up on the WebEngage dashboard. We suggest you meanwhile proceed to read the next sections to learn how to:
Updated 3 months ago