Push Messaging
Push Notifications are messages that pop up on mobile devices. App publishers can send them anytime, even if the recipients aren’t currently engaging with the app or using their devices.
Before continuing, please ensure that you have completed all of the steps in Getting started.
A demo Swift app showcasing the integration of WebEngage SDK is available on GitHub.
WebEngage push messaging can be integrated using Apple Push Notification service. To integrate WebEngage into your iOS application, you must be enrolled in Apple Developer Program.
To send push notifications to your iOS users, you will need to upload either your APNs Auth Key or APNs Certificate. We strongly recommend that you create and upload_APNs Auth Key_ for the following reasons:
- One auth key can be used for all your apps - hence there is no complication of maintaining different certificates for different apps
- There is no need to re-generate the push certificate every year once it expires.
If you already support push notifications in your app, skip to the section below about uploading your auth key. Note that you may still need to enable background modes.
1. Enable Push and Background Modes Capabilities
Here's how you can go about it:
Step 1: Enter Project Navigator view.
Step 2: Select your main app target from the expanded sidebar or the dropdown menu, then select the Capabilities tab.
Step 3: If Push Notifications isn't enabled, click the switch to add the "Push Notifications" entitlement to your app. If you are using Xcode 8 or above, ensure that a YOUR-APP-NAME.entitlements file has been added to your project.
Step 4: If Background Modes is not enabled, click the switch and then tick the Remote notifications checkbox. WebEngage uses background modes to track when push messages are received on a user's device before the message is opened.
2. Create APNs Auth Key
The documentation below covers the process of creating the APNs Auth Key to send push notifications to your users. If you intend to use the APNs Certificate instead, please refer to the documentation here.
Follow these steps to create an APNs Auth Key:
Step 1: Log in to the Apple Developer Console and go to Certificates, Identifiers & Profiles.

Click to enlarge
Step 2: Create a new Auth Key by clicking on the + button on the top right corner.

Click to enlarge
Step 3: Add a Key Name, and select APNs.

Click to enlarge
Step 4: Click the Confirm button.

Click to enlarge
Step 5: On this page, you will be able to download your Auth Key file. Please do not rename this file, and upload it as is to the WebEngage dashboard, as shown in the next section in the documentation below.

Click to enlarge
Step 6: Locate and copy your Team ID. To do this, click on your name/company name in the top right corner, then select View Account.

Click to enlarge
3. Upload APNs Auth Key
You need to upload the APNs Auth Key on WebEngage in order to enable WebEngage to send push notifications to your users on your behalf.
The documentation below covers the process of uploading the APNs Auth Key to send push notifications to your users. If you intend to use the APNs Certificate instead, please refer to the documentation here.
Step 1: Log in to your WebEngage dashboard and navigate to Data Platform > Integrations > Push Setup (Configure) > Channels.
Step 2: In Push tab, under the iOS section, select Auth Key as APNs Authentication Type. Upload the APNs Auth Key file that you downloaded earlier, and paste your Team ID and your app’s Bundle ID. Your app’s Bundle ID can be found in Xcode.
Step 3: Select the default push mode for sending push notifications i.e. Production or Development and then Click Save.

Click to enlarge
4. Deep Linking
WebEngage SDK supports URL-based deep linking. On the WebEngage dashboard, you can enter any valid URI while creating your push campaign. It can be an http / https link or a valid custom URI like yourapp://detailpage/1234
To handle custom deep links for more advanced use cases, the app can implement WEGHandleDeeplink in its AppDelegate. If this method is implemented, WebEngage SDK will not handle any deep links (including external links) and will call this method instead. The method will receive the deep link string provided on the dashboard along with the whole push notification payload including any custom data sent via the dashboard. You can then implement your logic for handling deep links.
func WEGHandleDeeplink(_ deeplink: String, userData data: [AnyHashable: Any]) {
	// Your Handling Code
}
- (void)WEGHandleDeeplink:(NSString *)deeplink userData:(NSDictionary *)data;5. App Delegate Method Swizzling
The WebEngage SDK uses Method Swizzling, a runtime feature in iOS that allows automatic handling of push notification callbacks within your app’s AppDelegate . This improves integration speed and reduces manual setup. Swizzling is enabled by default to simplify the onboarding process.
Critical for Multiple Push SDKs : If your app uses Firebase (FCM) or any other push SDK along with WebEngage, their swizzling implementations will likely conflict with WebEngage. To avoid issues, WebEngage recommends disabling Method Swizzling in the SDK settings and opting for the manual forwarding approach.
This manual approach requires you to forward the push payload directly to our SDK, giving you explicit control and ensuring that critical features like foreground notifications, click tracking, and deep links function reliably across all services.
6. Rich Push Notifications
Before continuing, please ensure that you have completed all steps inGetting started
Following requires iOS 12.0+ & WebEngage SDK Version 5.0.0+
To have the Rich Push Notification you need to integrate WEServiceExtension & WEContentExtenion in your project.
New SDK's for Rich Push Notification.WebEngageBannerPush & WebEngageAppEx/ContentExtension are now deprecated.
WEServiceExtension & WEContentExtension are the latest SDK's to achieve rich push.
WEServiceExtension integration.
Step 1: Create service extension for Project
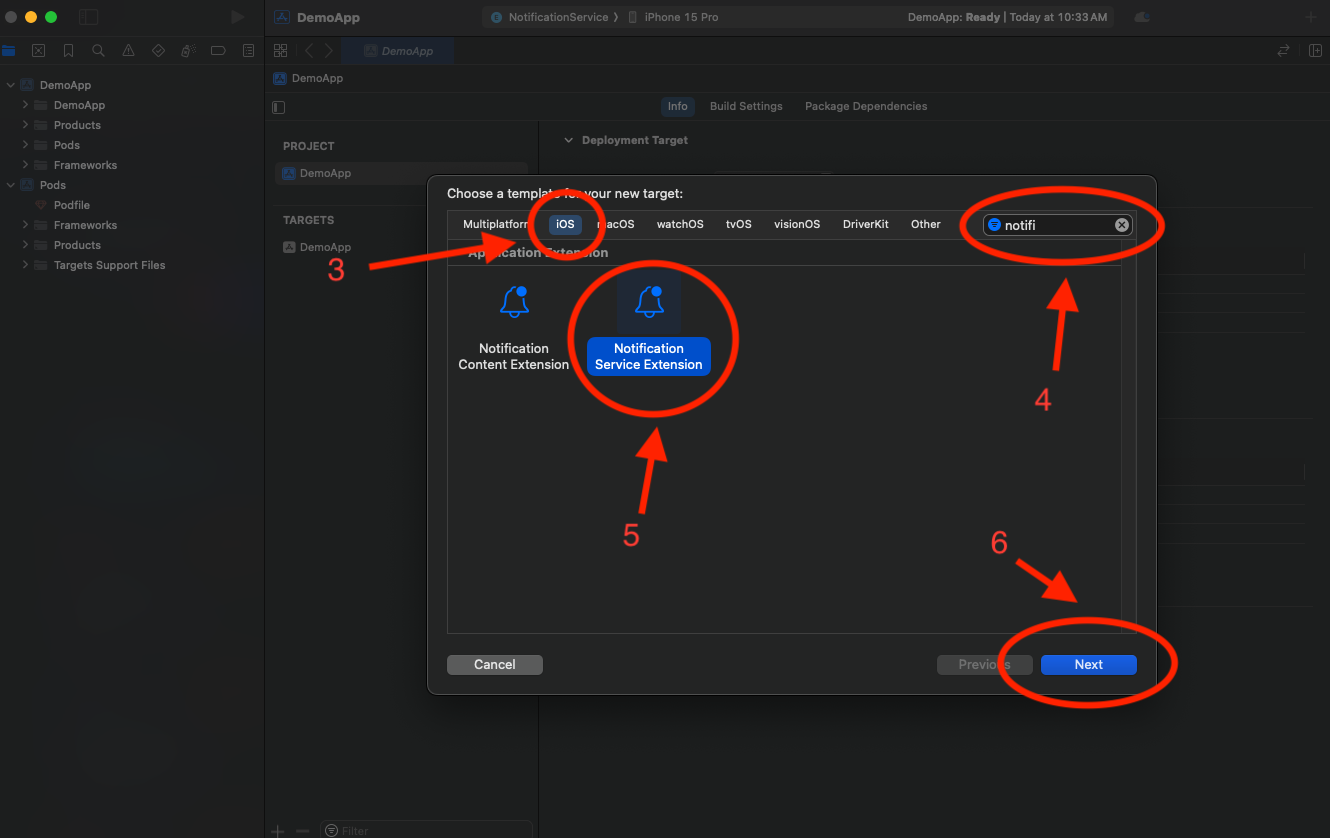
- In Xcode, navigate to
File>New>Targetand selectNotification Service Extensionthen Next
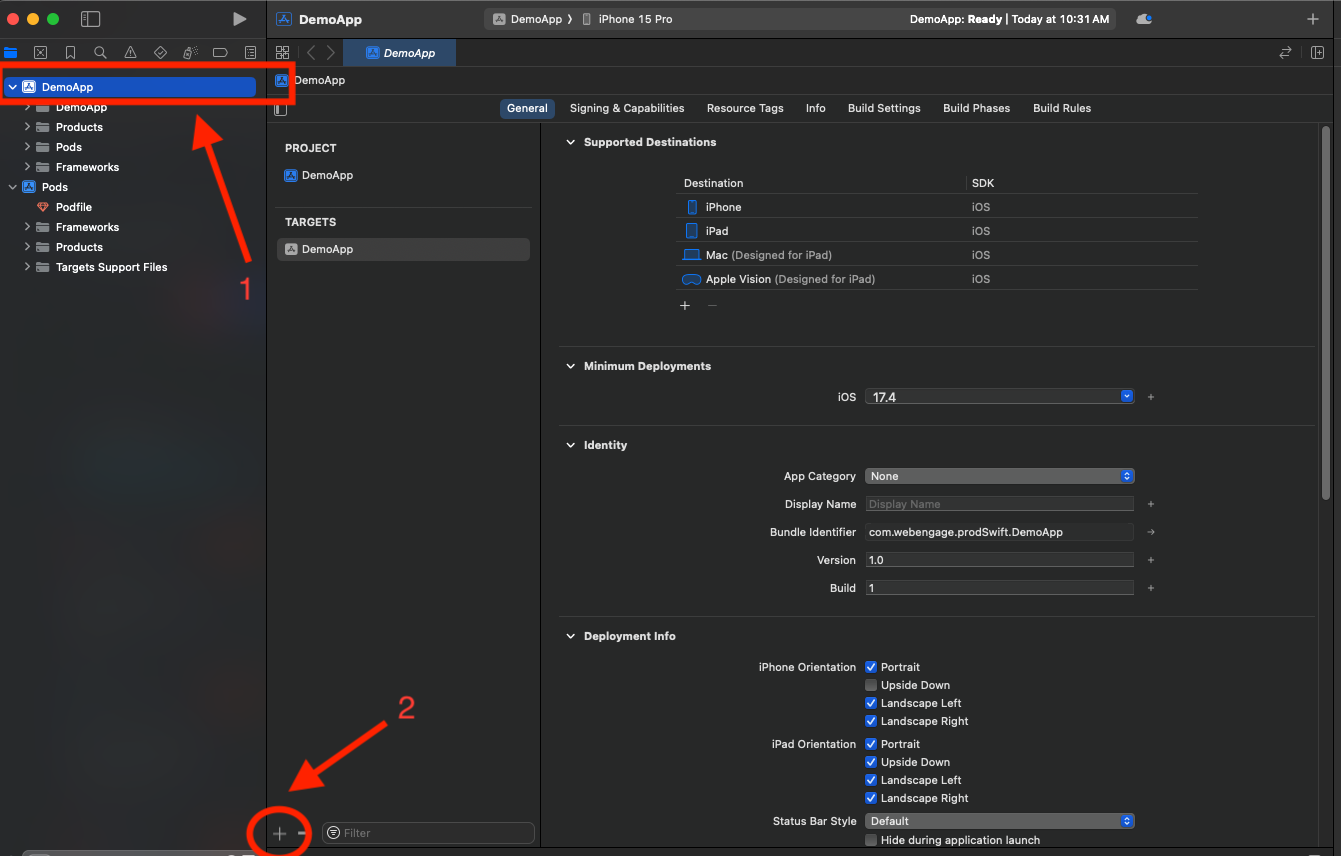
Screenshot 1
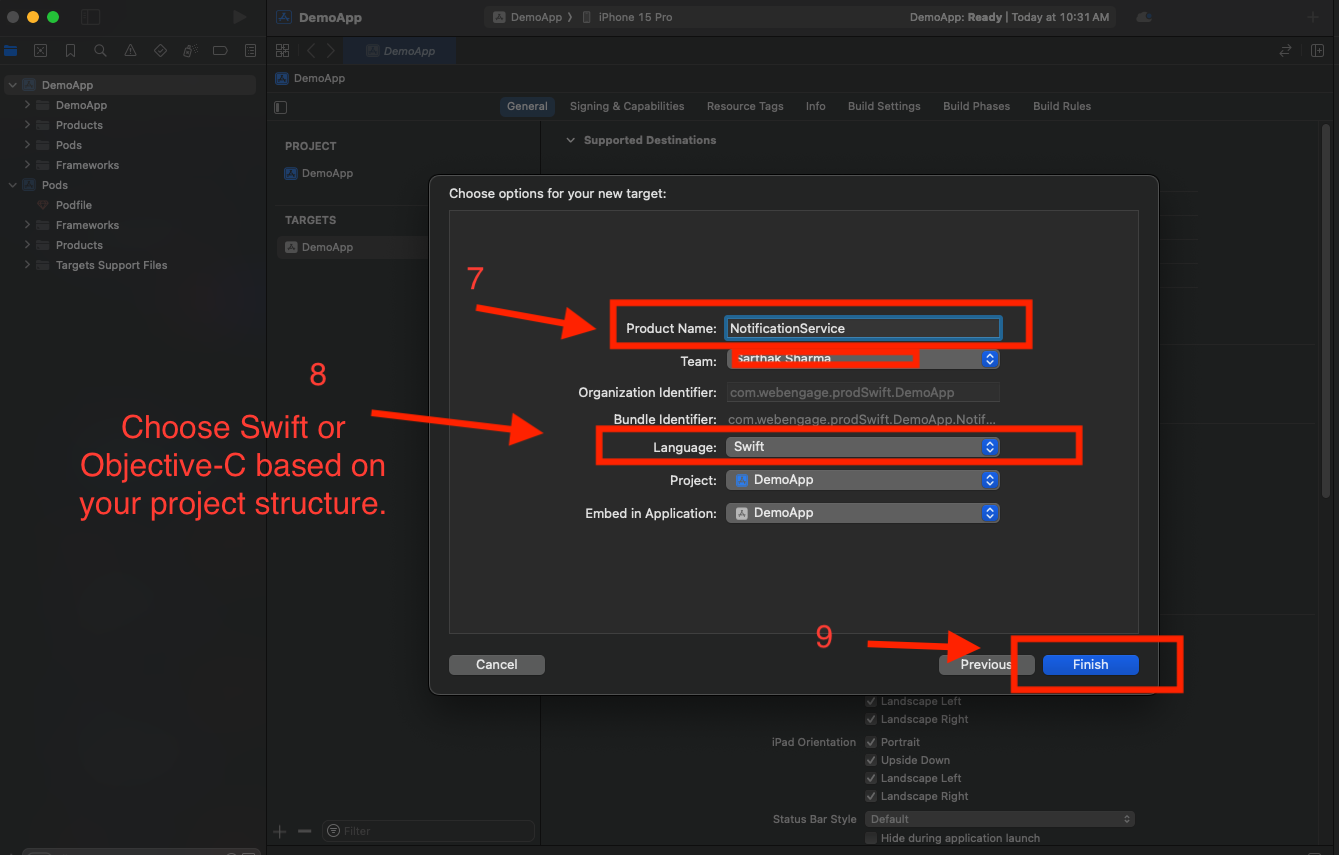
- Enter the Product Name as
NotificationService, and clickFinish.
Screenshot 2
Screenshot 3
- Click
Activateon the prompt shown to activate the service extension. Xcode will now create a new top-level folder in your project with the name NotificationService.
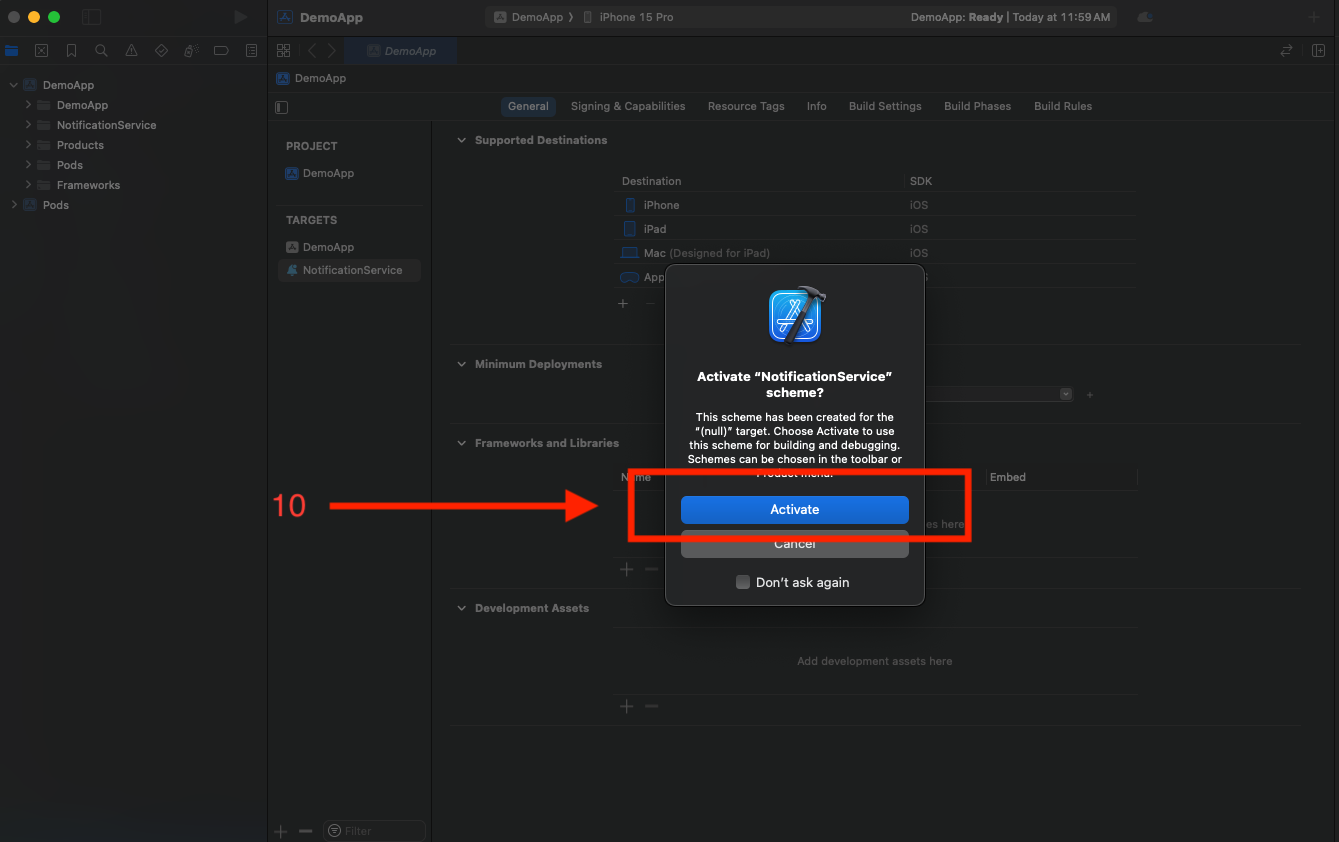
Screenshot 4
Step 2: Integrate WEServiceExtension inside Service Extension
There are 2 common methods for integrating a library inside a Service Extension:
Note: Choose Either SPM or CocoaPodsIt's recommended to choose either Swift Package Manager or CocoaPods for integrating the library into your Service Extension. Mixing both methods might lead to conflicts or inconsistency in your project setup.
Approach 1: Integrating via SPM
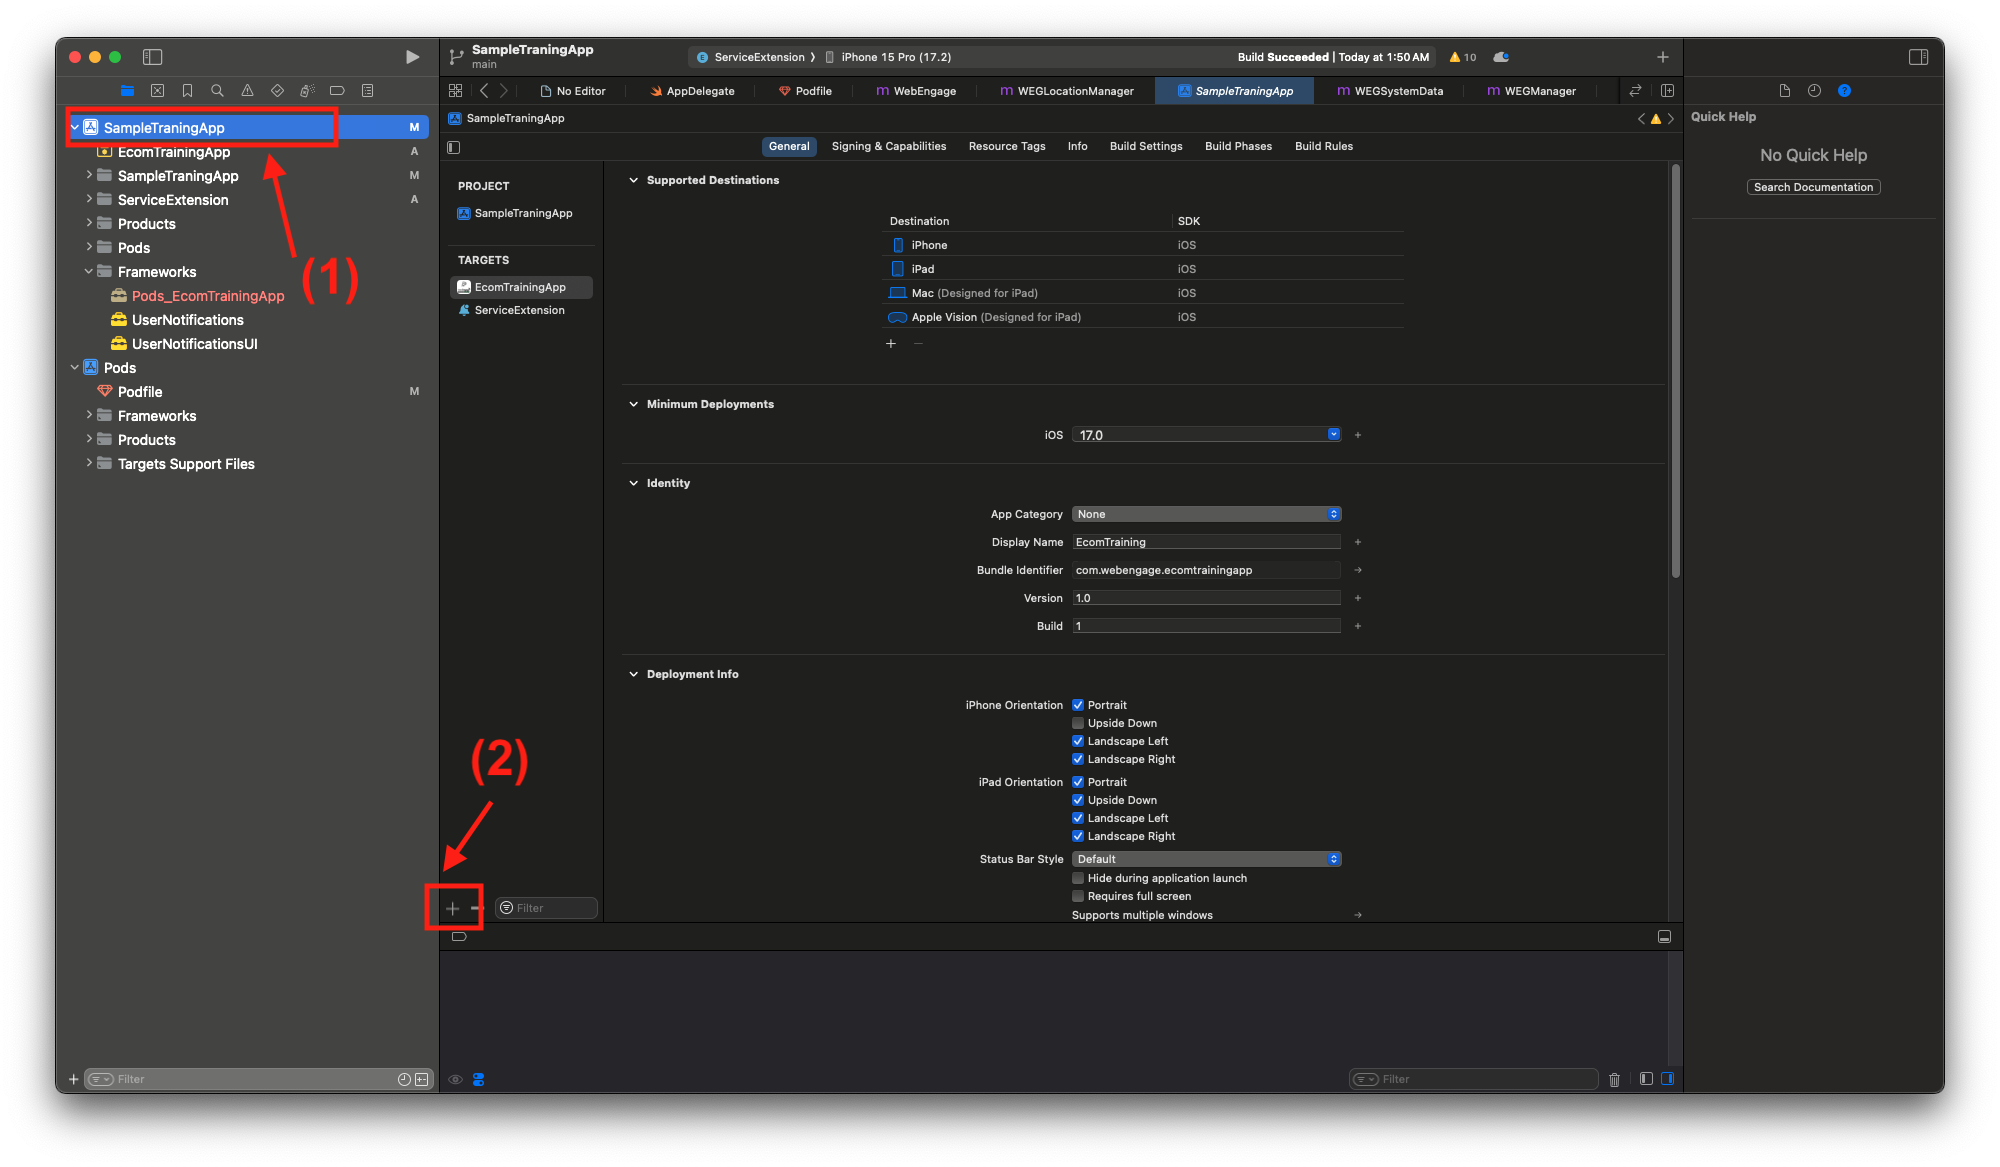
- Select your
Project>Package Dependencies>+button.
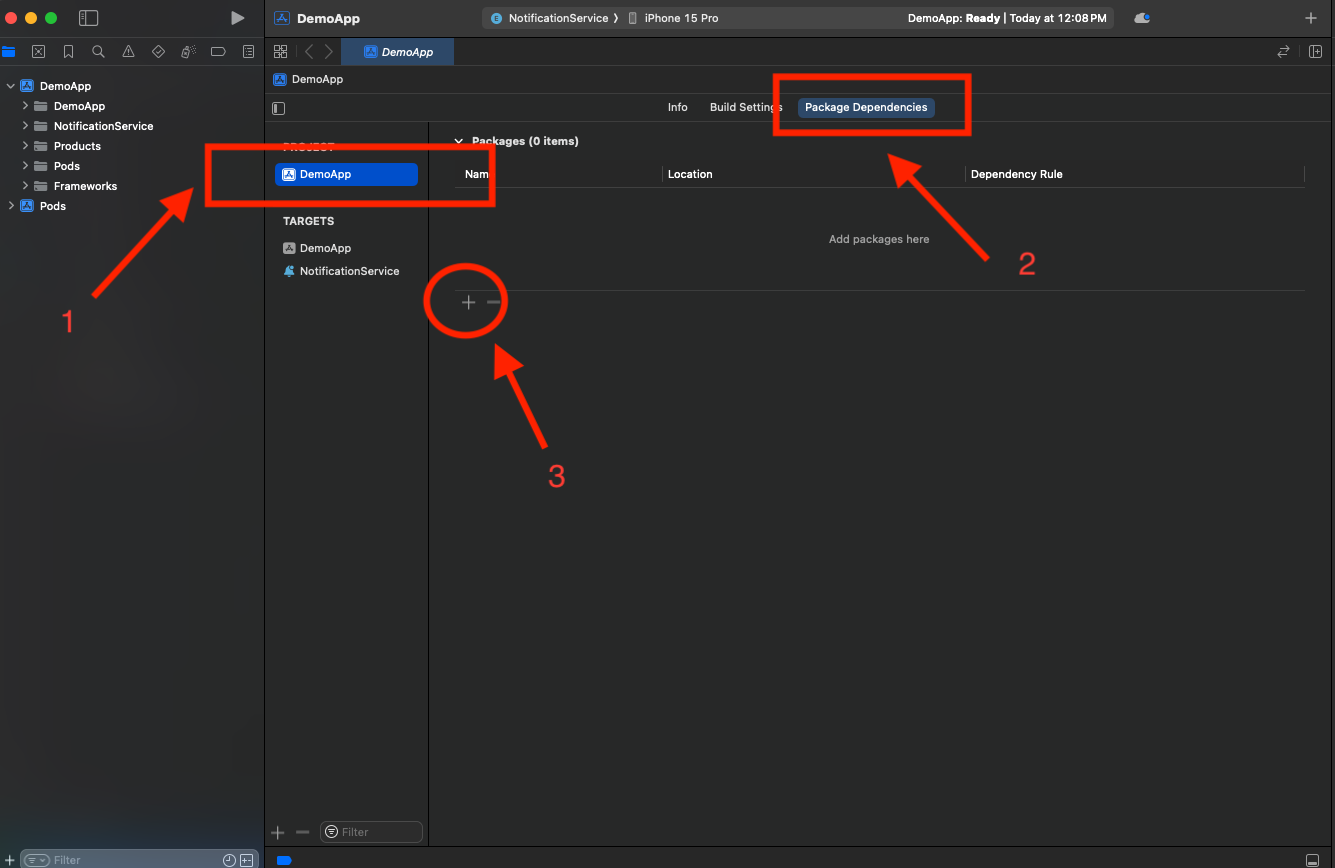
Screenshot 1
- Enter the Package URL: https://github.com/WebEngage/WEServiceExtension.git in the search bar.
https://github.com/WebEngage/WEServiceExtension.git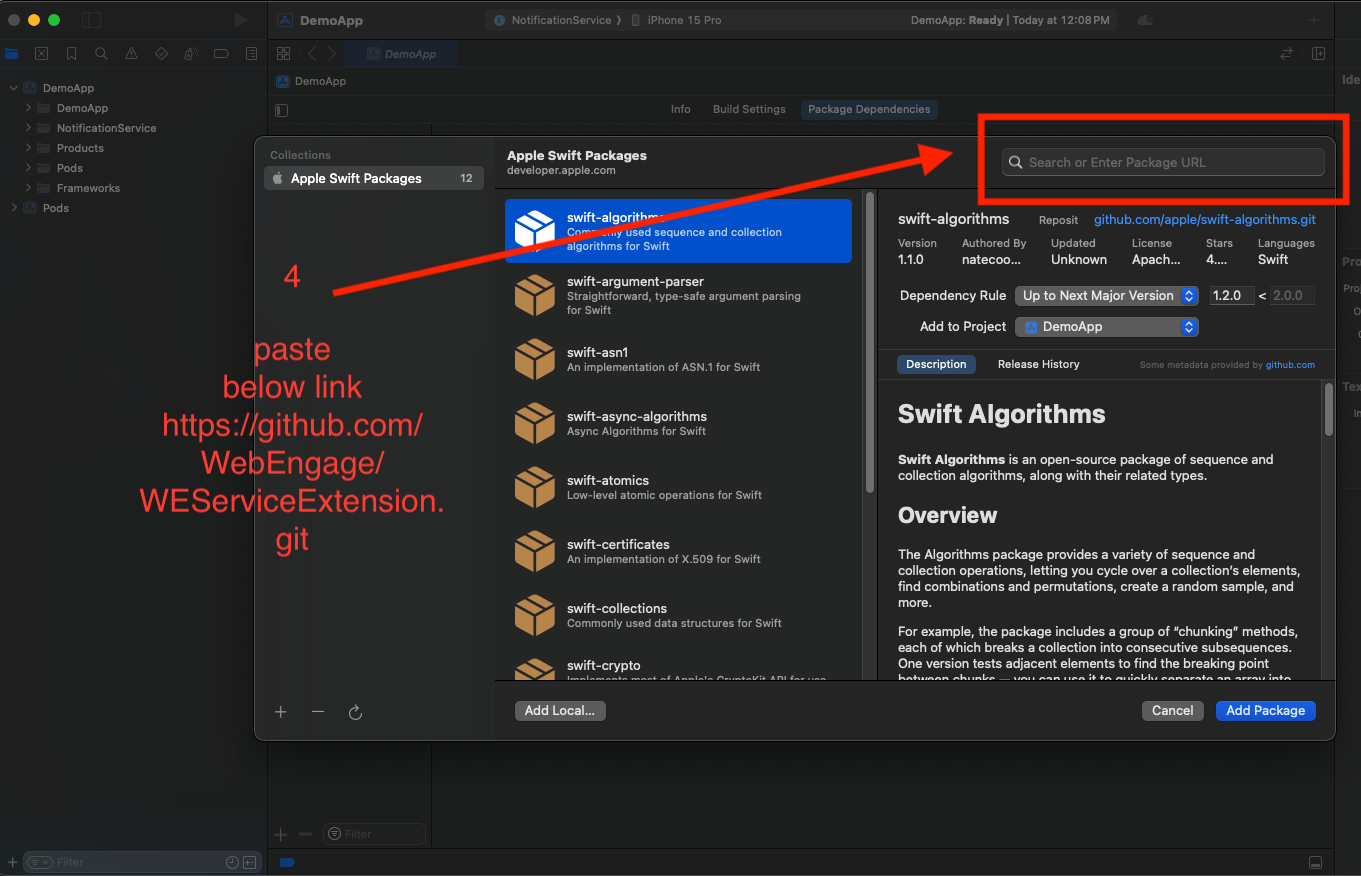
Screenshot 2
Screenshot 3
- Under
Add to TargetselectNotificationService(Your Service Extension Target).
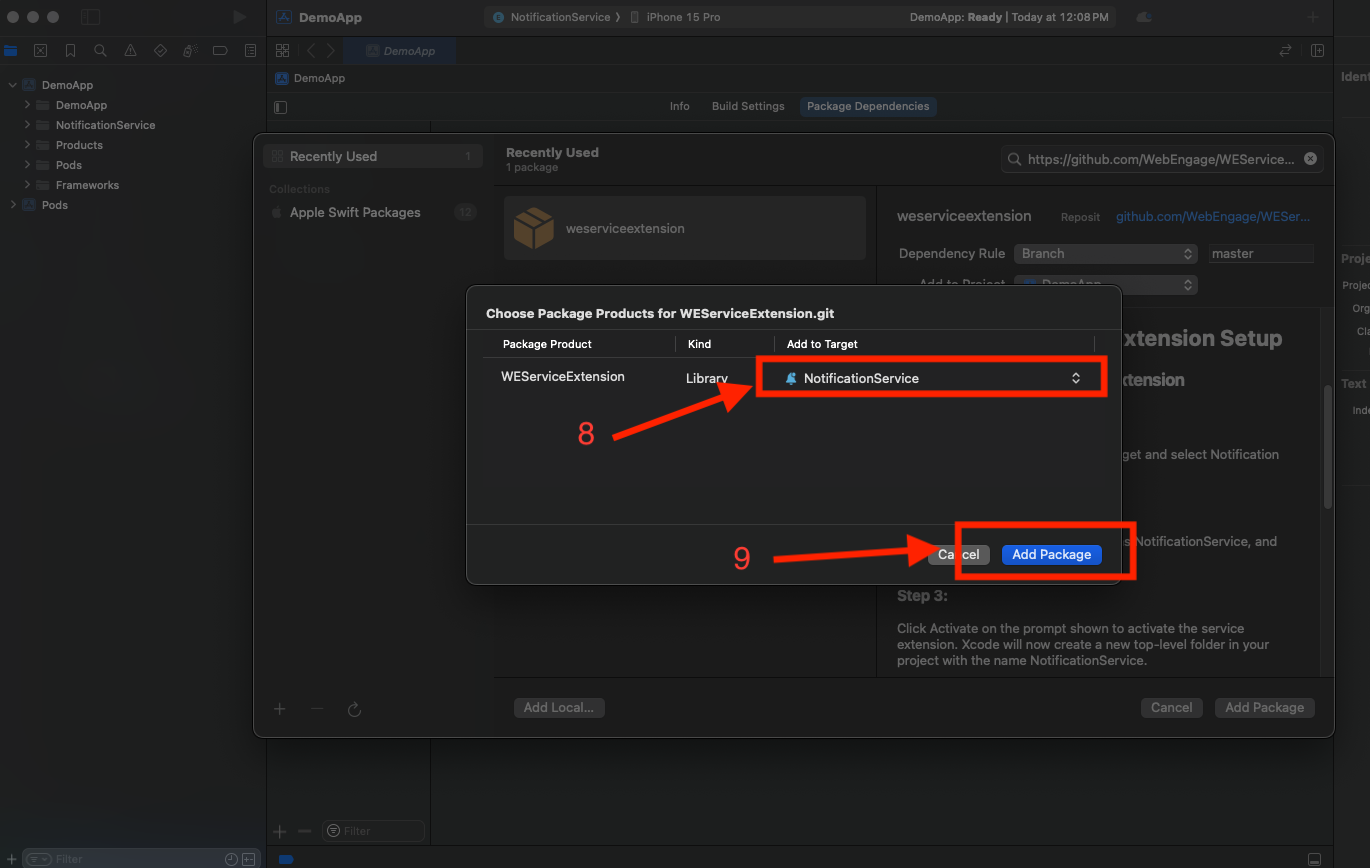
Screenshot 4
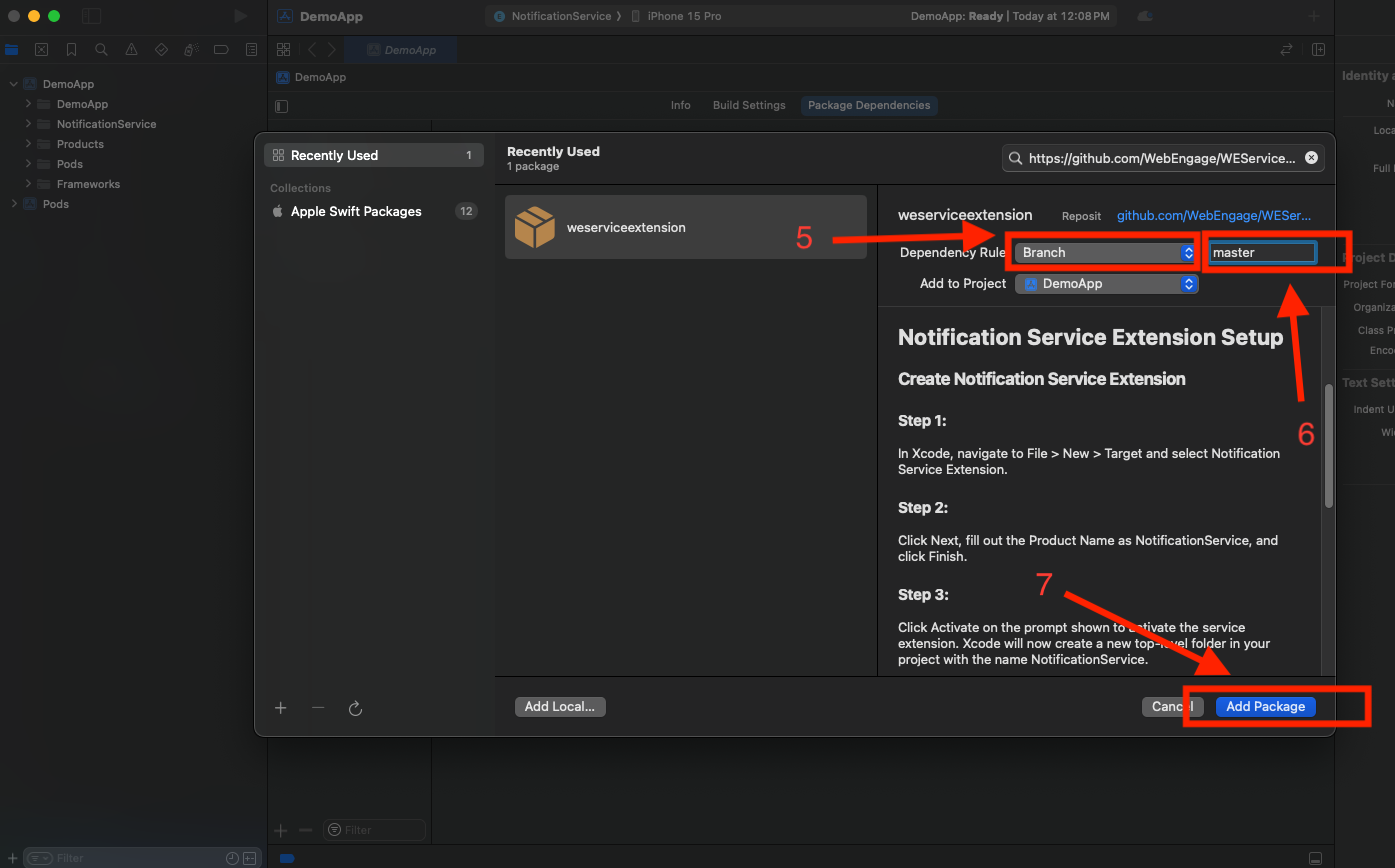
- Click
Add Package.

Screenshot 5
Approach 2: Integrating via CocoaPods
- Prerequisites
- Cocoapods should be installed inside your system
- podfile should be available for your project
- Edit Podfile
- Open the Podfile using a text editor.
- Add the library dependency to the Podfile. For example:
# this target name should be your ServiceExtension Name
target 'NotificationService' do
  # Uncomment the line below if the parent target also uses frameworks
  # use_frameworks!
  pod 'WEServiceExtension'
  # Add other pods for the NotificationService target here
end
Note : Your target name should be the Service Extension name which you have entered while creating ServiceExtension
- Install Pods
- Save the changes to the Podfile.
- Install the pods by running the following command:
pod installStep 3: Import and Use the WebEngage inside Service Extension
- SWIFT
- Open NotificationService.swift
- Import WEServiceExtension by adding code
import WEServiceExtension - Remove all existing code from the class NotificationService
- Add subclassing to NotificationService with WEXPushNotificationService
- Objective C
- Open NotificationService.m
- Import WEServiceExtension/WEServiceExtension-Swift.h
- Create Object of WEXPushNotificationService
- Pass necessary information to WebEngage through above created object
import UserNotifications
// Step 1 : Importing WEServiceExtension
import WEServiceExtension

// Step 2 : Subclassing service Extension
class NotificationService: WEXPushNotificationService {
}
#import "NotificationService.h"
// Step 1 : Importing WEServiceExtension
#import <WEServiceExtension/WEServiceExtension-Swift.h>
@interface NotificationService ()
// Step 2 : Creating Object of service Extension
@property (nonatomic, strong) WEXPushNotificationService *serviceExtension;
@end
@implementation NotificationService
// Step 3 : Pass necessary information to WebEngage
- (void)didReceiveNotificationRequest:(UNNotificationRequest *)request withContentHandler:(void (^)(UNNotificationContent * _Nonnull))contentHandler {
if (_serviceExtension == NULL){
_serviceExtension = [[WEXPushNotificationService alloc]init];
}
[_serviceExtension didReceiveNotificationRequest:request
withContentHandler:contentHandler];
}
- (void)serviceExtensionTimeWillExpire {
// Called just before the extension will be terminated by the system.
// Use this as an opportunity to deliver your "best attempt" at modified content, otherwise the original push payload will be used.
[_serviceExtension serviceExtensionTimeWillExpire];
}
@endStep 4: Configure ServiceExtension-Info.plist
Here's how you can go about it:
- Open the Info.plist file for NotificationService
- Add the App Transport Security Settings key under the Information Property List in the NotificationService-Info.plist file.
- Set Allow Arbitrary Loads to YES under App Transport Security Settings - Not required if you are sure that image URLs provided on the WebEngage dashboard will always use https.

Step 5: Create App Groups for all Targets
App Groups allow your app and the WebEngageNotificationServiceExtension to communicate when a notification is received, even if your app is not active. This is required for Confirmed Deliveries.
- Select your
Main App Target>Signing & Capabilities> +Capability>App Groups.
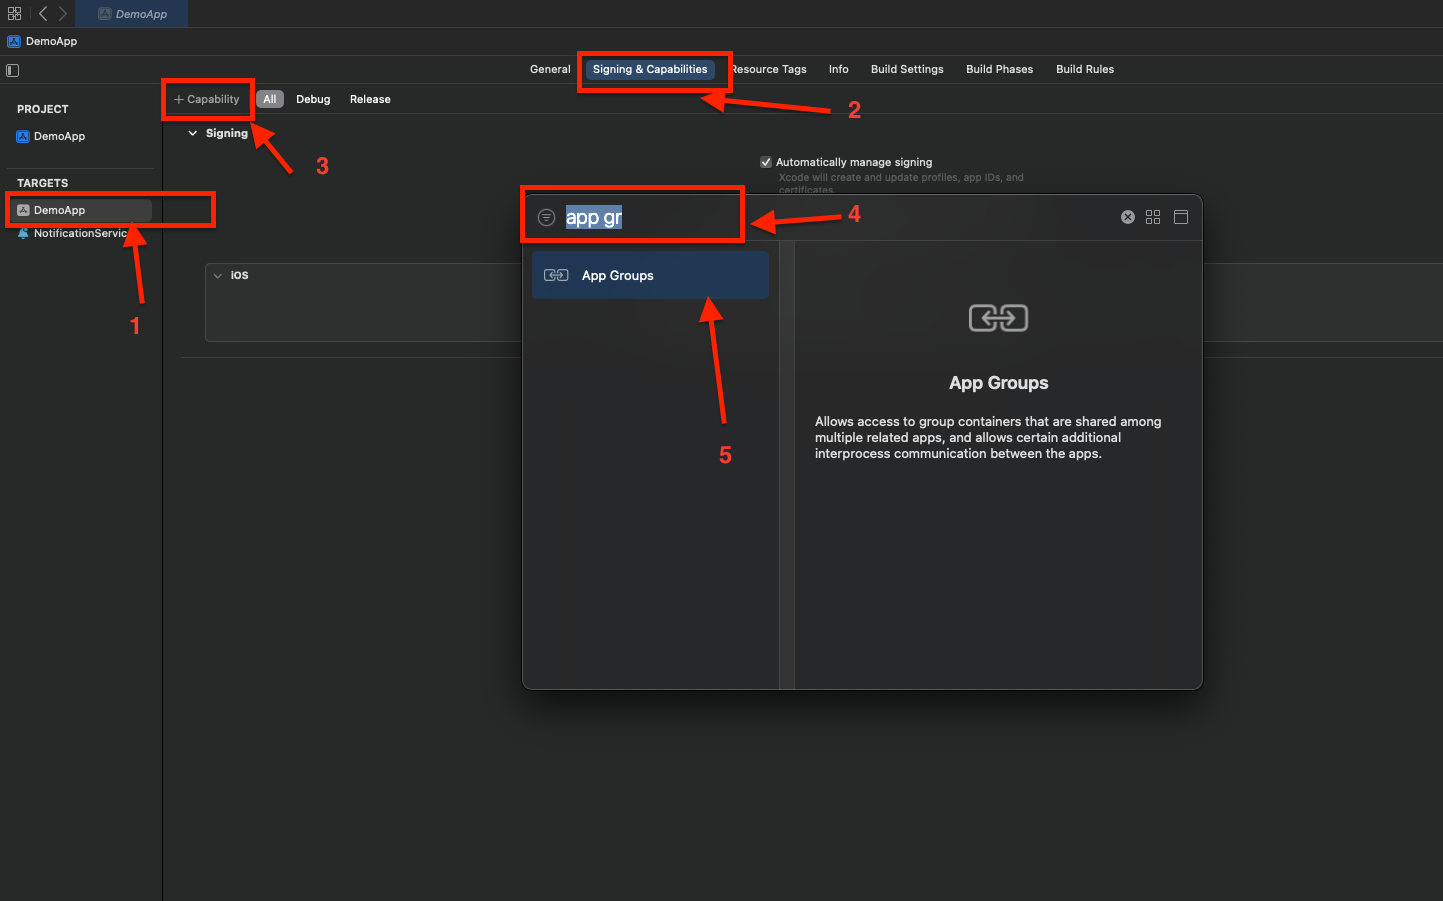
Screenshot 1
- Within
App Groups, click the+button.
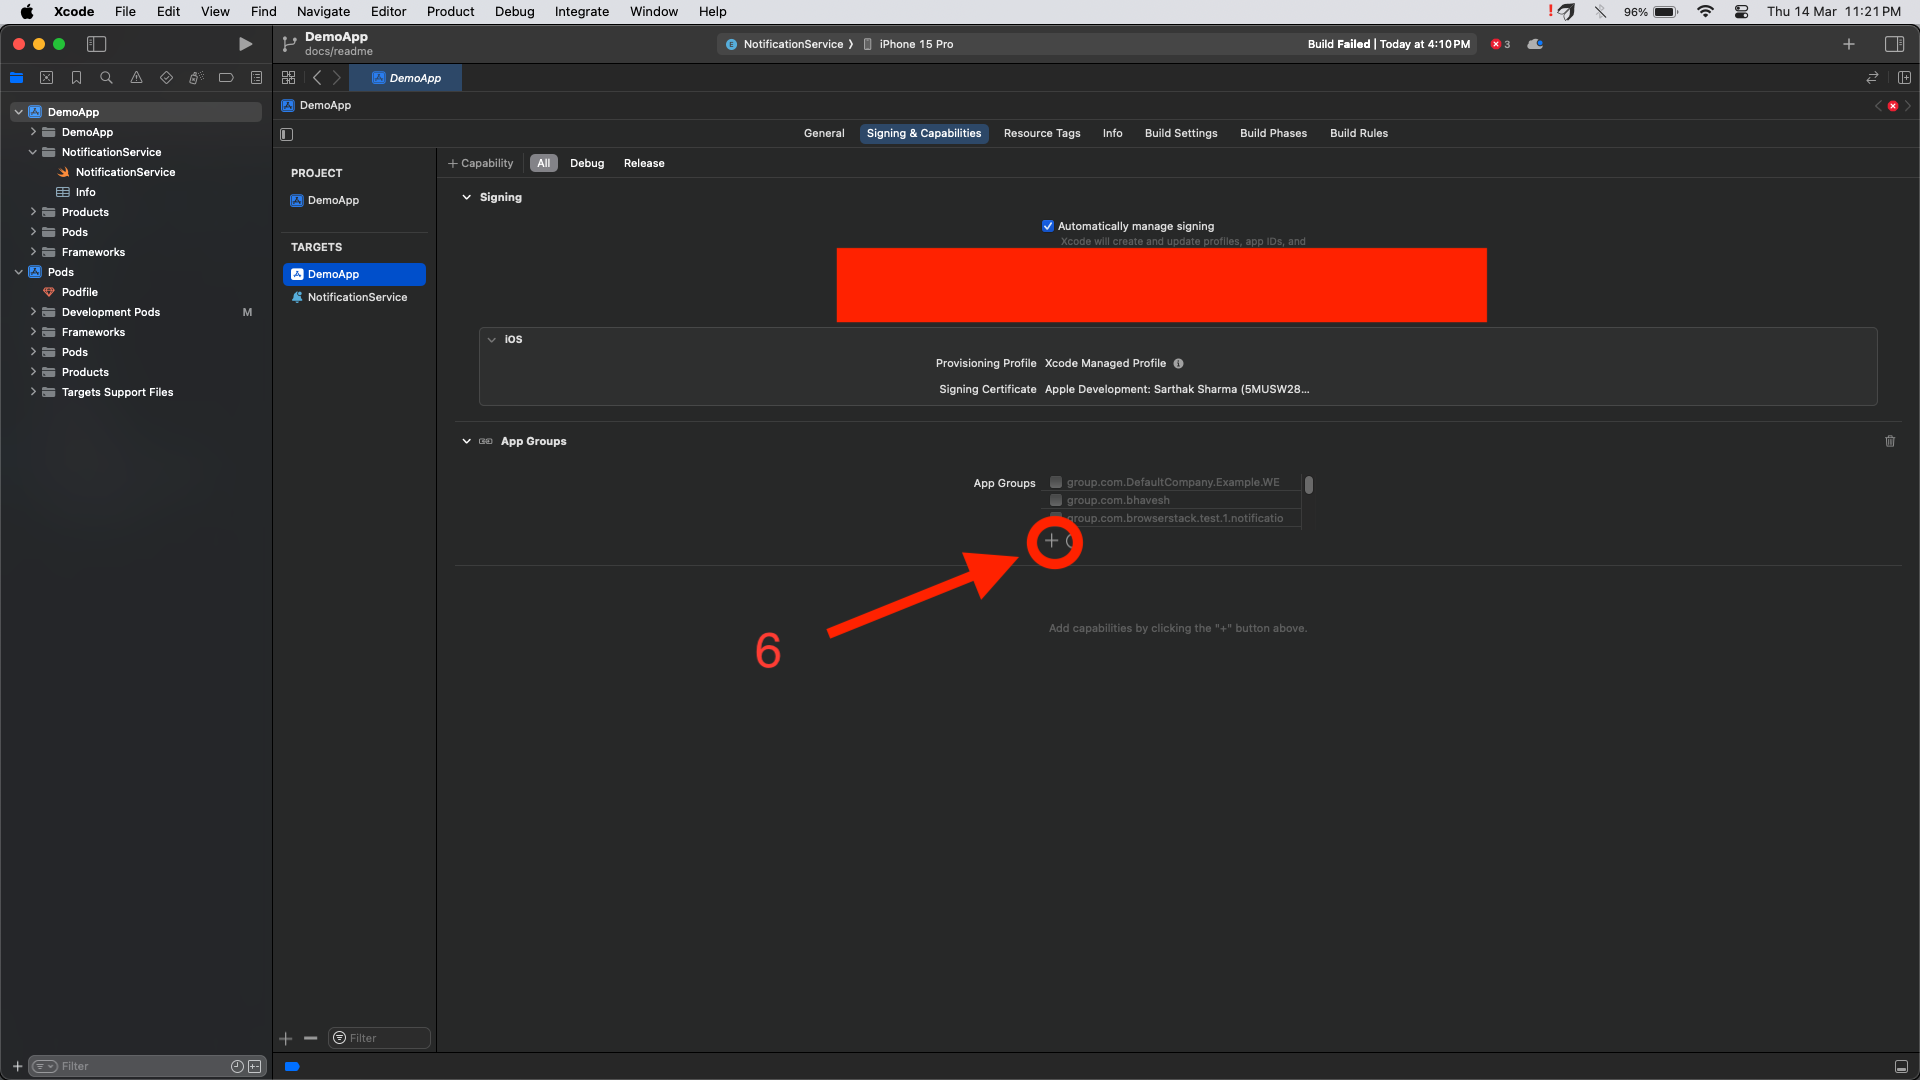
Screenshot 2
- Set the App Groups container to be a
group. YOUR_BUNDLE_IDENTIFIER.WEGNotificationGroupwhereYOUR_BUNDLE_IDENTIFIERis the same as your Main Application "Bundle Identifier".
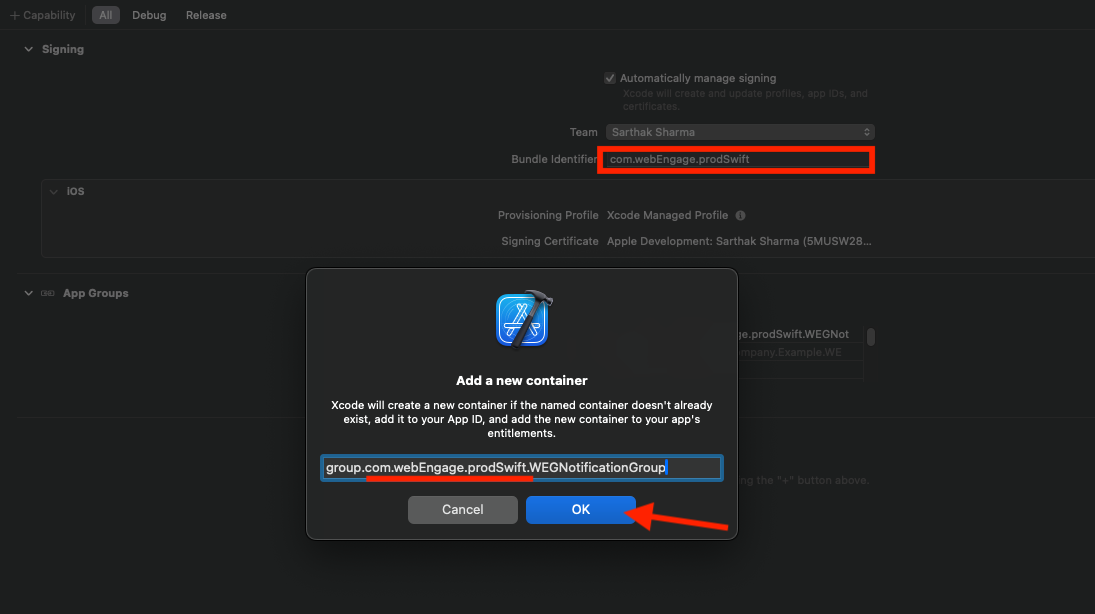
Screenshot 3
- Press OK and repeat for the
NotificationServiceTarget.
Step 6: Build and Test
- Build your project to ensure that the library integrates successfully.
- Test your Service Extension to ensure that it functions as expected with the integrated library.
WEContentExtension integration.
Step 1: Create a content extension for Project
This guide provides step-by-step instructions for integrating a content extension into your iOS project. Content extensions allow you to extend the functionality of your app by providing additional content that can be displayed in various contexts, such as the Today view or Messages app.
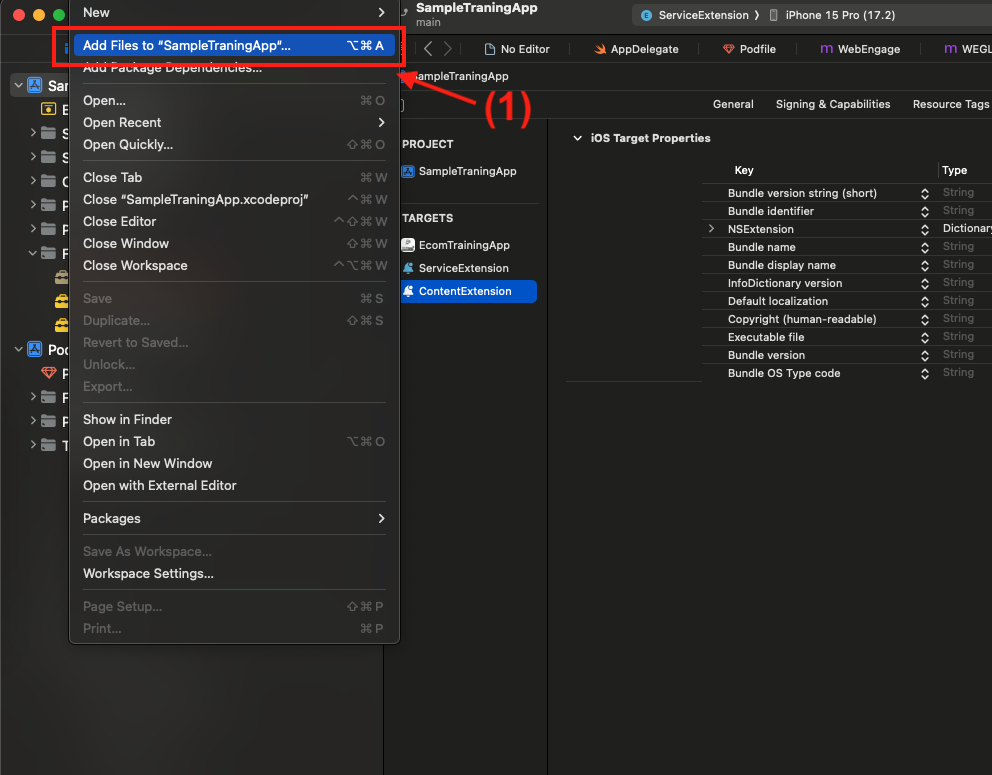
- Open your Xcode project.
- From the menu, select
File>New>Target
Screenshot 1
- Choose App Extension from the list of templates.
- Select the type of extension you want to create (e.g., ContentExtension).
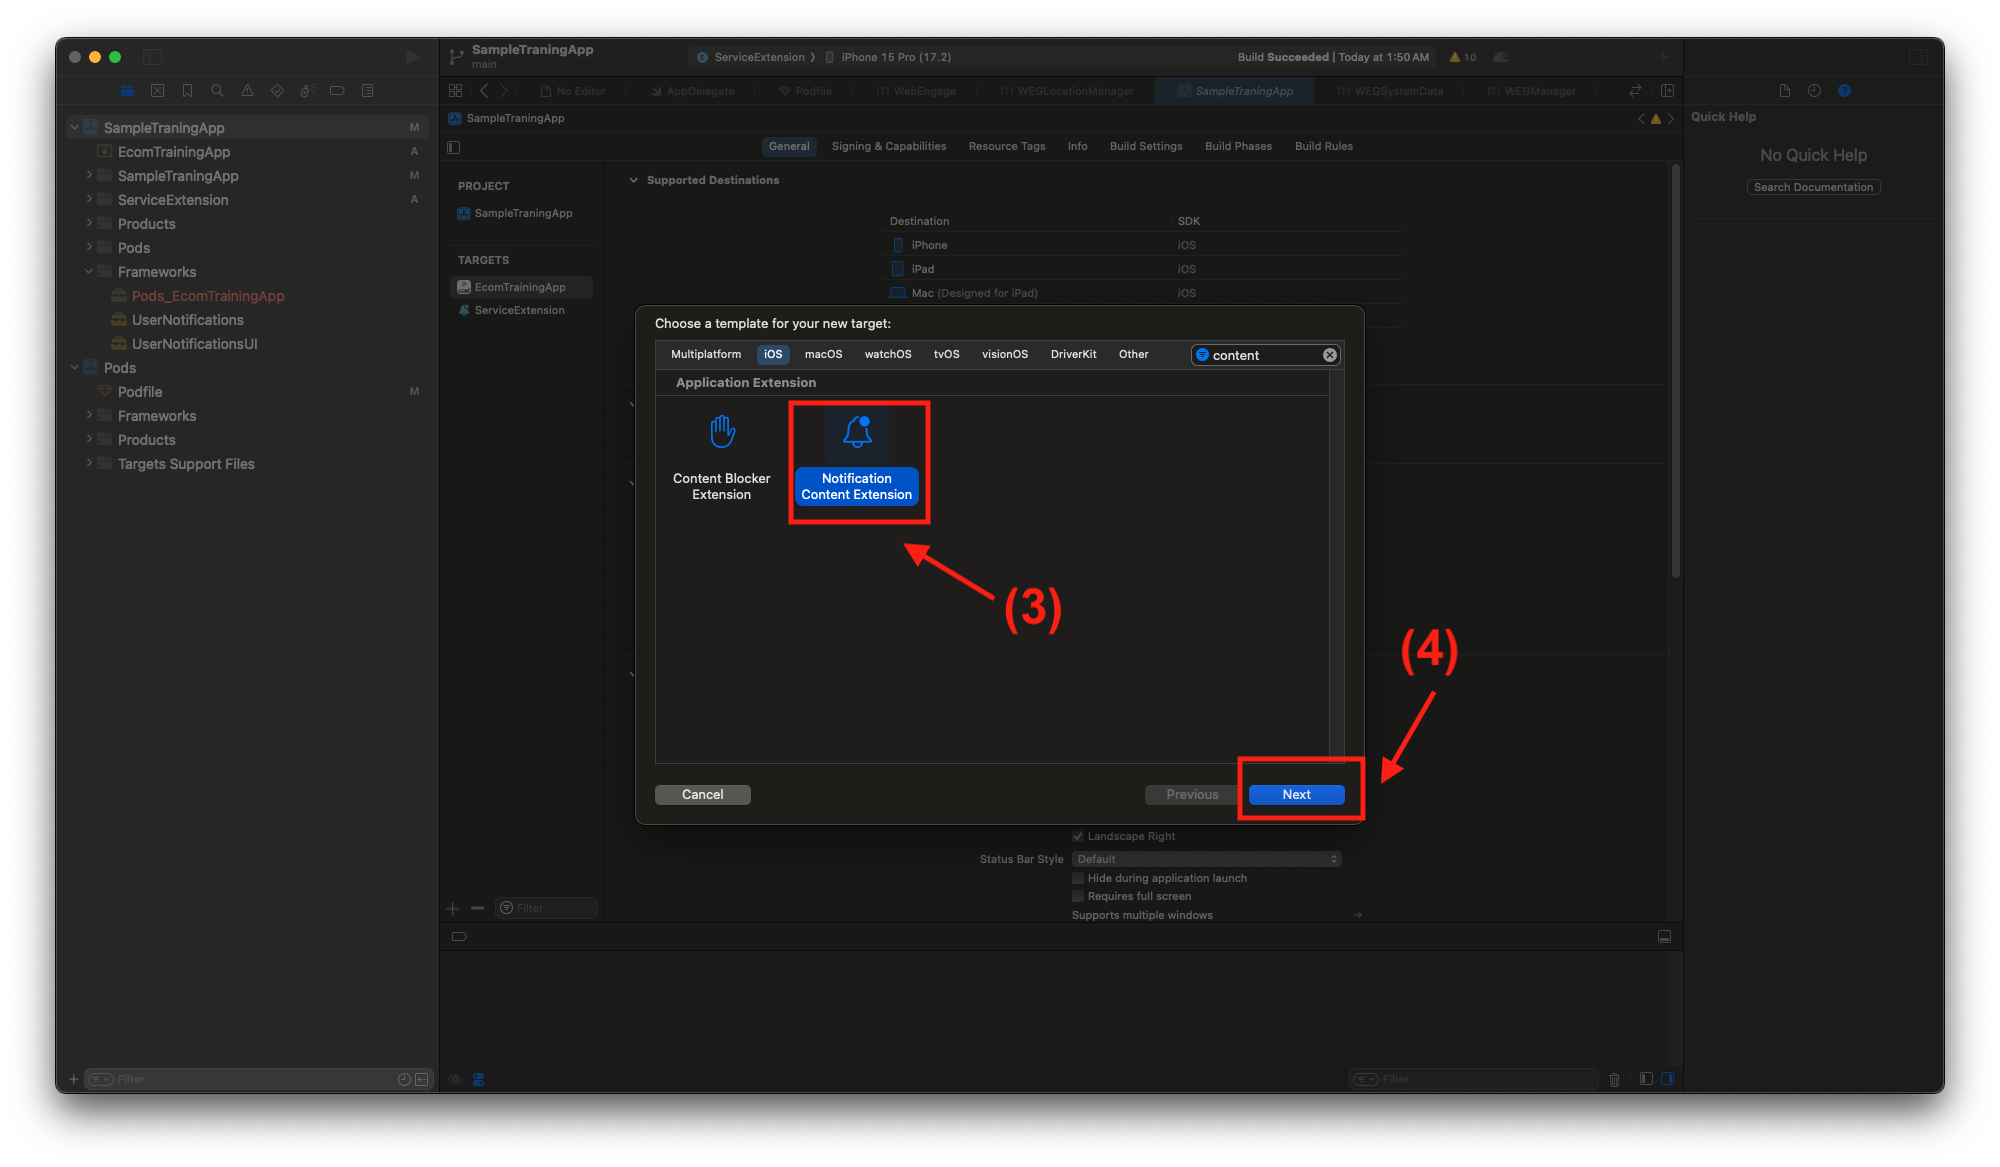
Screenshot 2
- Provide a name for your extension and click Finish.
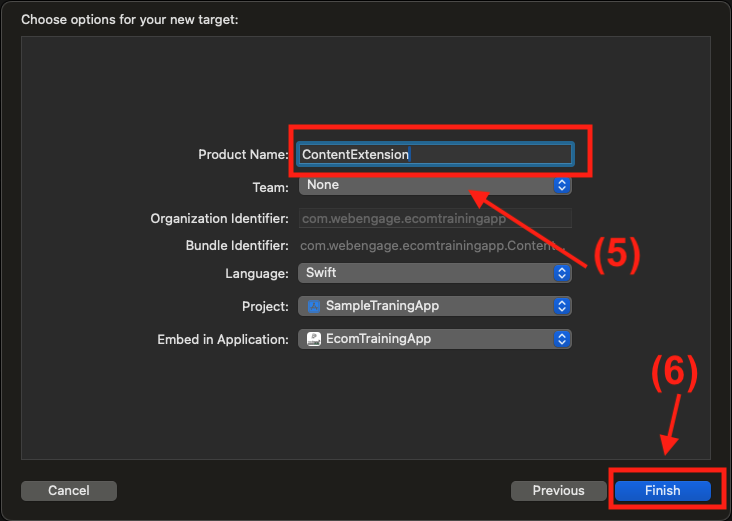
Screenshot 3
- Click
Activateon the prompt shown to activate the content extension. Xcode will now create a new top-level folder in your project with the name ContentExtension.
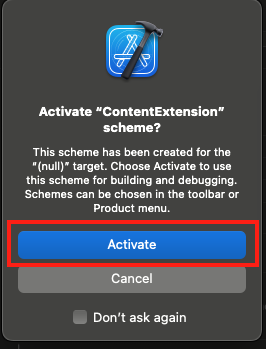
Screenshot 4
Step 2: Integrate WebEngage inside ContentExtension
There are 2 common methods for integrating a library inside a Content Extension:
Note: Choose Either SPM or CocoaPodsIt's recommended to choose either Swift Package Manager or CocoaPods for integrating the library into your Content Extension. Mixing both methods might lead to conflicts or inconsistencies in your project setup.
Approach 1: Integrating via SPM
-
Add Package Dependency
- Navigate to
File>Swift Packages>Add PackageDependency.
- Navigate to
-
Enter the URL of the library's repository: https://github.com/WebEngage/WEContentExtension
https://github.com/WebEngage/WEContentExtension- Click Next.
- Select the branch to use or enter a specific branch requirement (master).
- Click Next.
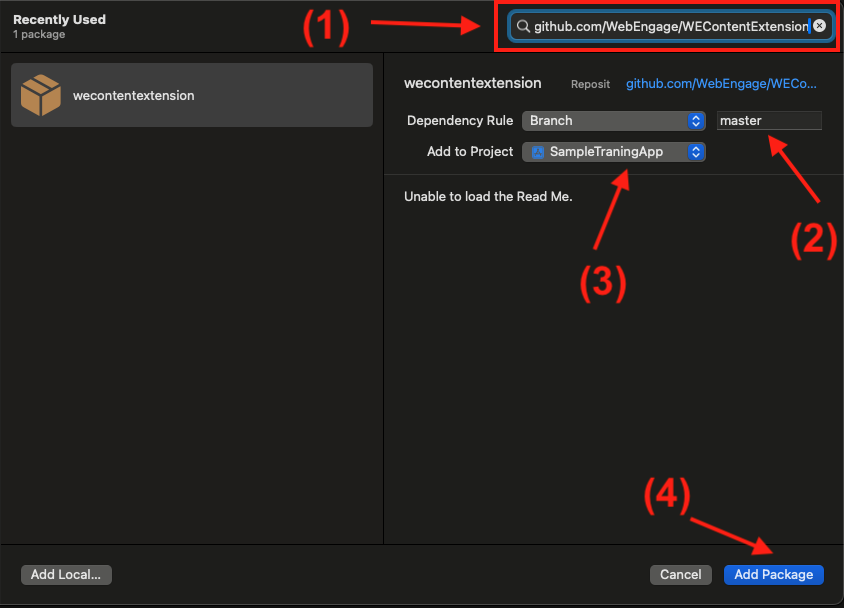
- Choose the target to which you want to add the dependency, i.e., your Content Extension target.
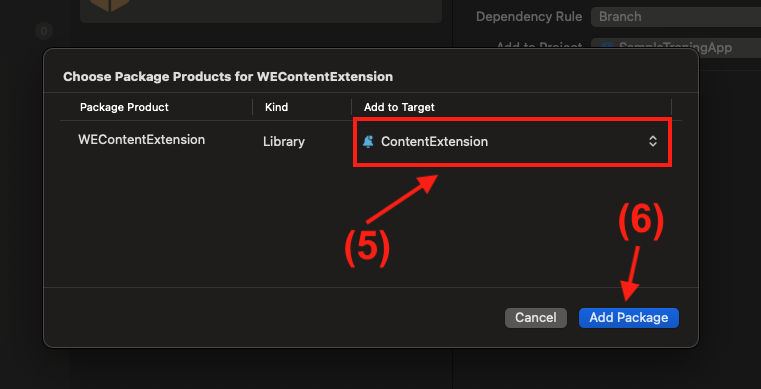
- Click Finish.
Approach 2: Integrating via CocoaPods
- Prerequisites
- Cocoapods should be installed inside your system
- podfile should be available for your project
- Edit Podfile
- Open the Podfile using a text editor.
- Add the library dependency to the Podfile. For example:
# this target name should be your ContentExtension Name
target 'ContentExtension' do
  pod 'WEContentExtension'
end
Note : Your target name should be the Content Extension name which you have entered while creating ContentExtension
- Install Pods
- Save the changes to the Podfile.
- Install the pods by running the following command:
pod installStep 3: Import and Use the WebEngage inside Content Extension
- SWIFT
- Open NotificationViewController.swift
- Import WEContentExtension by adding code import WEContentExtension
- Remove all existing code from the class NotificationViewController
- Add subclassing to NotificationViewController with WEXRichPushNotificationViewController
- Objective C
- Open NotificationViewController.m
Import WEContentExtension- Create Object of WEContentExtension
- Pass necessary information to WebEngage through above created object
import UIKit
import UserNotifications
import UserNotificationsUI

// Import WebEngage Extension SDK
import WEContentExtension

// Subclassing current class with WebEngage provided class
class NotificationViewController: WEXRichPushNotificationViewController {

    // remove all existing code inside this class

}
#import "NotificationViewController.h"
#import <UserNotifications/UserNotifications.h>
#import <UserNotificationsUI/UserNotificationsUI.h>
// Step 1 : Importing WEContentExtension
#import <WEContentExtension/WEContentExtension-Swift.h>
@interface NotificationViewController () <UNNotificationContentExtension>
@property IBOutlet UILabel *label;
// Step 2 : Creating Object of content Extension
@property WEXRichPushNotificationViewController *weRichPushVC;
@end
@implementation NotificationViewController
// Step 3 : Pass necessary information to WebEngage
- (void)viewDidLoad {
if (_weRichPushVC == NULL){
_weRichPushVC = [[WEXRichPushNotificationViewController alloc]init];
}
[_weRichPushVC setUpViewsWithParentVC:self];
[super viewDidLoad];
}
- (void)didReceiveNotification:(UNNotification *)notification {
[_weRichPushVC didReceiveNotification:notification];
}
- (void)didReceiveNotificationResponse:(UNNotificationResponse *)response completionHandler:(void (^)(UNNotificationContentExtensionResponseOption))completion{
[_weRichPushVC didReceiveNotificationResponse:response completionHandler:completion];
}
@endStep 4: Configure ContentExtension-Info.plist
Here's how you can go about it:
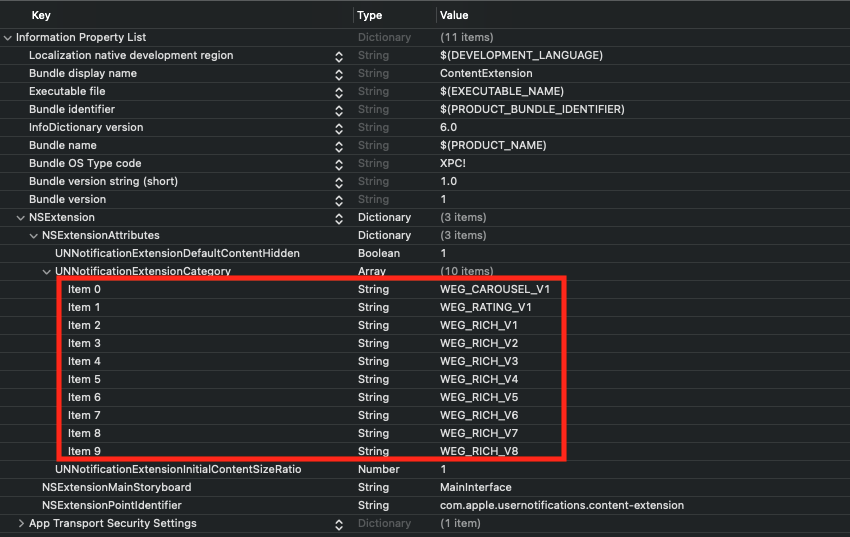
- Open the Info.plist file for NotificationViewController
- Expand NSExtension > NSExtensionAttributes
- Look for UNNotificationExtensionCategory under NSExtensionAttributes. Add it if it is not present and set the type as Array In the Array items, add:
- WEG_CAROUSEL_V1
- WEG_RATING_V1
- WEG_RICH_V1
- WEG_RICH_V2
- WEG_RICH_V3
- WEG_RICH_V4
- WEG_RICH_V5
- WEG_RICH_V6
- WEG_RICH_V7
- WEG_RICH_V8
- Set UNNotificationExtensionDefaultContentHidden under NSExtensionAttributes to YES
- Add App Transport Security Settings key under Information Property List in NotificationViewController Info.plist files. Set Allow Arbitrary Loads to YES under App Transport Security Settings in both of these files.
Note : Above step Not required if you are sure that image URLs provided for push on WebEngage dashboard will always use https.
-
Source code snippet for Info.plist
<key>NSExtension</key> <dict> <key>NSExtensionAttributes</key> <dict> <key>UNNotificationExtensionCategory</key> <array> <string>WEG_CAROUSEL_V1</string> <string>WEG_RATING_V1</string> <string>WEG_RICH_V1</string> <string>WEG_RICH_V2</string> <string>WEG_RICH_V3</string> <string>WEG_RICH_V4</string> <string>WEG_RICH_V5</string> <string>WEG_RICH_V6</string> <string>WEG_RICH_V7</string> <string>WEG_RICH_V8</string> </array> <key>UNNotificationExtensionDefaultContentHidden</key> <true/> <key>UNNotificationExtensionInitialContentSizeRatio</key> <real>1</real> </dict> <key>NSExtensionMainStoryboard</key> <string>MainInterface</string> <key>NSExtensionPointIdentifier</key> <string>com.apple.usernotifications.content-extension</string> </dict> -
Info.plist should look like the below screenshot
Step 5: Create App Groups for all Targets
App Groups allow your app and the WebEngageNotificationContentExtension to communicate when a notification is received, even if your app is not active. This is required for Confirmed Deliveries.
- Select your
Main App Target>Signing & Capabilities> +Capability>App Groups.
- Within
App Groups, click the+button.
- Set the App Groups container to be a
group. YOUR_BUNDLE_IDENTIFIER.WEGNotificationGroupwhereYOUR_BUNDLE_IDENTIFIERis the same as your Main Application "Bundle Identifier".
- Press OK and repeat for the
NotificationViewControllerTarget.
Step 6: Build and Test
- Build your project to ensure that the library integrates successfully.
- Test your Service Extension to ensure that it functions as expected with the integrated library.
Note: Make sure to set the Minimum deployment target of your ServiceExtension & ContentExtension to match with your main application target.
Migration from old Service & Content Extensions to the new one.
Migration from WebEngageBannerPush to WEServiceExtension
- If you've been using the old service extension and want to switch to the new one, just stick to these instructions in the documentation:
- Below are the steps to migrate from WebEngageBannerPush to the WEServiceExtension:
- Remove
pod 'WebEngageBannerPush'from the Service Extension Target NotificationService in the podfile. - Then Perform
pod install - Then Follow Step Approach 2: Cocoapods
- After completing the above step, let's move to the code section:
- For Swift Users :
- Open the NotificationService.swift file.
- Replace
import WebEngageBannerPushwithimport WEServiceExtension - Done
- For Objective-C Users:
- Open the
NotificationService.hfile. - Remove the import statement
#import \<WebEngageBannerPush/WEXPushNotificationService.h> - Replace
WEXPushNotificationServicewithUNNotificationServiceExtension. - Open the NotificationService.m file.
- Replace the code as given in Step Objective C
- Open the
- For Swift Users :
- Remove
Migration from WebEngageAppEx to WEContentExtension
- If you've been using the old content extension and want to switch to the new one, just stick to these instructions in the documentation:
- Below are the steps to migrate from WebEngageAppEx to the WEContentExtension:
- Remove
pod 'WebEngageAppEx/ContentExtension'from the Content Extension Target NotificationViewController in the podfile. - Then Perform
pod install - Then Follow Step Approach 2: Cocoapods
- After completing the above step, let's move to the code section:
- For Swift Users :
- Open the NotificationViewController.swift file.
- Replace
import WebEngageAppExwithimport WEContentExtension - Done
- For Objective-C Users:
- Open the NotificationViewController.h file.
- Remove the import statement
#import \<WebEngageAppEx/WEXRichPushNotificationViewController.h> - Replace
WEXRichPushNotificationViewControllerwithUNNotificationContentExtension. - Open the NotificationViewController.m file.
- Replace the code as given in Step Objective C
- For Swift Users :
- Remove
Please feel free to drop in a few lines at [email protected] in case you have any further queries. We're always just an email away!
Updated 5 months ago
Ran into a roadblock? Head over to troubleshooting for quick answers.