App In-line Content
App In-line Content allows you to insert content directly into your app's screen without disturbing the user experience. It also allows you to dynamically update your app's content and run relevant and contextual campaigns.
You may use the In-line Campaigns to change areas of your app or show banner ads based on live triggers and segmentation.
This capability is provided in WebEngage Personalization SDK, a child SDK that handles Inline campaigns.
Installation
For WebEngage Personalization SDK to support inline campaign processing, the parent WebEngage SDK version must be 6.2.0 or higher.
Step 1: Integrate WebEngage SDK by following the steps mentioned in this doc.
Step 2: Add WebEngage Personalization SDK to your project.
For installation, add the WebEngage Personalization SDK in your Podfile under your project's target.
pod 'WEPersonalization'
Initialization
Import and initialize WebEngage Personalization SDK unit
Add the following initialization code inside the didFinishLaunchingWithOptions method of your AppDelegate class
Note: Initialize post WebEngage iOS SDK initialization.
// import sdk
import PersonalizationSDK
// Application Life cycle class
class AppDelegate: UIResponder, UIApplicationDelegate {
    func application(_ application: UIApplication, didFinishLaunchingWithOptions launchOptions: [UIApplication.LaunchOptionsKey: Any]?) -> Bool {

        // Webengage integration
        WebEngage.sharedInstance().application(application, didFinishLaunchingWithOptions: launchOptions)
        // WEpersonalization SDK init
        WEPersonalization.shared.initialise()
        return true
    }
}
#import <WEPersonalization/WEPersonalization.h>

@implementation AppDelegate

- (BOOL)application:(UIApplication *)application didFinishLaunchingWithOptions:(NSDictionary<UIApplicationLaunchOptionsKey,id> *)launchOptions {

    // Webengage integration
    [[WebEngage sharedInstance] application:application didFinishLaunchingWithOptions:launchOptions];

    // WEPersonalization SDK init
  	[[WEPersonalization shared] initialise];

    return YES;
}

@end
Configuring property in your application
There are two ways to configure inline properties, which are as follows:
Using WebEngage/Native Views through Interface Builder
This implementation will allow you to use WebEngage pre-defined templates (Banner and Text) right out of the box, with the SDK handling campaign rendering and tracking stats
To configure the property on your screen, follow the steps below:
- Create a
UIViewinside your view controller to give the placeholder space for the campaign to appear - Change the class of
UIViewtoWEInlineViewit should be accessible from the moduleWEPersonalization
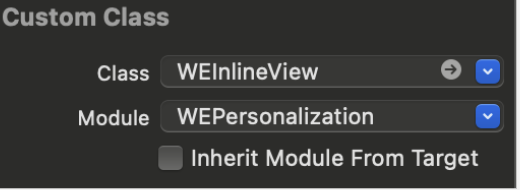
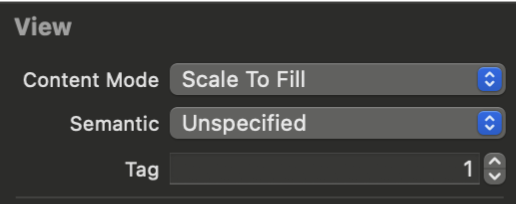
- Add a
tagto theWEInlineViewwhich should match the dashboard’s property ID.View
-
Assign the expected height for the
WEInlineViewfrom the code by following
the below code// Creating outlet of the WEInlineView @IBOutlet weak var inlinePlaceholderView: WEInlineView! //. . . // Setting expected height for the view inlinePlaceholderView.WEGExpHeight = 180// Declare IBOutlet for WEInlineView @property (nonatomic, weak) IBOutlet WEInlineView *inlinePlaceholderView; // Setting expected height for the view inlinePlaceholderView.WEGExpHeight = 180;
Recommendation
Declare the view's height, as this will ensure that the resulting campaign is rendered inside the stated height.
Tag your screen
Because properties are attached to screens ViewController, tagging screens with appropriate screen names is a required step for Inline personalization to function properly.
@Override
override func viewWillAppear(_ animated: Bool) {
    WebEngage.sharedInstance().analytics.navigatingToScreen(withName: "screen_name")
    //Callbacks to be configured after screen navigation step.
}
- (void)viewWillAppear:(BOOL)animated{
    id weAnalytics = [WebEngage sharedInstance].analytics;
    [weAnalytics navigatingToScreenWithName:@"screen"];
}
We highly recommend to tag the screen inside theviewWillAppearmethod.
Callbacks
There are two types of callbacks available in Personalization SDK
WEPlaceholderCallback: Placeholder Callbacks
You can subscribe to the callbacks based on placeholder views created with property ID to receive updates and respective data in the callback methods. This callback is generally recommended for registering properties as mentioned above (Without adding property in interface builder and rendering complex UI) and if you want to get property-wise updates.
Register your callback/property by passing the ID/TAG
Through WEPlaceholderCallback (hyperlink), inside the viewWillAppear method of your Controller and after calling screenNavigated.
@Override
override func viewWillAppear(_ animated: Bool) {
  	//Tagging your screen
     WebEngage.sharedInstance().analytics.navigatingToScreen(withName: "Screen_Name")
  	 // registering for the callback
     WEPersonalization.shared.registerWEPlaceholderCallback(iosPropertyId,self)
}
- (void)viewWillAppear:(BOOL)animated{
    id weAnalytics = [WebEngage sharedInstance].analytics;
    	//Tagging your screen
    [weAnalytics navigatingToScreenWithName:@"screen"];
	    // registering for the callback
    [[WEPersonalization shared] registerWEPlaceholderCallback:1002 :self];
}
Following are the callback methods available in WEPlaceholderCallback
onDataReceived:This callback will get triggered when the campaign data is received for Placeholder View. For Custom templates, you can obtain the data (key-value) pairs and can render your own UI using the same data (hyperlink toWECampaignData). Do track theImpressionand configureClick(hyperlink) according to your use case. This will be called for all the templates Banner, Text, and Custom available in WebEngage’s dashboard.
public func onDataReceived(_ data: WEGCampaignData) {
  //Build your own UI using the data
}
-(void)onDataReceived:(WECampaignData *)data{

}
onRendered:When the SDK displays the Campaign on the screen, this callback is triggered. This will only be triggered for Banner and Text templates, not Custom templates, because they are handled by your application, and in cases where you have calledstopRenderingthroughWECampaignCallback.
@Override
public func onRendered(data: WEGCampaignData) {
 // This will be executed when a placeholder view with campaign will be shown
}
- (void)onRenderedWithData:(WECampaignData *)data{

}
onPlaceholderException:This callback will get triggered when the campaign showing for this Property or Placeholder will fail. If the property is already visible, use this method to hide it or to display some default UI. Kindly refer to Exceptions (hyperlink) for types of exceptions.
public func onPlaceholderException(_ campaignId: String?,
                                   _ targetViewId: String,
                                   _ exception: Error)
       // This will executed once exception occured
}
-(void)onPlaceholderException:(NSString *)campaignId :(NSString *)targetViewId :(NSError *)exception{
 // This will executed once exception occured
}
WECampaignCallback: Campaign callbacks
Callbacks can be registered globally in the AppDelegate or locally in the Controller. This will be triggered throughout the campaign's lifecycle.
Register your callback whether in AppDelegate or viewDidLoad method of your screen Controller.
AppDelegate or viewDidLoad method of your screen Controller.WEPersonalization.shared.registerWECampaignCallback(self)
[[WEPersonalization shared]registerWECampaignCallback:self];
Following are the callback methods available in WECampaignCallback
onCampaignPreparedThis is the first callback method that is triggered when data for the qualified campaign is retrieved from the WebEngage servers. You can also stop rendering the campaign by calling stopRendering() method of WECampaignData, generally This can come in handy if you want to just retrieve some data and render on your own for templates like Banner and Text. This will always be called for your templates (banner, text, and custom).-
func onCampaignPrepared(_ data: WEGCampaignData) -> WEGCampaignData {
  // You will get data received for campaign
  return data
}
-(WECampaignData *)onCampaignPrepared:(WECampaignData *)data{ // You will get data received for campaign return data; } onCampaignShown :When the SDK displays the Campaign on the screen, this callback is triggered. This will only be triggered for Banner and Text templates, not Custom templates, because they are handled by your application, and in cases where you have called stopRendering.
func onCampaignShown(data: WEGCampaignData) {
  //Campaign Shown
}
-(void)onCampaignShown:(WECampaignData *)data{
  //Campaign Shown
}
onCampaignClicked:This callback will get triggered when clicked on the campaign view rendered by the SDK. This will only be triggered for Banner and Text templates, not Custom templates because they are handled by your application. Handle your deeplinks in this method; returning false results in automatic redirection because the SDK will handle and attempt to open the link, whereas returning true instructs the SDK not to perform any redirection because the application will handle the same.
func onCampaignClicked(actionId: String,
                       deepLink: String,
                       data: WEGCampaignData) -> Bool{
      // Returning true would not redirect automatically to action Url. Write your redirection code here and return false.
      // Returning false would open Action Url in Browser
    return false;
}
- (BOOL)onCampaignClickedWithActionId:(NSString *)actionId deepLink:(NSString *)deepLink data:(WECampaignData *)data{
		 // Returning true would not redirect automatically to action Url. Write your redirection code here and return false.
      // Returning false would open Action Url in Browser
  return true;
}
onCampaignException:This callback will get triggered when the campaign retrieval/showing fails.
func onCampaignException(_ campaignId: String?,
                         _ targetViewId: String,
                        _ exception: Error)
  // Exception occurred
}
- (void)onCampaignException:(NSString *)campaignId :(NSString *)targetViewId :(NSError *)exception{
    // Exception occurred
}
Exceptions
You will receive exception details in onCampaignException of WECampaignCallback & onPlaceholderException of WEPlaceholderCallback.
Types of Exception:
| Error Key | Error Description |
|---|---|
| timeout | The campaign failed to render in a set time. |
| missingTargetView | Target property missing. |
| campaignFetchingFailed | Campaign fetching failed. |
| resourceFetchingFailed | Resource fetching failed. |
Unregister the callbacks(mandatory)
This step is just as important as registering for the placeholder and campaign callbacks.
Implement the following code inside viewWillDisappear of your Controller.
override func viewWillDisappear(_ animated: Bool) {

//Unregister Placeholder callback
 WEPersonalization.shared.unregisterWEPlaceholderCallback(ios_property_id)

//Unregister Campaign callback
WEPersonalization.shared.unregisterWECampaignCallback(self)
}
- (void)viewWillDisappear:(BOOL)animated{
		  //Unregister Placeholder callback
     [[WEPersonalization shared] unregisterWECampaignCallback:self];
  		//Unregister Campaign callback
     [[WEPersonalization shared] unregisterWEPlaceholderCallback:ios_property_id];
}
Advance ways to configure Inline Properties:
- TableView:
WEInlineViewSubclassing (programmatically) to use insideUITableViewCell
In this method, you can create a subview inside your table view cell, and give a subclass of it to WEInlineView
@IBOutlet weak var inlineView: WEInlineView!
@property (nonatomic, weak) IBOutlet WEInlineView *inlineView;
Now inside the UITableView delegate method cellForRowAt you can load the InlineView by setting a tag
cell.inlineView.load(tag:1, callbacks:cell);
[cell.inlineView loadWithTag:1 callbacks:cell];
- Custom views: (for creating your own UI)
Another method for creating complex views is to use WebEngage's Custom template
This allows you to register your property (not necessarily a part of your Storyboard) with WebEngage and obtain campaign data to build your UI; however, this only allows you to obtain data; you must still track impressions and clicks.
- Implement
WEPlaceholderCallbackinside your class - Register your property by passing the ID/TAG (or any other unique property identifier) through
WEPlaceholderCallback(hyperlink), inside theviewWillAppearmethod and after calling screenNavigated
override func viewWillAppear(_ animated: Bool) {
  weAnalytics?.navigatingToScreen(withName: "screen")
  WEPersonalization.shared.registerWEPlaceholderCallback(iosPropertyId, self)
 }
- (void)viewWillAppear:(BOOL)animated{
    id weAnalytics = [WebEngage sharedInstance].analytics;
    	//Tagging your screen
    [weAnalytics navigatingToScreenWithName:@"screen"];
	    // registering for the callback
    [[WEPersonalization shared] registerWEPlaceholderCallback:iosPropertyId :self];
}
- After registering the property, you can obtain the data (key-value) pairs inside the onDataReceived function of WEPlaceholderCallbacks, post that you can render your UI using the same data WECampaignData. Do track the Impression and configure Click according to your use case.
- And finally, Tag your screen
Record Campaign Viewed and Clicked Event for Custom Views
For Custom Views, Personalization SDK will pass the custom data WECampaignData, which should be managed/rendered by your application only.
Please Note
To record Impression and click data, you must add the below: Record Viewed Impression and Record Click Impression.
Record Viewed Impression
Impression tracking is simply tracking the number of views each campaign receives.
For example, if a user visits the screen and sees a campaign and visits the screen again then they will see the exact same campaign again, two impressions will be counted.
Now, trackImpression will allow you to track impressions for your campaign. Kindly, use the mentioned method of WEGCampaignData once the custom view has been shown on the screen by the application.
Recommendation
WEGCampaignData will be received both in onDataReceived of WEPlaceholderCallback and onCampaignPrepared of WECampaignCallback.
//attributes: any custom dictionary [:] of data you want to record with this event
//data: WEGCampaignData
data.trackImpression(attributes: nil)
//attributes = (NSDictionary<NSString *,id> * _Nullable)
[data trackImpressionWithAttributes:nil];
Record Click Impression
You can track click impressions whenever the user clicks on the campaign view on the screen.
//attributes: any custom dictionary [:] of data you want to record with this event
//data: WEGCampaignData
data.trackClick(attributes: nil)
//attributes = (NSDictionary<NSString *,id> * _Nullable)
[data trackClickWithAttributes:nil];
WECampaignData
You can access the Campaign Id and Placeholder details like name (id) and content. It consists of the following members
| Name | Variable type | Definition |
|---|---|---|
| targetViewId | String | Placeholder name (id). |
| content | WECampaignContent | Campaign view content that contains custom key-value pairs. |
| campaignId | String | The id for the running campaign is on the placeholder. The default value would be blank. |
WECampaignContent
The Personalization SDK renders the Banner, and Text view through this data. Through this, you can access the custom key-value pairs.
| Name | Variable type | Definition |
|---|---|---|
| customData | dictionary [:] | Custom key-value pairs are defined for the campaign. |
WEInlineView
This is a WebEngage custom view for rendering campaigns and can be directly included in layout XML or can also be initialized programmatically.
The following are the methods available
| Method name | Params | Return type | Params Definition |
|---|---|---|---|
| load | identifier of type String: This is a property identifier (ID/TAG).listener of type WEPlaceholderCallback: This is for attaching Placeholder callbacks for your property view | : void | This method will give you accessibility to load the view dynamically. This is generally used in use cases that involve TableView or views that are server-driven. |
Updated 8 days ago