A step-by-step guide to configuring WhatsApp as a marketing channel
While you will be using WebEngage to create and analyze all your WhatsApp campaigns, the message is delivered to your target audience through a WhatsApp Service Provider (WSP).
Please Ensure That Your Website & Apps Are Integrated with WebEngage Before Proceeding
(Doing so will enable real-time personalization of all WhatsApp messages sent to each user!)
Getting Started with WhatsApp Marketing
Strict guidelines laid down by Facebook control WhatsApp marketing. Hence, you must follow these steps to ensure that you can use WhatsApp uninterruptedly through WebEngage.
Step 1: Get WhatsApp Business Account Approved
The first step is to create a business account and submit it to Facebook for approval. Here's how you can go about it.
We recommend that you use a phone number exclusively for your WhatsApp Business Account.
Here are a few guidelines to help you out:
-
The phone number must be owned by you, preferably registered to your business address, and must include a country code. It cannot be used for another WhatsApp account.
-
Phone numbers can easily be migrated from one WSP to another. However, once your business account is approved, the attached phone number cannot be changed.
-
You should be able to receive a call/SMS on the number for channel activation. Phone numbers that have an IVR service attached cannot be used unless IVR can be disabled to receive the activation code.
Step 2: Get Message Templates Whitelisted
Message templates are pre-approved messages that can contain a maximum of 4096 characters including elements of personalization, links, emojis, and WhatsApp specific formatting. These messages can be used to initiate a conversation with opted-in users (through campaigns) and respond to user queries in the Customer Service Window.
To curb marketing spam, WhatsApp has mandated whitelisting for each message that you'd like to send to your users. Promotional marketing is restricted, and the primary focus of this new channel is to provide customer support and contextual lifecycle updates. This means that early adopters can stand out - if you do it right!
-
Thus, we highly recommend that you restrict WhatsApp campaigns to conveying account updates, appointment updates, payment updates, personal finance updates, reservation updates, shipping updates and providing issue resolution.
-
Messages that contain any of the following elements are at a high risk of being disapproved:
- Discounts, promotions, product recommendations or offers.
- Surveys, product/service reviews, and rating requests.
- Media files (videos & images).
-
You can submit message templates directly to Facebook or on your WSP dashboard for approval. Once they're approved, upload these templates to your WebEngage dashboard to create WhatsApp campaigns.
Whitelisting Personalized Message Templates
Depending on your use-case, there may be several aspects that you'd like to personalize in the message. It could be anything like the user's name, name of purchase product(s), order number, date of appointment, upcoming events, and so on.
This can easily be achieved by:
-
Step 1: Tracking these data points as Custom User Attributes, Custom Events, and Custom Event Attributes for all your app & web users.
-
Step 2: Creating a placeholder in your message template for links, emojis, and personalization. Let's take the example of an order confirmation message that contains the following details:
- User's First Name
- Order Number
- Order Tracking Link
- An Emoji
Thus, while creating the message template, we'll replace each element with a numbered placeholder in the format, {{x}}. Here's what the final template should look like:
Whitelisting Order Confirmation Message
Hey {{1}}, thanks for your order!
We'll keep you posted on when it's ready to be shipped! You can track order number {{2}}, here {{3}}. Stay awesome {{4}}
So, the message received by a user, Jess, will look like this👇:
WhatsApp Message Receive by User
Hey Jess, thanks for your order!
We'll keep you posted on when it's ready to be shipped! You can track order number 45360d, here www.example.com/order-tracking/45360d. Stay awesome 🤙
Please Note
As per WhatsApp's guidelines, a message template must include at least one parameter, {{1}}. It can later be replaced with text, numbers, special characters or a link, as per your needs.
Step 3: Collect User Opt-ins
By default, all users that have a valid phone number listed in their WebEngage User Profile are considered unreachable via WhatsApp. This is because WhatsApp's Guidelines require users to provide explicit consent for receiving messages.
-
Hence, we recommend that you create a WhatsApp opt-in form on your app/website or add a call-to-subscription to your purchase/platform discovery flow. (Detailed Read)
-
Please ensure that you capture the user's country code along with the phone number. If a country code doesn't exist, then WhatsApp will try sending the message to a user by appending the country code of your business phone number.
-
Each time a user provides consent, you can track it as the System User Attribute,
we_whatsapp_opt_inand set the status totrue. Doing so will make the user reachable via WhatsApp in your dashboard. (Detailed Read)
Setting WhatsApp Opt-in Status for Users
Our platform integration SDKs enable you to set a user's opt-in status for WhatsApp, SMS, and Email. You can also choose to pass this data through a Rest API integration or manually upload it to your dashboard.
Please Note: It's extremely important that you opt-in only those users who have explicitly provided consent. Violating Facebook's user opt-in policies may put you at the risk of having your WhatsApp business account suspended.
- You can also promote WhatsApp subscription through contextual Push, In-app, SMS, On-site Notifications, Web Push, and Email campaigns that convey the value proposition of connecting with you over the channel.
WhatApp Service Provider (WSP)
You can think of WhatsApp Service Providers as middlemen that transmit the message from your WebEngage account to a user's WhatsApp account. Currently, you can leverage Infobip, Gupshup, Kaleyra, and ValueFirst to engage users via WhatsApp. We'll be adding more WSPs to the stack pretty soon!
Click to enlarge
WSP Integration
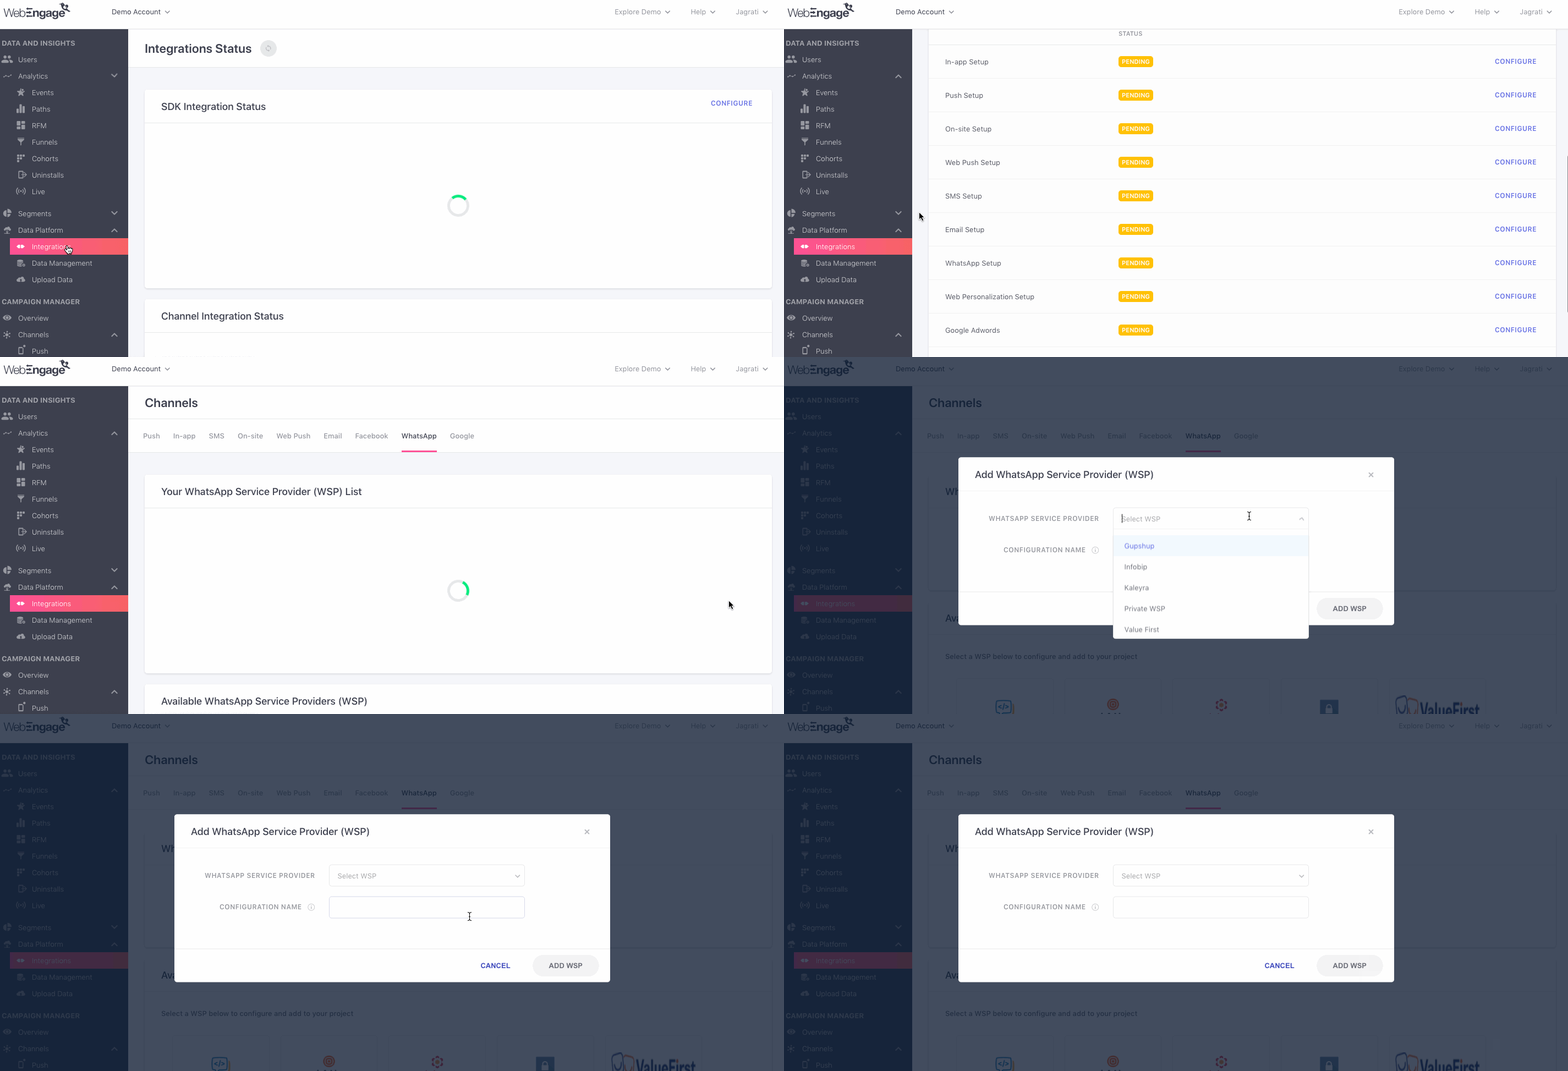
As highlighted below, access WhatsApp through the Data Platform> Integrations > Whatsapp Setup (Configure) menu on the left side of your dashboard. Click the Add WhatsApp Service Provider button to get started.
Click to enlarge
WSP Setup
Please select a WSP from the left navigation panel (Channel Configurations > WhatsApp) to continue configuration.
Uploading Whitelisted Templates
Click to enlarge
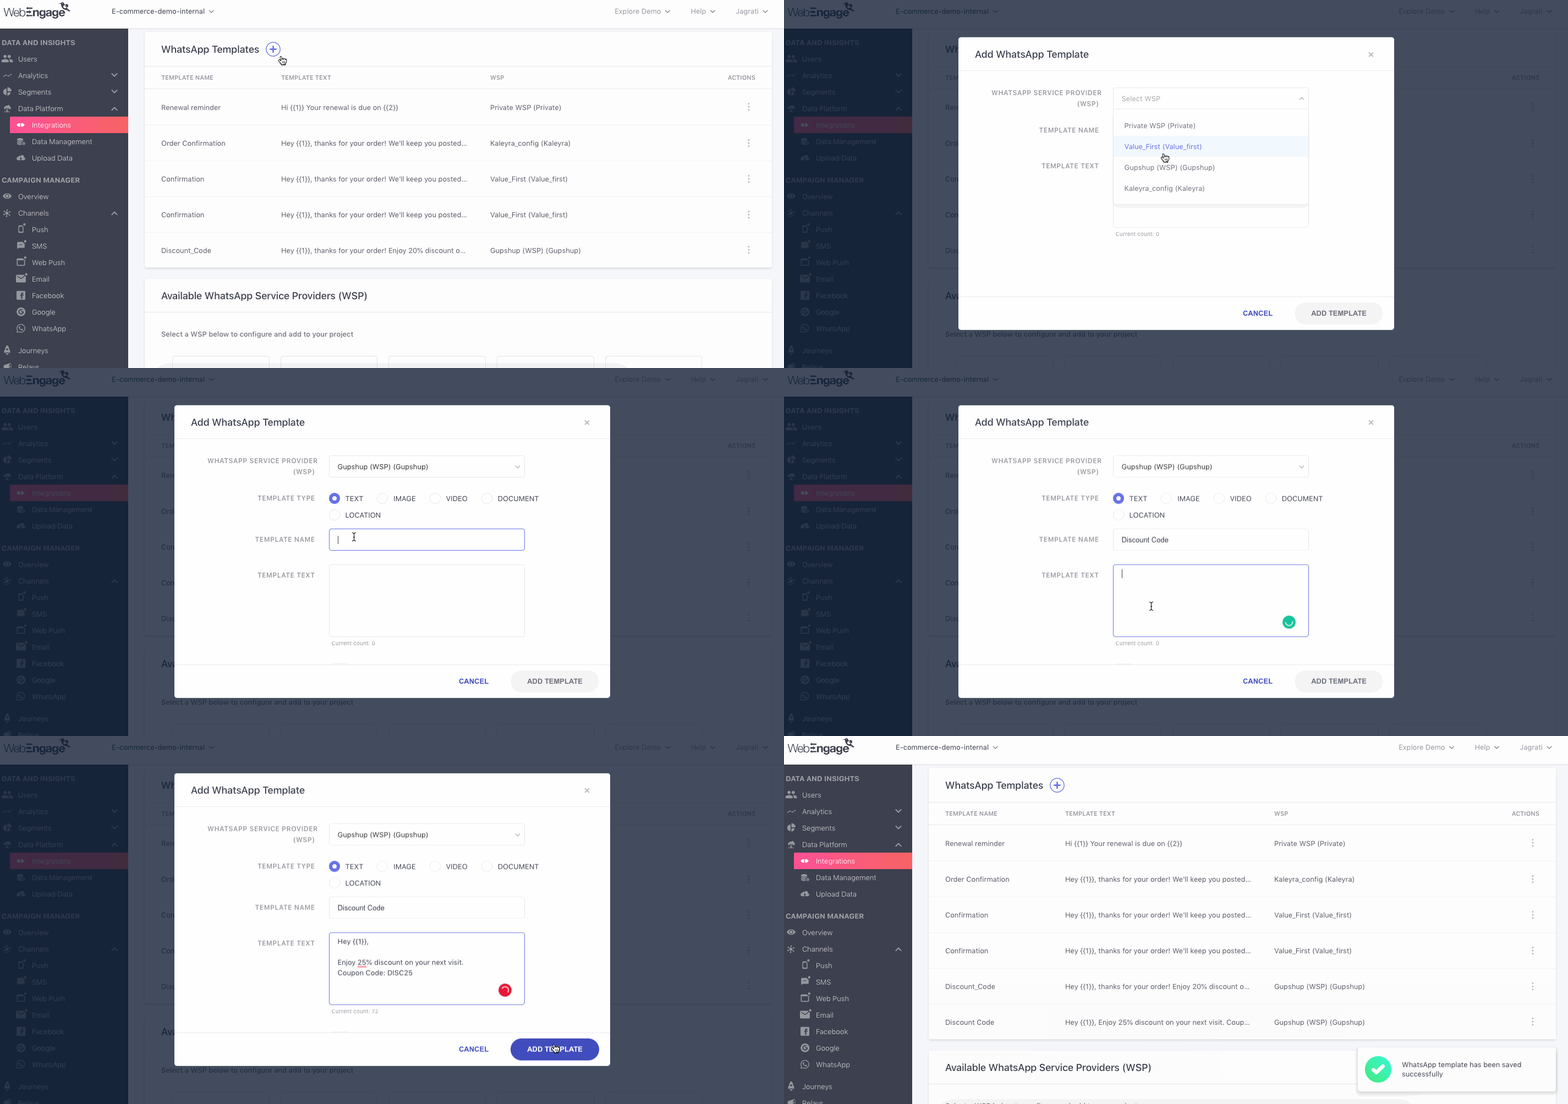
As shown above:
Step 1: Click the Add WhatsApp Template button to get started.
Step 2: Select the WSP through which you've whitelisted the template/ would like to send the campaign.
Please Note
Each template is mapped a WSP in your dashboard. Thus, while creating the campaign, the list of templates will include only those messages that have been mapped to the WSP selected at Step 3: Message.
Step 3: Add template details (may vary for each WSP):
-
Template Name (For your reference only).
-
Template Text (Paste the exact message that has been approved, do no edit).
-
Template Namespace (While copying from your Facebook/WSP dashboard, please ensure that you use the format,
<template_namespace>:<template_name>, for namespace)
-
Template Language (List of languages supported by WhatsApp).
-
Please get in touch with your WSP Account Manager or Facebook business support if you're unable to find these details.
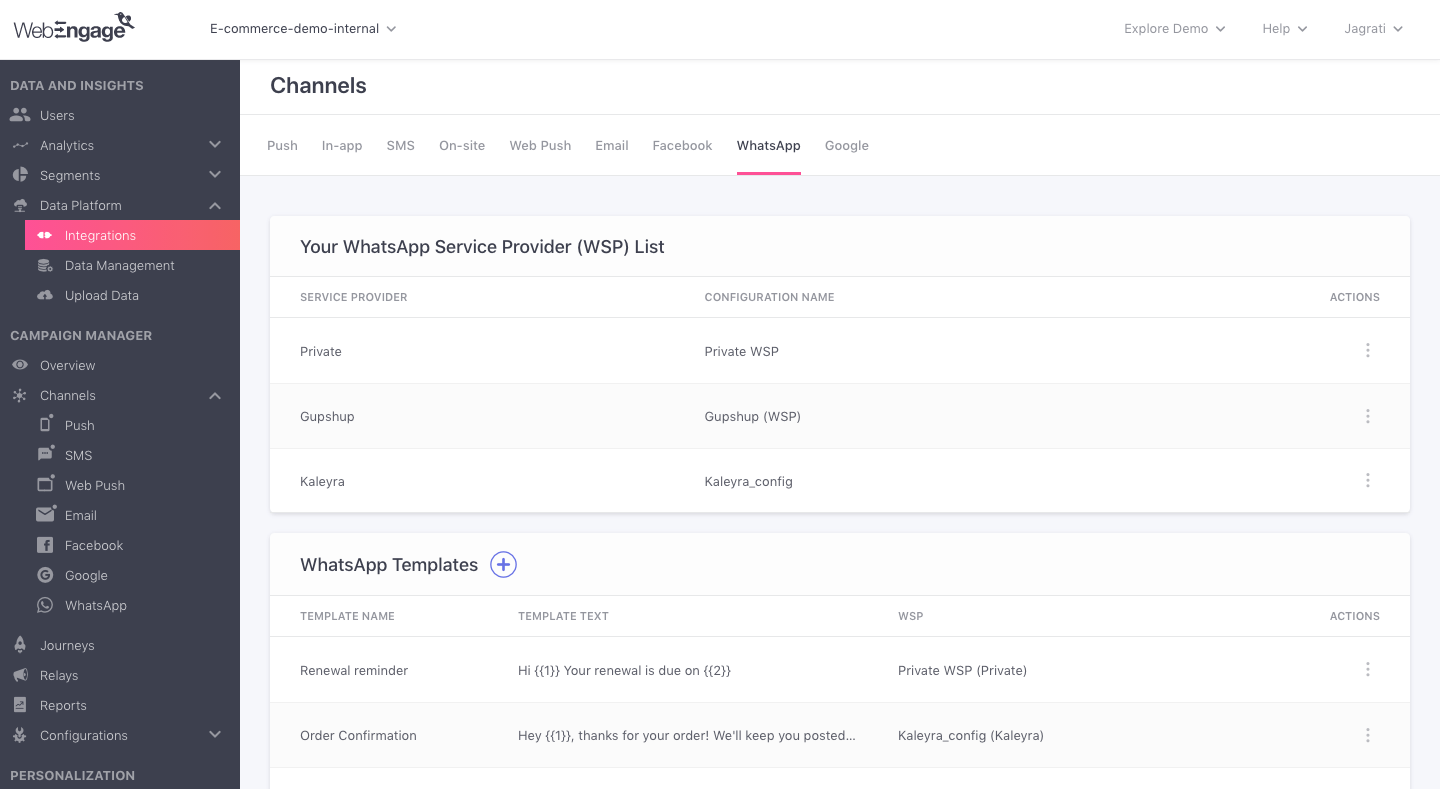
Once you've added the templates, your Channels > WhatsApp section will look like this👇. You can choose to Edit and Delete a template anytime you through the Actions menu.
Click to enlarge
Congratulations!
You're now ready to engage users via WhatsApp!
Managing Configuration
Click to enlarge
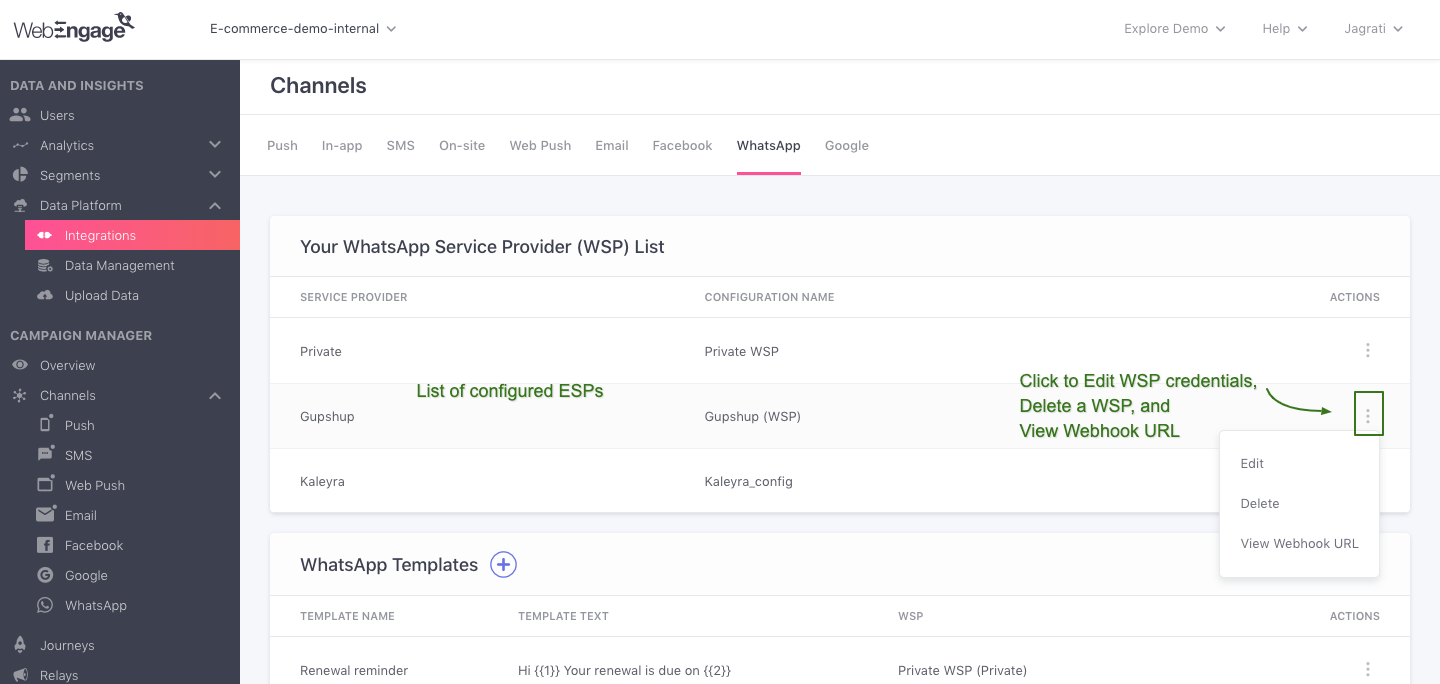
As shown above, integrated WSPs are listed under the section, Your WhatsApp Service Provider List. You can choose to Edit or Delete the integration anytime you like by accessing the Actions menu placed on the extreme right.
The Actions menu also indicates the unique Webhook URL you can add to your WSP dashboard to ensure that delivery status notifications (sent, failed, queued, delivered) are tracked under campaign stats in your WebEngage dashboard.
Editing a WSP
You can choose to edit configuration details in cases where incorrect details were entered during configuration, or some details were updated at the WSP's end post-integration.
As shown below, select Edit from the Actions menu, make your changes, and click Save.
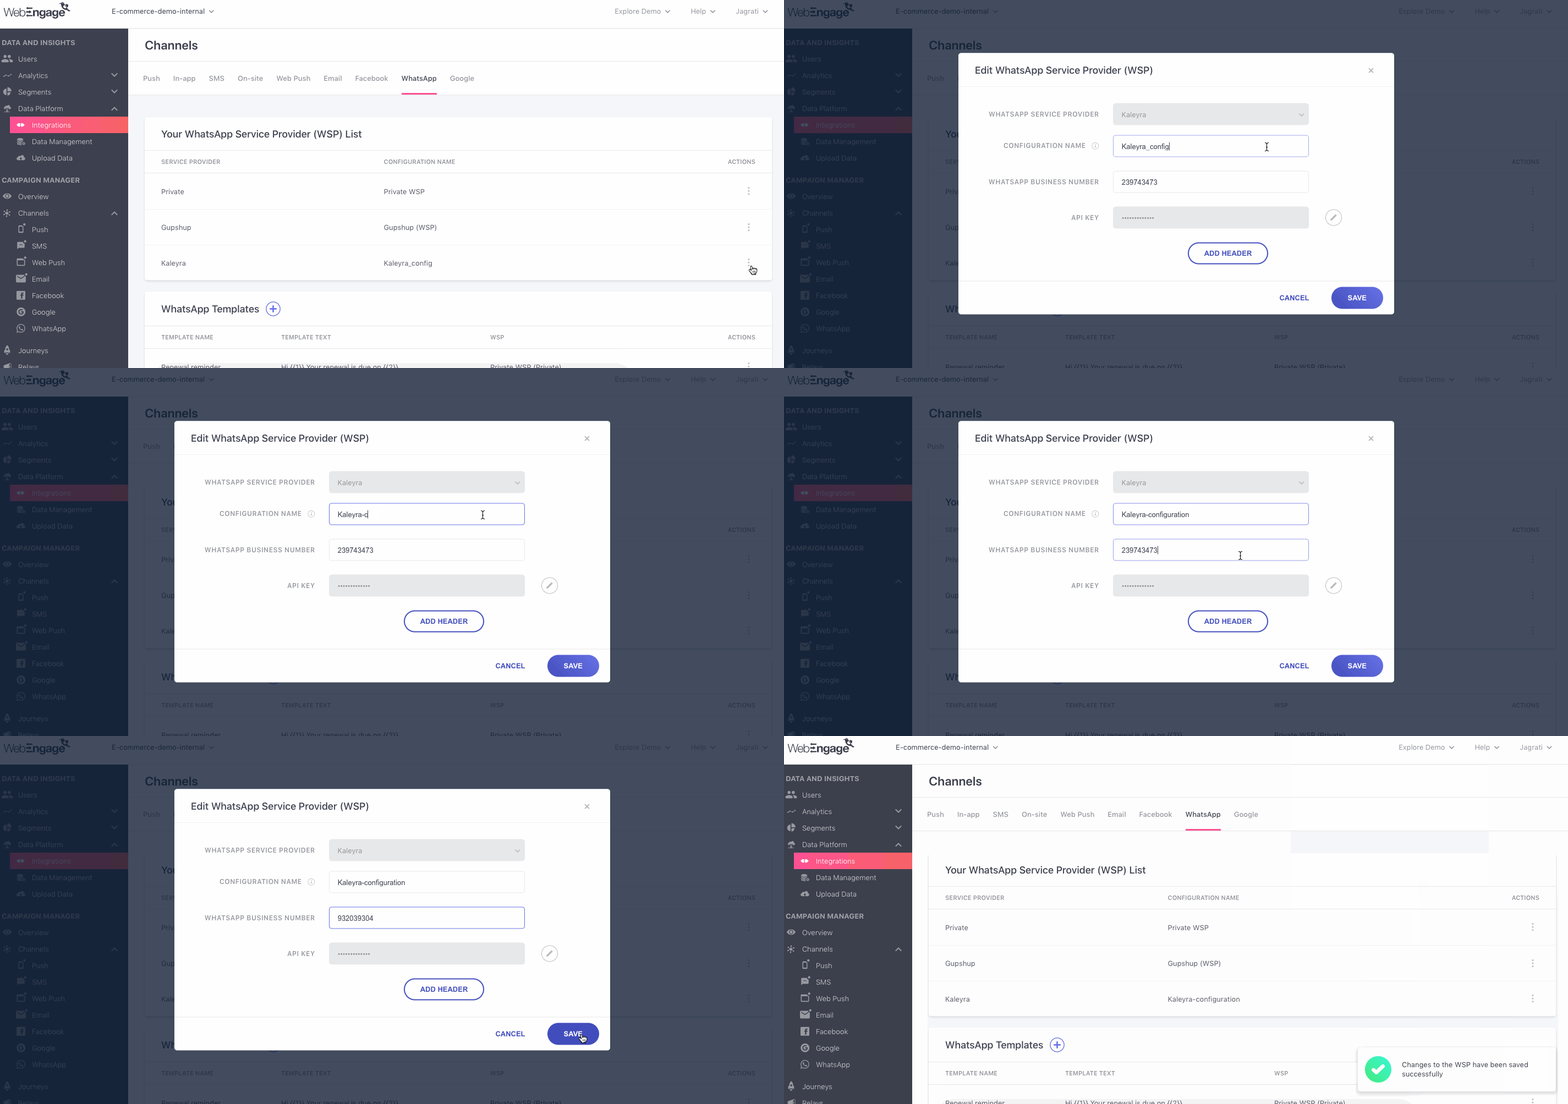
Adding more authentication headers to configuration & updating it's name (click to enlarge)
Deleting a WSP
Deleting an integration will:
-
Cease campaign delivery for all Running and Upcoming campaigns where the respective WSP was selected for sending it.
-
Cause the deletion of all WhatsApp Templates mapped to the specific WSP in your dashboard.
Thus, while doing so, please ensure that no existing campaigns are dependant on the WSP for sending WhatsApp messages to your users.
As shown below, select Delete from the Actions menu, and click the Delete button in the pop-up to confirm your decision.
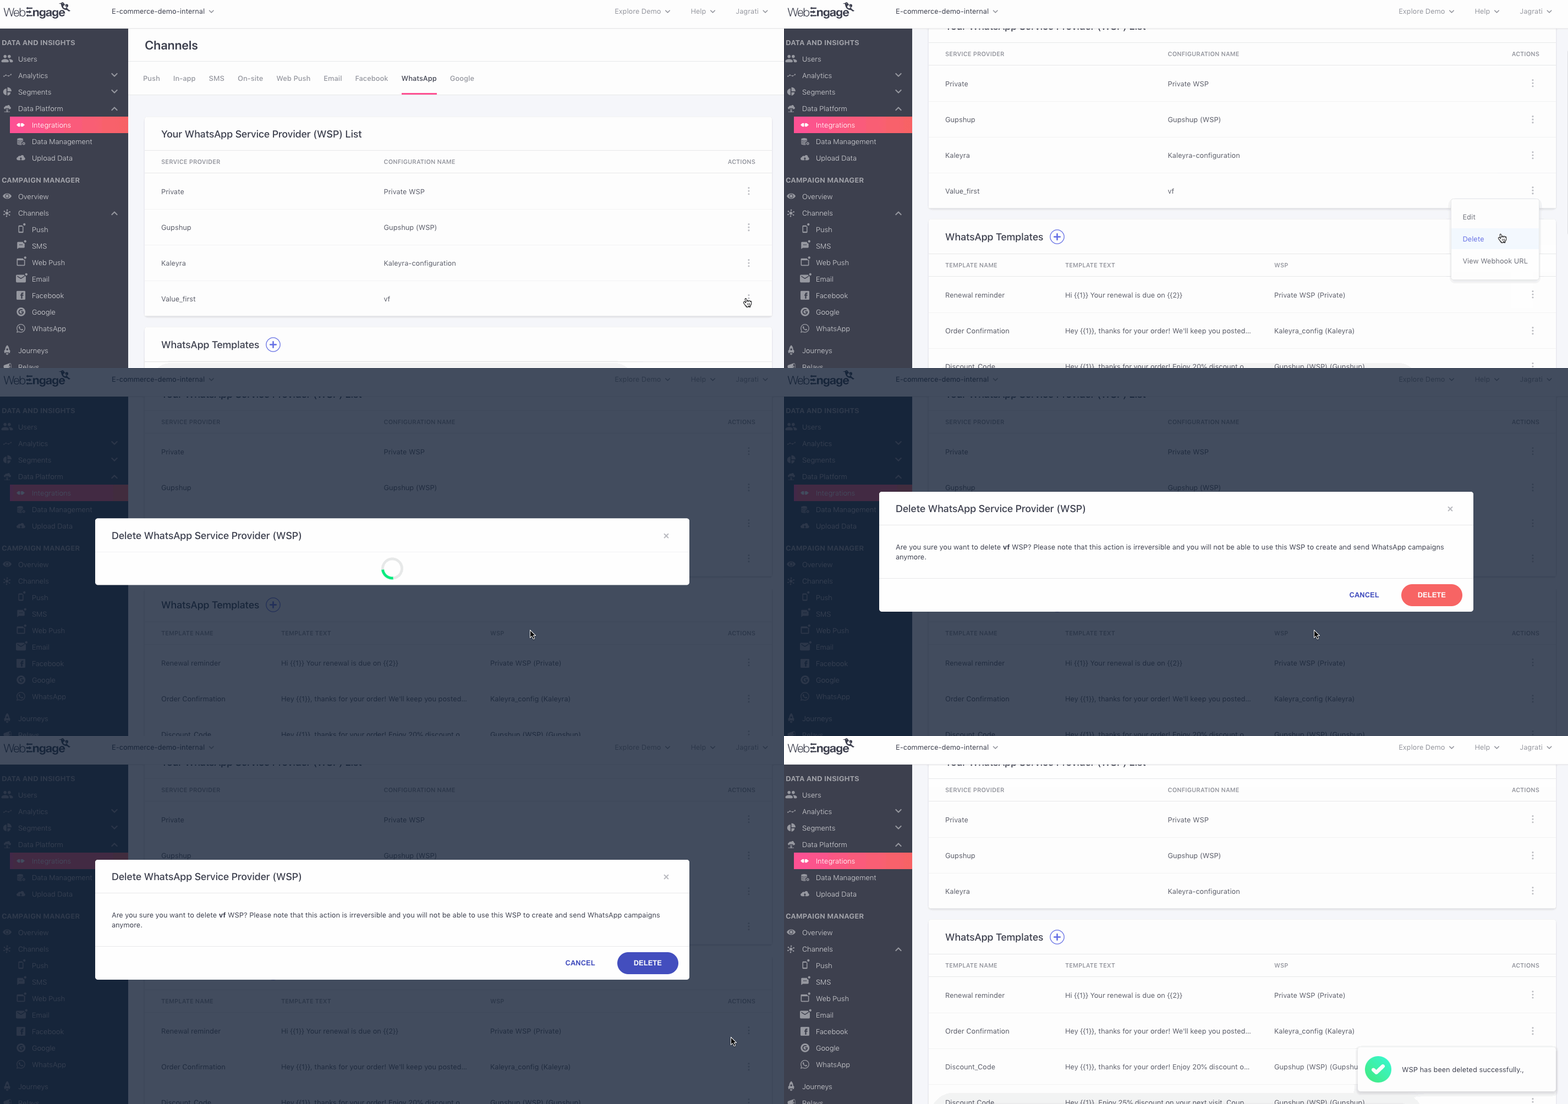
Click to enlarge
Please feel free to drop in a few lines at [email protected] in case you have any queries. We're always just an email away!
Updated over 2 years ago